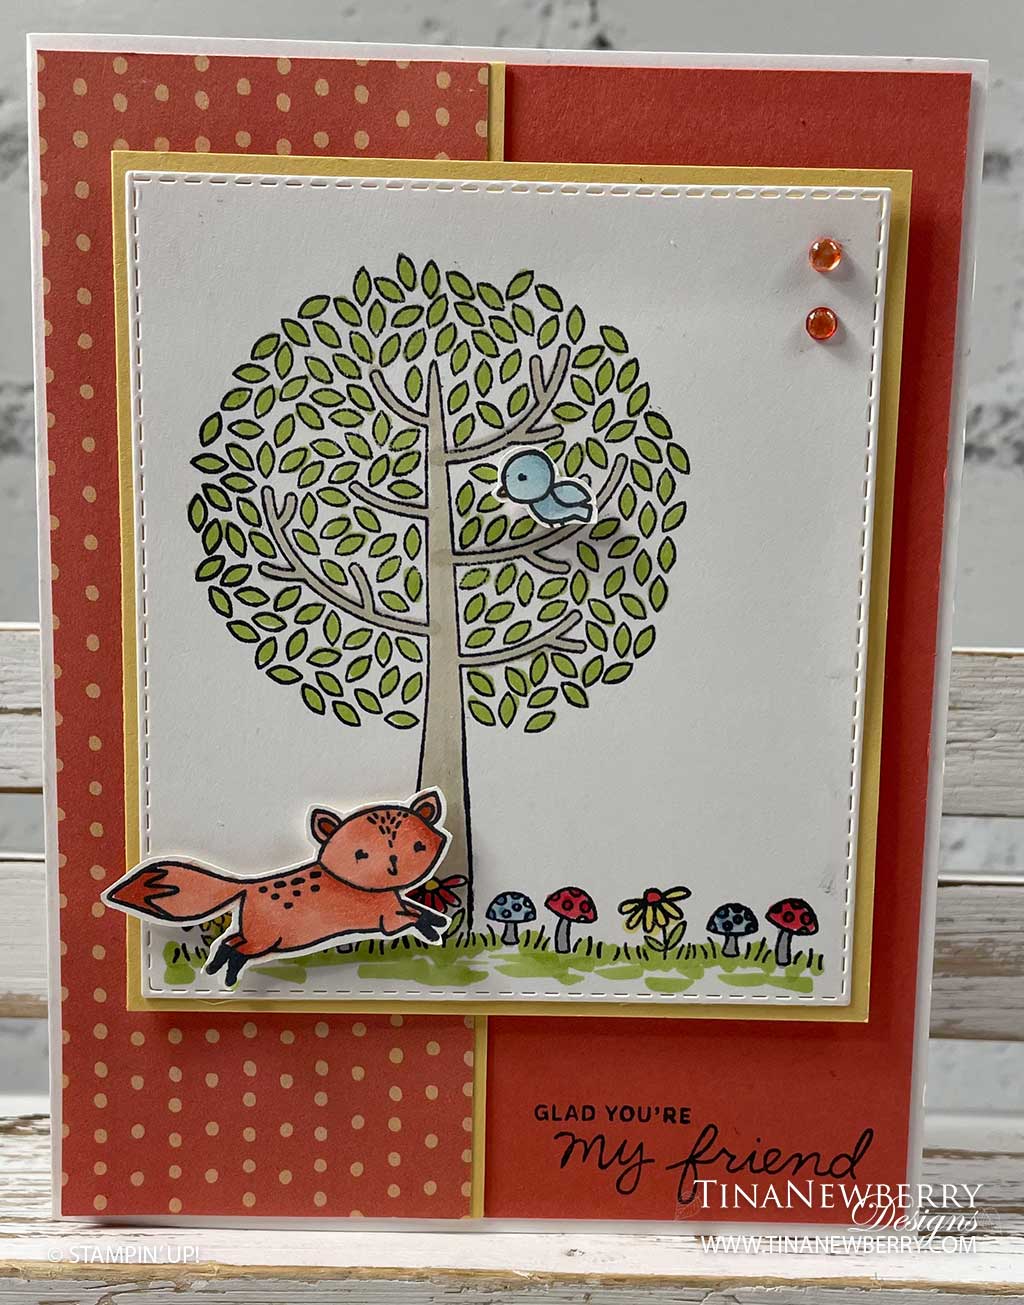
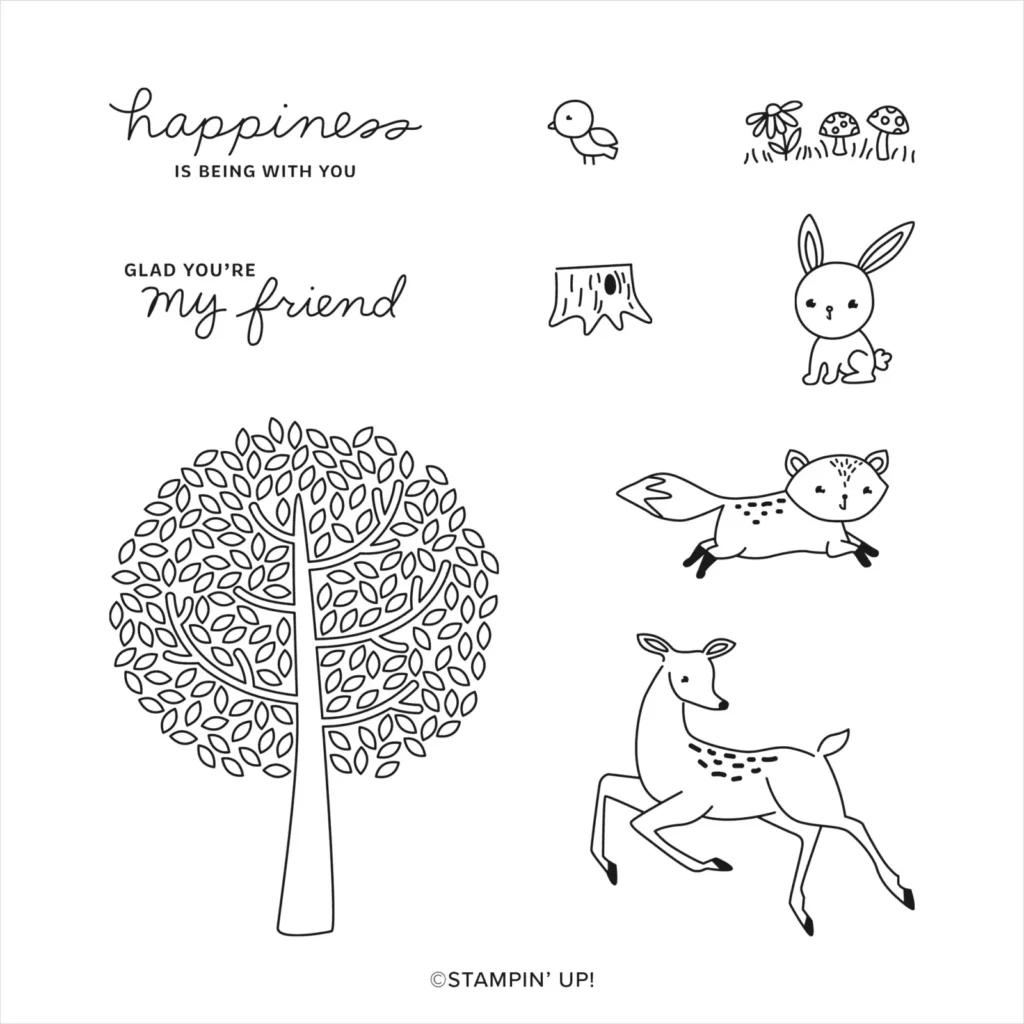
Send cards of cheer to your friends with the whimsical Forest Friends stamp set. You set the scene with your color choices and style. I just love the little bird in the tree on this fun card!
Measurements
Full list of supplies needed, listed below. A die cutting machine is needed for this card.
Basic White Thick Cardstock
- 8 ½” x 5 ½” (score at 4 ¼”) for the Card Base
Basic White Cardstock
- 5” x 4” for cutting stitched rectangle
- 2” x 2” for stamping and cutting fox and bird
Calypso Coral Cardstock: 5 ⅜” x 4 ⅛” for the Background
Pansy Petals Designer Series Paper: 5 ⅜” x 2”
So Saffron Cardstock
- 5 ⅜” x ¼”
- 3 ⅝” x 4”
Let’s Create
- Affix all stamps to Acrylic Blocks.
- Fold the Basic White Thick Card Base in half using a Bone Folder to sharpen the crease.
- Cut the 5” x 4” Basic White cardstock using the Stitched Rectangle Die (Use the die that measures approximately 4 ⅞” x 3 ½” – the 2nd largest one)
- Using memento black ink, stamp the row of mushrooms/small daisy across the bottom of the stitched rectangle 3 times. I started with the one in the center and then one on each side of that.
- With Memento Black ink, stamp the tree so the lines of the trunk are just above the flower in the center. (you will use a black marker to bring these lines lower in another step)
- Making your rectangle a little shorter: Take the same stitched rectangle die and line it up so the top of the die will cut your stamped rectangle just above the tree. You can line this up pretty easily if you place it upside down on your cutting plate. Place the top cutting plate so it just covers the top edge of the die. This is the only part you want to cut. By placing the cutting plate only over the top edge, you’ll cut off the excess paper and the rest of the rectangle will not be affected by this second pass through the die cutting machine.
- Stamp the fox and the small bird on the 2” x 2” piece of Basic White using Black Memento ink.
- Using a Basic Black Stampin’ Write Marker, extend the tree trunk down to the grass line. Color in the images using Stampin’ Blends as shown in the photo. Colors used in the sample are Granny Apple Green light, Crumb Cake light Poppy Parade light, Daffodil delight light, Balmy Blue light and dark, Cajun Craze light and dark.
- Fussy cut both the fox and the bird.
- Attach the stamped rectangle to the 3 ⅝” x 4” So Saffron. You may need to adjust the size of this piece depending on how you cut your rectangle.
- Attach the fox and the bird onto your stamped and colored panel using Stampin’ Dimensionals.
- Adhere the narrow So Saffron strip to the right of the DSP on leaving just a narrow edge showing. Then adhere this to the Calypso Coral background panel and then to the folded card base.
- Stamp the sentiment using Black Memento ink to lower right on the Calypso Coral panel.
- Adhere the layered stamped stitched rectangle panel to the card using Stampin’ Dimensionals.
- Using the dark Calypso Coral Blend, color 2 of the Polished Dots. Place them in the upper right of the stitched rectangle.
- Stamp and decorate the inside and attach.
- Decorate your envelope.
- So cute! Now send it to someone special.
Shopping List


 Designer Series Paper")


$7.50

$35.00
Stamper’s Toolkit
You will also need adhesive, acrylic blocks, scissors and other basic PaperCrafting items from the Stamper’s Toolkit

$8.00

$12.00

$4.00


$5.25

$7.00

$4.00

$7.00

$10.00

$8.00

$8.00

$10.00

$25.00

$7.00

$6.00

$10.00

$8.00

$5.00

$5.00

$6.00

$71.50

$8.00

$11.75
")
$30.00

$9.50


$120.00