Love & Thanks To A Dear Friend

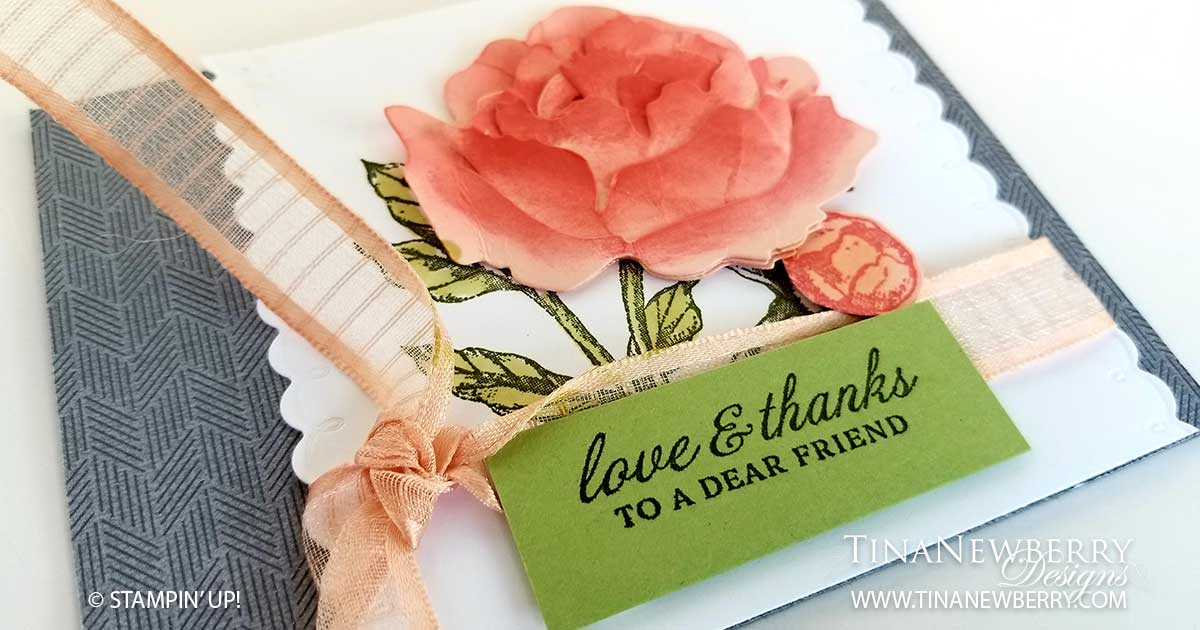
Could this color combination get any prettier? The soft pinks combined with elegant peonies and are just gorgeous add a touch of green and I never thought I’d say it, pretty gray?! Really? But yes. Here it is.

Measurements

Full list of supplies needed, listed below. A die cutting machine is needed for this card.
Card Base: Basic Gray 8 1/2 h” x 5 1/2″ w folded to 5 1/2″ w x 4 1/4″ h
Background: Peony Garden DSP 5 1/2″ w x 4 1/4″ h
Stamped Layer: Whisper White Cardstock 5 1/2″h x 4 1/2″ w die cut down to 4 1/4″ w
Sentiment Layer: 
Pear Pizzaz Cardstock 1″ h x 2 1/2″ w

Let’s Create

  1. Affix all stamps to Acrylic Blocks.
  2. Fold the Card Base in half using a Bone Folder to sharpen the crease.
  3. Stamp the Flower and Leaves in Old Olive Ink on the Stamped Layer.
  4. Color in the Leaves and Stem with Old Olive Stampin’ Blends
  5. Die cut the Peony pieces with Petal Pink Cardstock (see diagram of dies), use sponge dobbers to apply color to edges in Flirty Flamingo ink, assemble (see Build a Peony details below) and adhere using Stampin’ Dimensionals.
  6. Stamp the Peony Blossom in Flirty Flamingo ink on Petal Pink Cardstock. Color in with Petal Pink Stampin’ Blends. Cut out and adhere with a Stampin’ Dimensional.
  7. Tie a piece of Petal Pink Ribbon around Stamped Layer and attach using Stampin’ Dimensionals.
  8. Stamp Sentiment in Old Olive ink on Sentiment Layer and attach using Stampin’ Dimensionals.
  9. Done! Now send it to someone special.
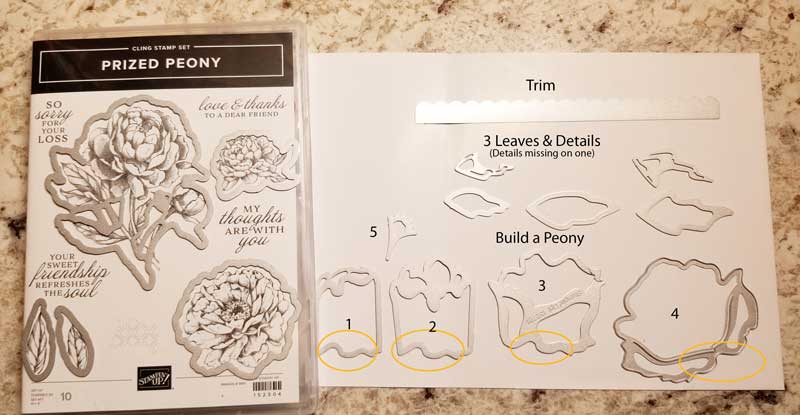
Build a Peony

  • Die cut shapes 1-4 for your flower.
  • Die cut 5 for the flower pistil.
  • Die cut the 3 leaves and details.
  • Each of the flower dies has a slit in it and bumps (see yellowed circled sections) at the bottom. You insert a smaller layer into a larger layer, lining up the bumps and build from smallest to largest.
    • Insert #5 into the slit in #1.
    • Insert #1 into the slit in #2, line up the bumps and adhere together.
    • Insert #2 into the slit in #3, line up the bumps and adhere together.
    • Insert #3 into #4, line up the bumps and adhere. Please note the smallest section of #4 is the front and the larger is the back.

Shopping List

Recommended Stamper’s Toolkit

Product List
Order online from the convenience of your own home or send me your order and I’ll take care of you. ❤ Either way, please use the host code ANTD9UHS. Order online AND, if your order is $50 or more using host code ANTD9UHS between now and the end of the month you’ll receive a free pack of embellishment as a THANK YOU gift from me. ❤ If your order is over $150, skip the host code, earn Stampin’ Rewards for free stuff yourself and I’ll still send you a free pack of embellishment as a THANK YOU gift from me. ❤

Design inspired by the 2020-2021 Stampin’ Up! Annual Catalog.

Let Hope Be Your Anchor

Let hope be your anchor through the storms of life. Such good advice. I whipped this card up in about 30 minutes. The Sailing Home Stamp Set and the Smooth Sailing Dies are such a fun combo and I adore these sea worthy fonts.

Measurements

Full list of supplies needed, listed below. A die cutting machine is needed for this card.
Card Base: Soft Suede Cardstock 8 1/2 h” x 5 1/2″ w folded to 5 1/2″ h x 4 1/4″ w.
Embossed Background: Balmy Blue 3 1/2″ h x 4 1/4″ w
Decorative Background Matte: Whisper White 4 1/2″ h x 3 1/4″ w
Decorative Background: Brights DSP 4 5/16″ h x 3 1/8″ w
Water Color Layer: 
Whisper White Cardstock 3″ h x 2 1/4″ w

Let’s Create

  1. Affix all stamps to Acrylic Blocks.
  2. Fold the Card Base in half using a Bone Folder to sharpen the crease.
  3. Run the Embossed Background through the Embossing Machine with the Pinewood Plank Embossing Folder and adhere with Stampin’ Seal.
  4. Adhere the Decorative Background and the Decorative Matte and then affix to card.
  5. Watercolor wash the Watercolor Layer with Balmy Blue Ink and allow to dry before attaching to the card with the Stampin’ Dimensionals.
  6. Stamp the Anchor in Soft Suede ink on Whisper White and then die cut and attach with Stampin’ Dimensionals.
  7. Stamp the Sentiment in Balmy Blue on Whisper White cardstock and die cut with the Layering Circles Dies.
  8. Die cut a a Matte for the Sentiment in Crumb Cake using the Stitched Circle die.
  9. Attach the two Sentiment Layers together and attach with Stampin’ Seal and Stampin’ Dimensionals.
  10. You’re Done! Put it in the mail today!

Shopping List

Recommended Stamper’s Toolkit

Product List
Order online from the convenience of your own home or send me your order and I’ll take care of you. ❤ Either way, please use the host code ANTD9UHS. Order online AND, if your order is $50 or more using host code ANTD9UHS between now and the end of the month you’ll receive a free pack of embellishment as a THANK YOU gift from me. ❤ If your order is over $150, skip the host code, earn Stampin’ Rewards for free stuff yourself and I’ll still send you a free pack of embellishment as a THANK YOU gift from me. ❤

Design inspired by Carol Lovenstein.

Set Sail

There’s something nostalgic about Lighthouses. Probably because they’ve stood tall and proud through the worst weather and they’re a constant through centuries of change. The Sailing Home Stamp Set and coordinating Smooth Sailing Dies made this card really easy to make. I love it when papercraft therapy is easy!

Measurements

Full list of supplies needed, listed below. A die cutting machine is needed for this card.
Card Base: Whisper White Thick Cardstock 8 1/2 h” x 5 1/2″ w folded to 5 1/2″ h x 4 1/4″ w.
Background: 2019-2020 DSP 5 1/4″ h x 4″ w
Sentiment Layer: 
Whisper White Cardstock 4″ h x 2 3/4″ w Stitched Rectangles Die
Ribbon 1: 3 – 4″ strips of Red Stitched Ribbon
Ribbon 2: 6″ Black and White Thread

Let’s Create

  1. Affix all stamps to Acrylic Blocks.
  2. Fold the Card Base in half using a Bone Folder to sharpen the crease.
  3. Attach the Background with Stampin’ Seal.
  4. Add the Red Ribbon
  5. Stamp the Lighthouse and Anchor in Smoky Slate ink and the Sentiment in Seaside Spray Ink on Whisper White Cardstock. Then die cut all three with the Smooth Sailing Dies.
  6. Use the Dark Daffodil Delight to color the windows on the Lighthouse and also to create the beacon on the Stitched Rectangle.
  7. Attach the Lighthouse,Sentiment, Black and White Trim and Anchor with Stampin’ Dimensionals.
  8. That’s it! Who will you send it to?

Shopping List

Recommended Stamper’s Toolkit

Product List
Order online from the convenience of your own home or send me your order and I’ll take care of you. ❤ Either way, please use the host code ANTD9UHS. Order online AND, if your order is $50 or more using host code ANTD9UHS between now and the end of the month you’ll receive a free pack of embellishment as a THANK YOU gift from me. ❤ If your order is over $150, skip the host code, earn Stampin’ Rewards for free stuff yourself and I’ll still send you a free pack of embellishment as a THANK YOU gift from me. ❤

Design inspired by Mary Fish.