Happy Birthday

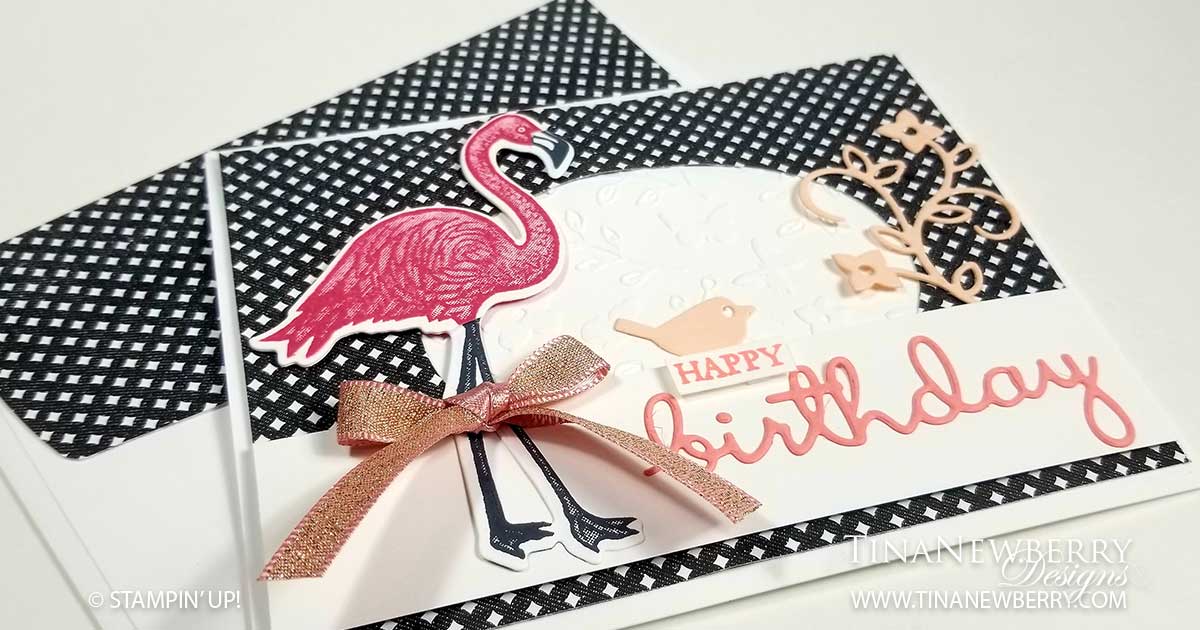
Black and pink. A fitting combination for the striking flamingo. I combined the Friendly Flamingo Stamp Set and Dies with the Well Written Dies along with the True Love Designer Series Paper and Meadow Moments Embossing Folder for this pretty card.

Full list of supplies needed, listed below. A die cutting machine is needed for this card.
Card Base: Basic White Thick Cardstock 8 1/2 h” x 5 1/2″ w folded to 4 1/4″ h x 5 1/2″ w.
Background: True Love DSP 4″ h x 5 1/4″ w
Embossed Background: Basic White Cardstock 3″ h x 5″ w
Sentiment Layer: 
Basic White Cardstock 1 1/4″ h x 5 1/4″ w
Inside Layer: Basic White Cardstock 4″ h x 5 1/4″ w

  1. Affix all stamps to Acrylic Blocks.
  2. Fold the Card Base in half using a Bone Folder to sharpen the crease.
  3. Run the Embossed Background Layer through the Emboss N’ Cut Machine with the Meadow Moments Embossing Folder.
  4. Attach a piece of Adhesive Sheet to Petal Pink Cardstock and Die Cut the Branch and Bird.
  5. Attach a piece of Adhesive Sheet to Flirty Flamingo Cardstock and Die Cut Birthday.
  6. Make the Flamingo
    1. Stamp the Flamingo on scrap Basic White Cardstock in Tuxedo Black Ink and Die Cut
    2. Stamp the Flamingo on scrap Basic White Cardstock in Melon Mambo Ink and Die Cut
    3. Use Stampin Snips to fussy cut the Melon Mambo Flamingo body and attach to the Tuxedo Black Flamingo with Stampin’ Seal.
  7. Stamp the Happy in Flirty Flamingo ink and use Paper Snips to fussy cut it out.
  8. Layout all of the pieces to get an idea of where everything will go on the card and mark roughly where to cut the Oval.
  9. Use the second largest oval in the Stitched Shapes Dies to cut an oval shape out of the Background Layer. Attach the Embossed Background to the back to cover the Oval hole.
  10. Attach the Background to the card.
  11. Peel off the adhesive backer and attach the Bird, Branch and Birthday to the card.
  12. Use Stampin’ Dimensionals to attach the Sentiment Layer, the Body of the Flamingo, and the Happy.
  13. Tack down the Flamingo legs with Stampin’ Seal, if needed.
  14. Attach a bow from  Blushing Bride 3/8″ Metallic Ribbon with a Mini Glue Dot.
  15. Decorate the Inside Layer and attach.
  16. Decorate the envelope.
  17. Love it! Now put it in the mail.

Shopping List

Stamper’s Toolkit

You will also need adhesive, acrylic blocks, scissors and other basic PaperCrafting items from the Stamper’s Toolkit

Sorry You’re Feeling Blue

Thank you for your interest in this project. Some projects are exclusive to subscribers who will receive passwords by email.

Are you a subscriber? Awesome! Check your email for the password and enter it here to view this project.

Not yet subscribed?  We’d love for you to join us.  Subscribe to my email list and receive news, information and inspiration by email.

Sympathy Card Six-Pack

Using the same layout, with varying sentiments, my good friend, Annette & I were able to each create a quick six-pack of sympathy cards. Scroll down for measurements and supplies.

Heal Your Heart Sale-a-bration Stamp Set
Misty Moonlight Card Base 4 1/4″ h x 5 1/5″ w
Boho Indigo Product DSP 3″ h x 4″ w
Very Vanilla Sentiment with Misty Moonlight Ink cut to size
Crumb Cake Cardstock 3/4″ h x 4 1/4″ w
Peaceful Moments Stamp Set
Garden Green Card Base 4 1/4″ h x 5 1/5″ w
Boho Indigo Product DSP 3″ h x 4″ w
Very Vanilla Sentiment with Garden Green Ink with the Painted Label Dies
Boho Indigo Gold Ribbon
Heal Your Heart Sale-a-bration Stamp Set
Night of Navy Card Base 4 1/4″ h x 5 1/5″ w
Boho Indigo Product DSP 3″ h x 4″ w
Very Vanilla Sentiment with Night of Navy Ink with the Label Me Lovely Punch
Merry Merlot Cardstock with the Label Me Lovely Punch
Gilded Gems

Shopping List

Stamper’s Toolkit

You will also need adhesive, acrylic blocks, scissors and other basic PaperCrafting items from the Stamper’s Toolkit

Boho Thank You

Pull together a simple, elegant card in minutes using the pre-embossed paper, die cut tags, beautiful patterned paper, cute paper flowers and a single stamped vase and branches. WOW! I’m not sure why I waited so long to buy the Boho Indigo Product Medley! This beautiful card came together so easily, I made two!

Full list of supplies needed, listed below.
Card Base: Very Vanilla Cardstock 8 1/2 h” x 5 1/2″ w folded to 5 1/2″ h x 4 1/4″ w.
Background: Boho Indigo Embossed Paper 5 1/2″ h x 2″ w
Decorative Strip 1: Boho Indigo DSP 5″ h x 1/2 ” w
Decorative Strip 2: Boho Indigo DSP 4 3/4″ h x 1″ w
Sentiment Layer:
Boho Indigo Die Cut Tag
Inside Layer: Very Vanilla Cardstock 5 1/4″ h x 4″ w

  1. Affix all stamps to Acrylic Blocks.
  2. Fold the Card Base in half using a Bone Folder to sharpen the crease.
  3. Attach the Background Layer and Background Strip 1 using Stampin’ Seal.
  4. Attach Background Strip 2 using Stampin’ Dimensionals.
  5. Cut a 3 3/4″ piece of the Gold Ribbon and attach using Tear & Tape.
  6. Stamp a Vase in Misty Moonlight ink on scrap Very Vanilla and die cut.
  7. Stamp the Leaves & Branches in Garden Green ink on the Card Base.
  8. Attach the Vase with Stampin’ Dimensionals.
  9. Stamp the Sentiment on the Tag in Misty Moonlight ink and attach Tag with Stampin’ Dimensionals.
  10. Add the Paper Flowers.
  11. Decorate the Inside Layer and attach.
  12. Decorate the envelope.
  13. So cute! Now send it to someone special.

Shopping List

Stamper’s Toolkit

You will also need adhesive, acrylic blocks, scissors and other basic PaperCrafting items from the Stamper’s Toolkit