Wishing You the Brightest Birthday

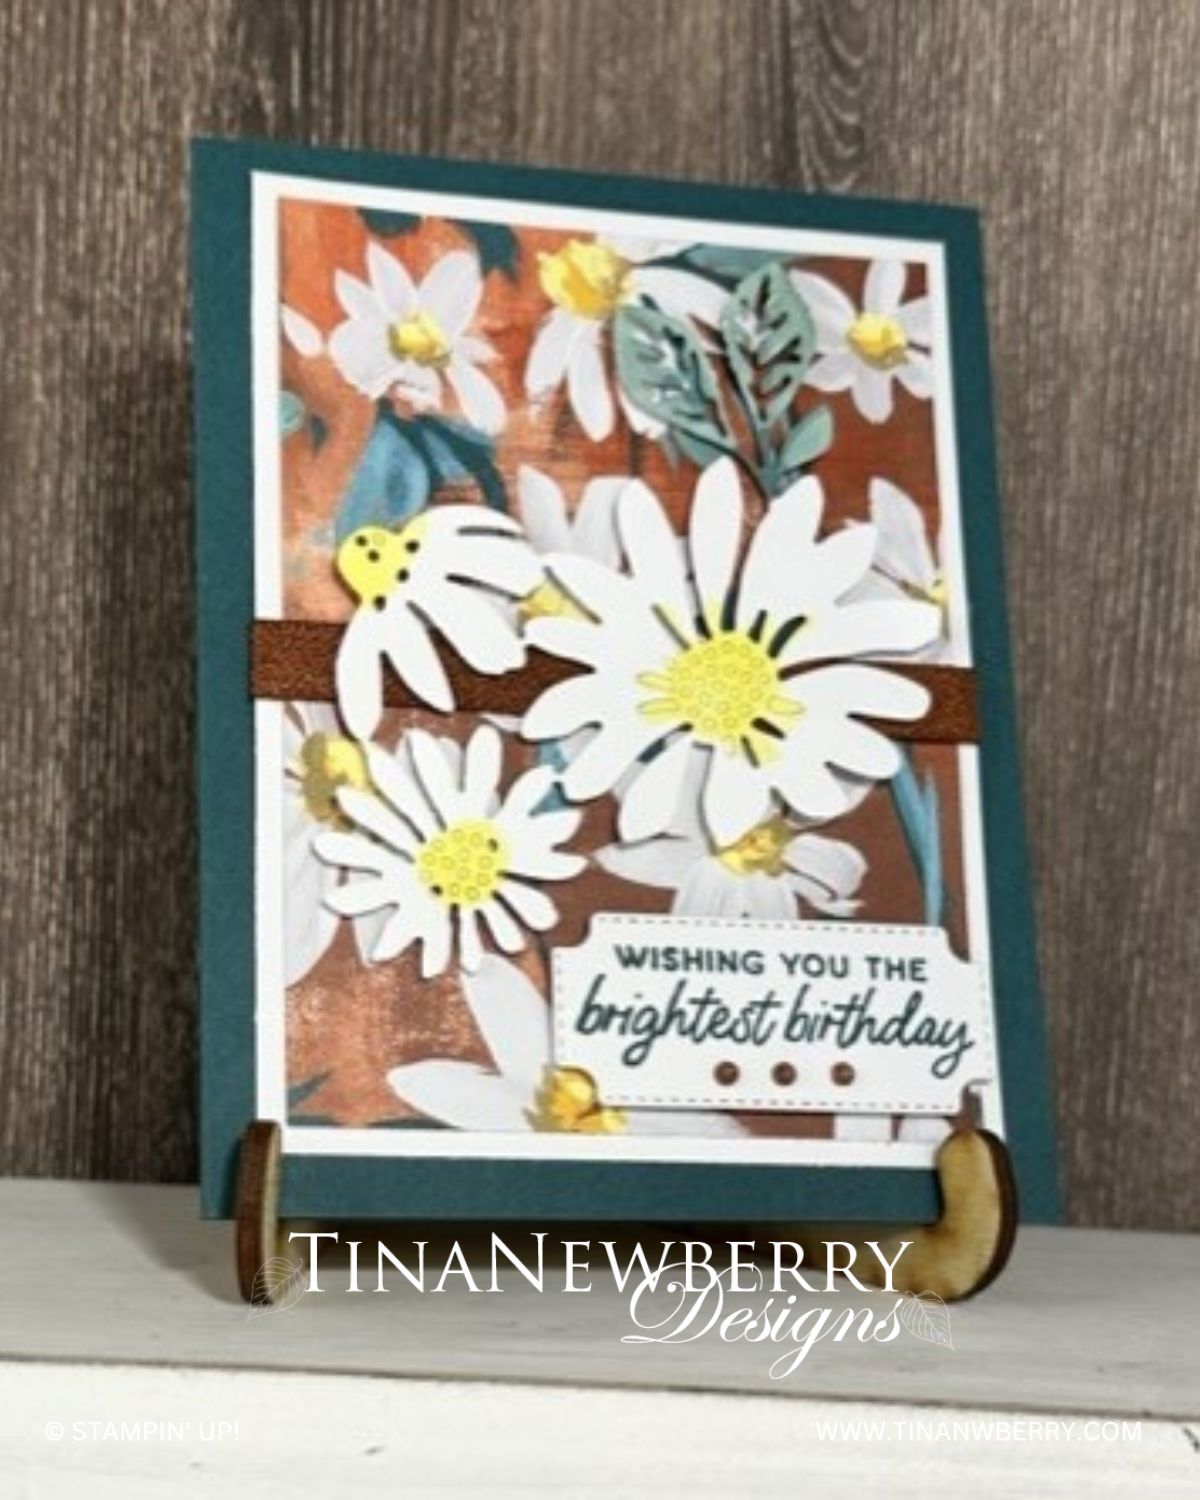
What a stunning color combination with the returning Pretty Peacock and two new colors: Lemon Lolly and Copper Canyon! What will you make with this color palette?

Your cards will bloom with happiness when you use the Cheerful Daisies Bundle. Stamp a daisy or two complete with leaves and stem, then cut out using the coordinating dies. Happy has never been so easy!

Measurements

Full list of supplies needed, listed below. A die cutting machine is needed for this card.

Card Base Pretty Peacock 8 ½” x 5 ½”, scored at 4 ¼”
Basic White 3 ¾” x 5”
Designer Series Paper (DSP) 3 ½” x 4 ¾”
Basic White (inside) 3 ¾” x 5”
Basic White Die Cuts


Let’s Create

  1. Affix all stamps to Acrylic Blocks.
  2. Fold the Card Base in half using a Bone Folder to sharpen the crease.
  3. Cut Card Base Pretty Peacock 8 ½” x 5 ½”, scored at 4 ¼”
  4. Cut Basic White   3 ¾” x 5”.
  5. Adhere 3 ½” x 4 ¾” (DSP) to Basic White layer. Wrap ribbon around and adhere to back with Tear N’ Tape.
  6. Adhere this panel to Pretty Peacock Card Base.
  7. Die-cut sentiment label. Stamp sentiment in Pretty Peackock and adhere to card front with Stampin’ Dimensionals.
  8. Die-Cut largest Daisy family in Basic White. Use lightest Blend to color center in Lemon Lolly. Color leaves with light Lost Lagoon Blend, then add a tiny bit of shadow with Pretty Peacock Blend.
  9. Adhere daisy family to card front with small Stampin’ Dimenstionals.
  10. Sprinkle on three Copper gems.
  11. Stamp and decorate the 3 ¾” x 5” Basic White for inside and attach with Stampin’ Seal.
  12. Decorate your envelope.
  13. Lovely! Who needs a pick-me-up?

Shopping List

Recommended Stamper’s Toolkit ❤

Product List
Order online from the convenience of your own home or send me your order and I’ll take care of you. ❤ Either way, please use the host code KBSZKQ3A. Order online AND, if your order is $50 or more using host code KBSZKQ3A between now and the end of the month you’ll receive a free pack of embellishment as a THANK YOU gift from me. ❤ If your order is over $150, skip the host code, earn Stampin’ Rewards for free stuff yourself and I’ll still send you a free pack of embellishment as a THANK YOU gift from me. ❤

Thanks for Your Kindness

So this design came out of nowhere and I’m really digging the look. When I started, I was intending to take it in a completely different look. I love when that happens! I used the Soft Succulent Brushed Metallic Specialty DSP, Gold Foil Sheets, Vellum Basics, Soft Shimmer, Lost Lagoon cardstock, and a piece from the Hello, Irresistible pack for the various layers in this card.

The Beauty of the Deep Bundle is perfect for all your underwater card making adventures! This bundle comes with nine stamps of oceanic features and eleven dies that coordinate perfectly. You can easily stamp and cut out any of the images to make your own scene! Stamp background images, layer detailed die-cut pieces, and add color. Descend into the deep blue waters and discover the possibilities of the ocean!

Measurements

Full list of supplies needed, listed below. A die cutting machine is needed for this card.

  • Lost Lagoon Cardstock:
    • 5 ½” h x 8 ½” w scored and folded on the long-side at 4 ¼” w.
    • Scrap for Country Corners die cut
  • Hello, Irresistible Designer Series Paper (DSP): 5 ¼” h x 4” w
  • Soft Succulent Dry Brushed Metallic Specialty DSP: scrap for coral die cut
  • Gold Foil Sheets: scrap for sentiment tag and fish.
  • Vellum Basics: scrap for seaweed. I used the striped piece
  • Soft Shimmer Specialty DSP: scrap for coral

Basic White cardstock:  5 ¼” w x 4” h


Let’s Create

  1. Affix all stamps to Acrylic Blocks.
  2. Fold the Card Base in half using a Bone Folder to sharpen the crease.
  3. Attach the Hello, Irresistible DSP with Stampin’ Seal.
  4. Use the Country Corners die to make a Lost Lagoon layer. 
  5. Stamp the fish and sentiment on the Gold Foil using Stazon ink. Let it dry.
  6. Die cut:
    1. Seaweed from Vellum Basics and Soft Shimmer Specialty DSP
    2.  For the Pretty Peacock Soft Shimmer, first die cut a Country Corners piece. Then, run it through again with the Coral die. 
    3. Coral from the Soft Succulent Brushed Metallic scrap.
    4. Once dry, die cut the fish and sentiment label. 
  7. Layout your card layers.
    1. Attach the vellum seaweed and brushed metallic coral so they will be behind the Lost Lagoon layer.
    2. Attach the Pretty Peacock coral to the Lost Lagoon layer. Use Stampin’ Seal for the top and bottom and tiny Dimensional pieces for the middle.  
    3. Attach the Lost Lagoon layer with Stampin’ Dimensionals.
    4. Then attach the rest of the Soft Shimmer coral pieces with Multipurpose Liquid Glue.
    5. Attach the fish and sentiment with Stampin’ Dimensionals 
  8. Sprinkle on some Pretty Peacock sequins from the Adhesive-Backed Sequins Trio.
  9. Stamp and decorate the 5 ¼” w x 4” h for inside
  10. Decorate your envelope.
  11. So nice! Put this in the mail.
Product List

Recommended Stamper’s Toolkit ❤

Product List
Order online from the convenience of your own home or send me your order and I’ll take care of you. ❤ Either way, please use the host code KBSZKQ3A. Order online AND, if your order is $50 or more using host code KBSZKQ3A between now and the end of the month you’ll receive a free pack of embellishment as a THANK YOU gift from me. ❤ If your order is over $150, skip the host code, earn Stampin’ Rewards for free stuff yourself and I’ll still send you a free pack of embellishment as a THANK YOU gift from me. ❤

Wishing You Everything Wonderful

Stamp on patterned paper to create a scene for your background. I’ll show you how!

The Beauty of the Deep Bundle is perfect for all your underwater card making adventures! This bundle comes with nine stamps of oceanic features and eleven dies that coordinate perfectly. You can easily stamp and cut out any of the images to make your own scene! Stamp background images, layer detailed die-cut pieces, and add color. Descend into the deep blue waters and discover the possibilities of the ocean!

Measurements

Full list of supplies needed, listed below. A die cutting machine is needed for this card.

Pretty Peacock Cardstock: 

  • 5 ½” w x 8 ½” h scored and folded on the long-side at 4 ¼”
  • 2 ¾” h x 4 ¼” scrap 

Basic White Cardstock: 

  • 5 ¼” w x 4” h for inside
  • Scrap for sentiment label and fish

Calypso Coral Cardstock: scrap

Earthen Elegance Designer Series Paper (DSP): 4”” h x 5 ¼” w

Let’s Create

  1. Affix all stamps to Acrylic Blocks.
  2. Fold the Card Base in half using a Bone Folder to sharpen the crease.
  3. Stamp various coral and seaweed on the DSP. Colors I used the following stamp pads:
    1. Blueberry Bushel
    2. Daffodil Delight
    3. Old Olive
    4. Cajun Craze
    5. Pretty Peacock
  4. From the Deckled Rectangle Dies, die cut
    1. The center of the DSP with the 2” h x 3 ½” w die
    2. The Pretty Peacock Cardstock with the 2 ½” h x 4” w die.
  5. Attach the outer DSP frame to the front of the card with Stampin’ Seal.
  6. Attach the center of the DSP to the Pretty Peacock Deckled Rectangle with Stampin’ Seal. 
  7. Attach the Pretty Peacock with Stampin’ Dimensionals.
  8. On Basic White scrap, stamp the sentiment from Charming Sentiments with Pretty Peacock, two fish with Blueberry Bushel and two with Tuxedo Black, then die cut the sentiment with the Sentiment Silhouettes Dies and the fish from the Beauty of the Deep dies.
  9. Attach Adhesive sheets to the back of the Calypso Coral scrap and then die cut the coral from Calypso Coral cardstock and then use a sponge dauber to add a bit of Calypso Coral ink on the edges of the die cut coral.
  10. Set the Coral so it’s overhanging the Pretty Peacock layer. Use Paper Snips to trim the excess.
  11. Remove the adhesive backing from the Calypso Coral cardstock and attach to the Pretty Peacock and the DSP. 
  12. Attach the sentiment and fish with Stampin’ Dimensionals and Stampin’ Seal.
  13. Sprinkle on some Pretty Peacock sequins from the Adhesive-Backed Sequins Trio.
  14. Stamp and decorate the 5 ¼” w x 4” h for inside
  15.  Decorate your envelope.
  16. Lovely! Who can you send it to? Put it in the mail.

Shopping List

Recommended Stamper’s Toolkit ❤

Product List
Order online from the convenience of your own home or send me your order and I’ll take care of you. ❤ Either way, please use the host code KBSZKQ3A. Order online AND, if your order is $50 or more using host code KBSZKQ3A between now and the end of the month you’ll receive a free pack of embellishment as a THANK YOU gift from me. ❤ If your order is over $150, skip the host code, earn Stampin’ Rewards for free stuff yourself and I’ll still send you a free pack of embellishment as a THANK YOU gift from me. ❤