You are Amazing

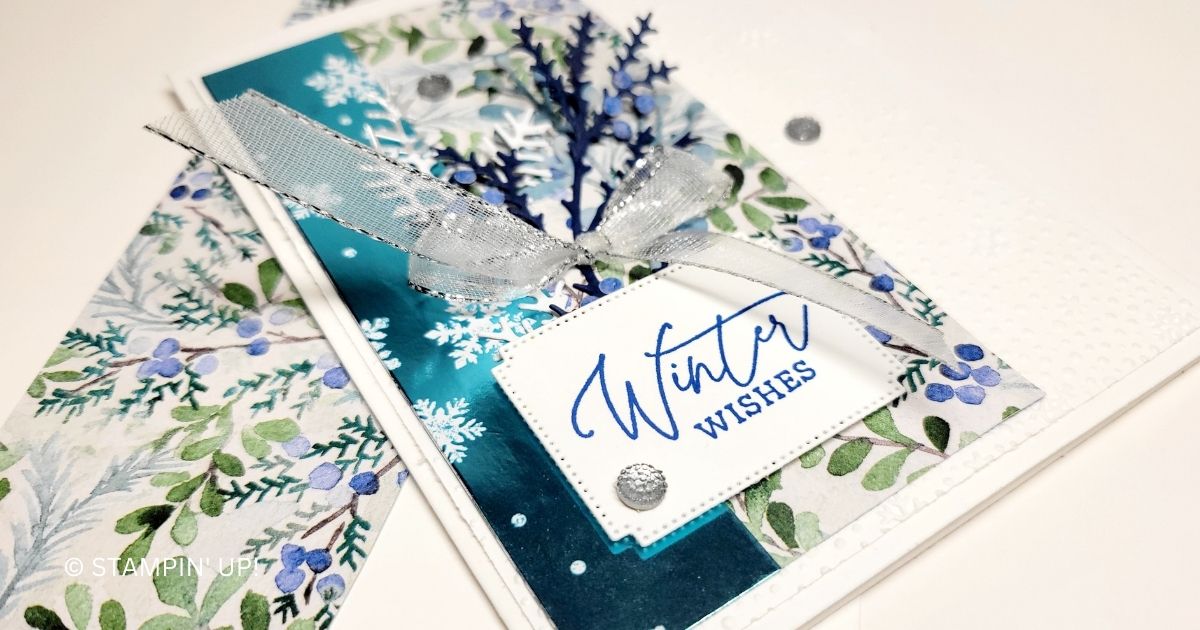
My favorite kind of snow flurries are paper snow flurries! Ha! Who needs a pick-me-up today? Send them some words of encouragement with this beautiful, quick and easy card.

Create your own tags with this coordinating stamp and punch in the Snowflake Magic bundle! Stamp snowflakes and sentiments, then punch out quick tags and labels. Or use the snowflakes and sentiments on their own for cards and other paper crafting projects.

Measurements

Full list of supplies needed, listed below. A die cutting machine is needed for this card.

Card Base – Basic White:

  • 5 ½” x 8 ½, scored at 4 ¼”
  • Scraps for stamping and die cutting

Snowflake Magic Specialty Designer Series Paper (SDSP) – Blue foil snowflake pattern: 3 ¼” x 5 ½”

More Dazzle Specialty Designer Series Paper (SDSP) – silver: 1 5/8” x 3”

Let’s Create

  1. Affix all stamps to Acrylic Blocks.
  2. Fold and burnish card base using bone folder. 
  3. Attach the panel of dsp to the center of the card front using glue.
  4. Use dimensionals to add the rectangle of the More Dazzle paper to the center of the card front.
  5. Stamp the sentiment from Season of Chic to a scrap of White.  Die cut with the Natural Prints die.
  6. Attach the shape from Step 5 to the center of the rectangle More Dazzle paper using dimensionals.
  7. Die cut 2 small snowflakes from the dies with White.
  8. Glue the snowflakes to the card front with one in the upper left corner of the More Dazzle paper and the other in the lower right corner.  See photo above for placement.
  9. Use glue to sprinkle some Loose Silver sequins on the card front.
  10. Stamp the large snowflake from the Season of Chic stamp set randomly on the inside of the card using Lost Lagoon ink.  
  11. Randomly stamp the snowflake on the envelope using Lost Lagoon ink.
  12. Love the foil!! Who needs this pick-me-up?

Shopping List

Recommended Stamper’s Toolkit ❤


The Colder Weather Brings Us Together

The colder weather brings me inside to my studio to craft the day away (and yes it DOES cool of in north FL)! 🤣 How about you? Add a few branches and a sentiment to pull this card together. The patterned Designer Series Paper does all the work.

Add a little winter magic to your cards and other paper crafts with the Magical Meadow Bundle. The stamps and dies coordinate: stamp, then die cut the images to use on cards, scrapbook pages, gift tags, and more.

Measurements

Full list of supplies needed, listed below. A die cutting machine is needed for this card.

  • Smoky Slate Cardstock:
    • 8 ½” w x 5 ½” h scored and folded on the long side at 4 ¼”
  • Basic White Cardstock:
    • 4 ¼” w x 5 ¼” h (1) for inside
    • 2” square for sentiment
    • 3” w x 2 ½” h 
    • Scrap for branches
  • Winter Meadow Designer Series Paper (DSP):
    • 3 ¾” w x 5 ¼” h pine trees
    • 3” w x 2 ½” h 
  • Pretty Peacock:
    • 1 ¼” w x 5 ¼” h


Let’s Create

  1. Affix all stamps to Acrylic Blocks.
  2. Fold the Card Base in half using a Bone Folder to sharpen the crease.
  3. Unfold the Card Base and trim 1 ¼” w x 5 ½” h piece off the front (section to the right of the fold line).
  4. Refold the Card Base.
  5. Trim 1” off the right side of the 3 ¾” w x 5 ¼” h pine tree DSP and attach both pieces to the Card Base with Stampin’ Seal. 
  6. Run the Pretty Peacock strip through the Stampin’ Cut & Emboss machine with the snowflake die to add snowflake pattern in the top and bottom of the strip then attach with Stampin’ Seal. 
  7. Use Smoky Slate ink to stamp the pine tree forest image on the 3” w x 2 ½” h Basic White piece.
  8. Die cut the coordinating die for the pine tree forest image out of the center of the 3” w x 2 ½” h DSP. 
  9. Align the DSP cutout over the stamped pine tree forest image. Trim any excess Basic White from the edge and attach the two layers together with Stampin’ Dimensionals. Then attach to the card with Stampin’ Dimensionals. 
  10. Stamp the sentiment in Pretty Peacock ink onto edge of the 2” square Basic White and then punch with the Lasting Label Punch- you want the bottom edge to be square. 
  11. Attach the Sentiment with a combination of Stampin’ Seal and Stampin’ Dimensionals. 
  12. Die cut some branches in Basic Gray and Basic White Cardstock. Trim as needed and then use Mini Glue Dots to tuck them in behind the pine tree forest. 
  13. Sprinkle on some Faceted Gems Trio Pack. 
  14. Stamp and decorate the 5 ¼” w x 4” h for inside.
  15. Decorate your envelope.
  16. Love! Put it in the mail!
Shopping List

Recommended Stamper’s Toolkit ❤


May This Season of Sparkle Bring Joy & Delight

Make a beautiful paper wreath in the colors of your choice. I’ll show you how!

Add a little winter magic to your cards and other paper crafts with the Magical Meadow Bundle. The stamps and dies coordinate: stamp, then die cut the images to use on cards, scrapbook pages, gift tags, and more.

Measurements

Full list of supplies needed, listed below. A die cutting machine is needed for this card.

  • Cherry Cobbler Cardstock:
    • 8 ½” w x 5 ½” h scored and folded on the long side at 4 ¼”
    • Scrap for berries
  • Basic White Cardstock:
    • 4 ¼” w x 5 ¼” h (1) for inside
    • 1” h x 3 ¼” w for tag
  • Winter Meadow Designer Series Paper (DSP): 4 ¼” w x 5 ¼” h 
  • More Dazzle Specialty Paper: 2” circle
  • Pretty Peacock:
    • ½” h x 3” w
    • ~2” circle ring
    • Scrap for wreath
  • Vellum Cardstock: scrap for wreath
  • Garden Green Cardstock: scrap for wreath


Let’s Create

  1. Affix all stamps to Acrylic Blocks.
  2. Fold the Card Base in half using a Bone Folder to sharpen the crease.
  3. Attach the DSP with Stampin’ Seal+
  4. To make the wreath
    1. Run the two pine and one curved branch dies through the Stampin’ Cut & Emboss machine several times with Pretty Peacock cardstock so you have 3-4 of die cut pieces of each branch.
    2. Die cut three pieces of each die with the Vellum  and Garden Green Cardstock.
    3. Attach a piece of Adhesive Sheets to the back of the Cherry Cobbler scrap and die cut the berries die 2-3 times to create a bunch of berries.
    4. On a Silicone Craft Sheet, set down the Pretty Peacock circle ring. Attach Tear n ‘ Tape to the circle ring and remove the backing.
    5. Layer the curved branches around the edge of the circle- there will be overhanging pieces. Use Multipurpose Glue to attach the curved branches to each other and use your Paper Snips to snip off the overhanging pieces. 
    6. Next layer the pine pieces, you might find you need to cut some into smaller pieces and tuck them in. Use Multipurpose Glue to adhere into place.
    7. Break the Garden Green and Vellum branches into smaller pieces and tuck them in here and there. Use Mini Glue Dots to adhere into place.
    8. Remove the adhesive backing from the berries and attach to the berries on the Pretty Peacock. 
    9. Use Mini Glue Dots to attach to the More Dazzle Circle.
  5. Attach the wreath to the DSP with Stampin’ Seal+ or Multipurpose Glue or Tear N’ Tape.
  6. Stamp the sentiment in Cherry Cobbler ink on the Basic White cardstock and trim the ends with the Banners Pick a Punch.
  7. Use Stampin’ Seal to attach the Pretty Peacock strip. 
  8. Use Tear n Tape to attach the Glitter Organdy ribbon and trim to size with your Paper Snips. 
  9. Attach the sentiment with Stampin’ Dimensionals. 
  10. Sprinkle on some Adhesive Backed Sparkle Gems. 
  11. Stamp and decorate the 5 ¼” w x 4” h for inside.
  12. Decorate your envelope.
  13. Stunning! Who will you send this to?
Shopping List

Recommended Stamper’s Toolkit ❤