Ten Years of Growth Alternative #1

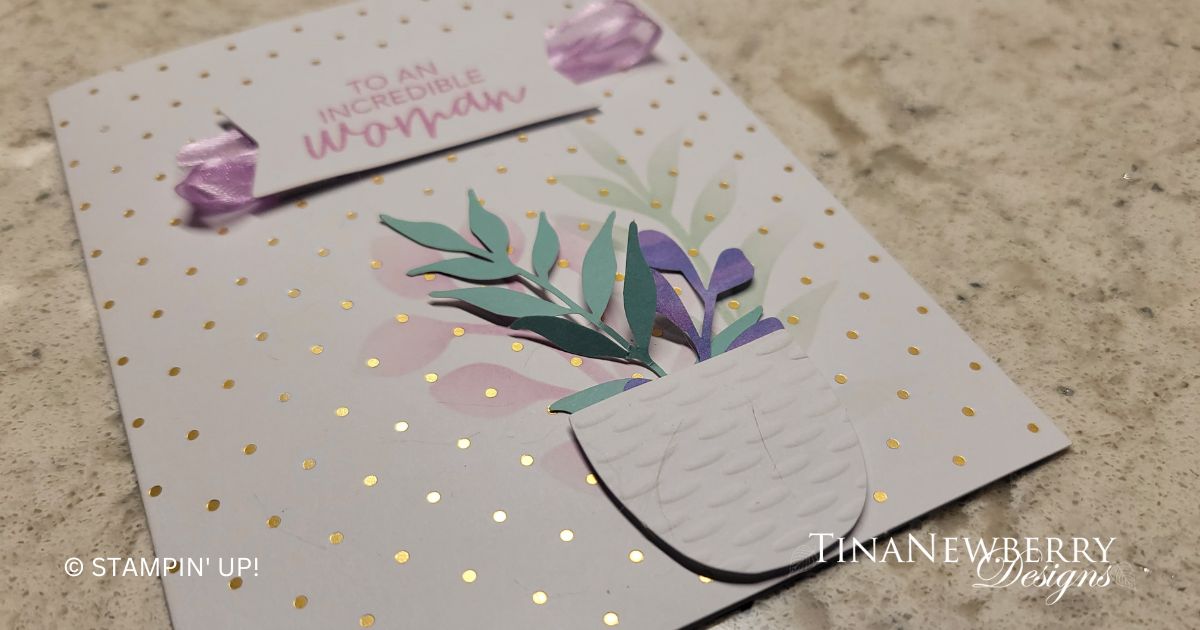
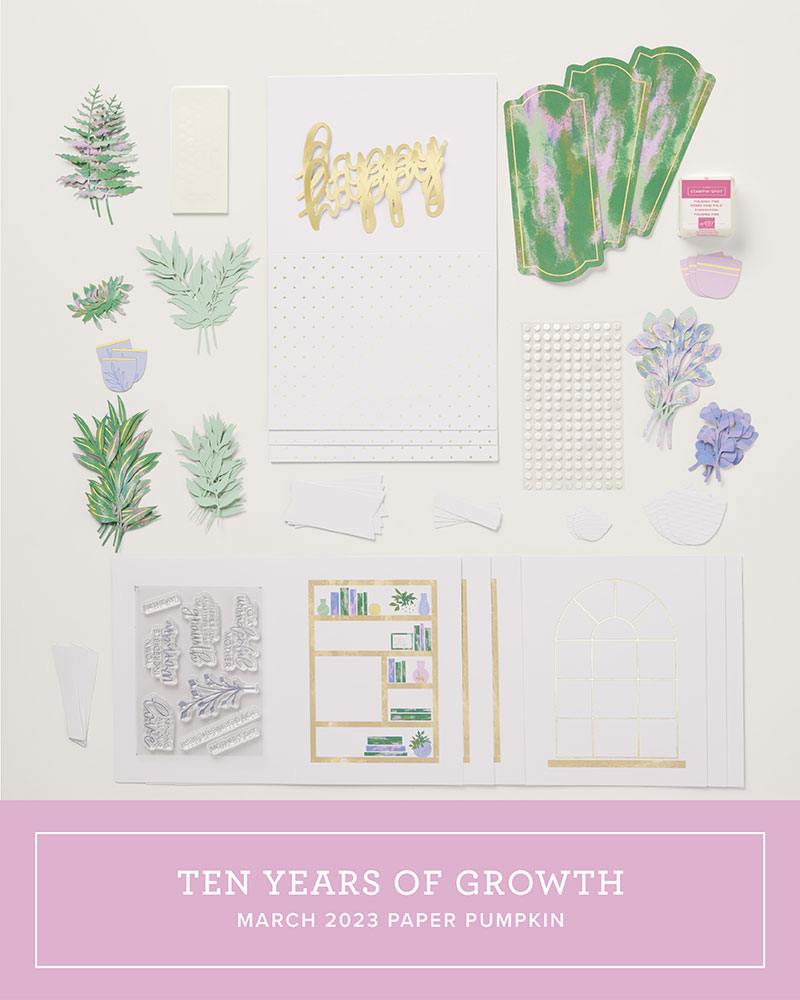
The stamp set, die cuts and die cut punch outs are easily combined with a card base from the Ten Years of Growth Paper Pumpkin kit to create a stunning, simple card.

It’s Paper Pumpkin’s 10-year anniversary and we want to celebrate how much we’ve grown! This month’s kit is all about happy greetings, organic and botanical designs, and a FREE GIFT as part of our anniversary celebration that we hope you’ll love! It’s also the occasion to root for the people in your life who help you grow! Let them know you recognize their support at different chapters of your life by sending them heartfelt cards with happy, fresh, and colorful designs! Subscribe to next months kit.

Measurements

Full list of supplies needed, listed below.
From the Kit:

  • Card Base
  • Die Cuts
  • Die Cut Stencils
  • Label

Let’s Create

  1. Affix all stamps to Acrylic Blocks.
  2. FIrmly press a stencil down onto the flattened Card Base, apply ink – Fresh Freesia and Coastal Cabana – one color at a time with a blending brush to create the foliage on the Card Base.
  3. Fold the Card Base in half using a Bone Folder to sharpen the crease.
  4. Stamp the sentiment on the tag from the kit with Fresh Freesia ink.
  5. Weave a 6 – 9″ piece of Fresh Freesia Open Weave ribbon along the back of the tag and secure with Mini Glue Dots. Then attach to the card with Stampin’ Dimensionals.
  6. Use Mini Glue Dots and Stampin’ Dimensionals to attach the die cut Foliage and Pot to the lower right of the card front.
  7. Stamp and decorate the inside and attach with Stampin’ Seal.
  8. Decorate your envelope.
  9. So sweet! Now send it to someone special.

Shopping List

Recommended Stamper’s Toolkit ❤


Handmade Shimmery Thank You Card

Thank you for your interest in this project. Some projects are exclusive to subscribers who will receive passwords by email.

Are you a subscriber? Awesome! Check your email for the password and enter it here to view this project.

Not yet subscribed?  We’d love for you to join us.  Subscribe to my email list and receive news, information and inspiration by email.

10-Minute Embossed Thank You Card

A little vellum and brick wall embossing add a bit of character to this card without adding a lot of time.

You’ll never be at a loss for words when you have the Kind & Sincere Stamp Set. Use a large-size word as the focus and add supporting phrases to create the sentiments you want. Create custom cards to show your thanks, send congratulations, and convey feelings of friendship. The graceful script is easy to read and looks beautiful alone or paired with images from your favorite stamp sets.

Measurements

Full list of supplies needed, listed below. A die cutting machine is needed for this card.

Card Base: Soft Succulent cardstock 4 ¼” h  x  11” w folded to 4 1/4″ h x 5 1/2″ w

Background and Inside: Basic White cardstock  4″ h x 5 1/4″ w (2)

Front Layer: Fine Shimmer paper 3 ¾” h x 2” w

Sentiment Layer: Vellum cardstock 1 ½” h x 3” w


Let’s Create

  1. Affix all stamps to Acrylic Blocks.
  2. Fold the Card Base in half using a Bone Folder to sharpen the crease.
  3. Emboss the Basic White cardstock layer with the Brick & Mortar 3D Embossing Folder in the Stampin’ Cut & Emboss Machine.
  4. Use the Soft Succulent Stampin’ Pad to stamp the sentiment onto the Vellum cardstock layer, be very careful to avoid smearing. Set it aside to dry.
  5. Adhere the Fine Shimmer paper onto the Basic White cardstock.
  6. Wrap the Soft Succulent Open Weave Ribbon around the layers and tie a double knot.
  7. Place the 2021-2023  In Color Opal Rounds onto the stamped Vellum layer.  
  8. On the backside of the Vellum place adhesive behind the Opal Rounds, now adhere onto the card front.
  9. Stamp and decorate the inside and attach with Stampin’ Seal.
  10. Decorate your envelope.
  11. So cute! Now send it to someone special.

Shopping List

Recommended Stamper’s Toolkit ❤


10-Minute Handmade Congratulations Card

Make a quick & easy congratulations card with four pieces of rectangle paper.

You’ll never be at a loss for words when you have the Kind & Sincere Stamp Set. Use a large-size word as the focus and add supporting phrases to create the sentiments you want. Create custom cards to show your thanks, send congratulations, and convey feelings of friendship. The graceful script is easy to read and looks beautiful alone or paired with images from your favorite stamp sets.

Measurements

Full list of supplies needed, listed below. A die cutting machine is needed for this card.

Card Base: Basic White Thick cardstock 4 ¼” h  x  11” w folded to 4 1/4″ h x 5 1/2″ w

Background: Basic Black cardstock  2″ h x 5 1/4″ w

Front Layer: Fine Shimmer paper 2 ¾” h x 5 ¼” w

Sentiment Layer: Basic White cardstock 1 ¾” h x 4 ¾” w

Let’s Create

  1. Affix all stamps to Acrylic Blocks.
  2. Fold the Card Base in half using a Bone Folder to sharpen the crease.
  3. Emboss the Basic Black cardstock with the Let’s Celebrate Embossing folder in the Stampin’ Cut & Emboss Machine.  I placed the cardstock so that I embossed the “congratulations” word towards the top edge so that it is visible to coordinate with the stamped sentiment.
  4. Adhere the Fine Shimmer paper onto the Basic Black embossed cardstock, they overlap by ¾” of an inch.
  5. Wrap the Gold & Vanilla Ribbon around the layers and adhere the ends onto the backside. 
  6. Adhere these layers onto the Basic White Thick card base.
  7. Stamp the sentiment with Tuxedo Black Memento ink pad onto the Basic White cardstock layer.
  8. Use Dimensionals to adhere the stamped sentiment layer onto the card front.
  9. Place 4 black Classic Matte Dots in the four corners of the sentiment layer.
  10. Stamp and decorate the inside.
  11. Decorate your envelope.
  12. So cute! Now send it to someone special.
Product List

Recommended Stamper’s Toolkit ❤


Oh, Happy Turtle! A Book Fold Card

Thank you for your interest in this project. Some projects are exclusive to subscribers who will receive passwords by email.

Are you a subscriber? Awesome! Check your email for the password and enter it here to view this project.

Not yet subscribed?  We’d love for you to join us.  Subscribe to my email list and receive news, information and inspiration by email.