Create a Farm Scene From All of Us Card

My sister and her family run a farm in southeastern OH and I couldn’t wait to create with the new On The Farm Bundle and Sale-a-bration Designer Series Paper! So cute!! The On the Farm Bundle is new in the 2023 Jan-April Mini Catalog and the On the Farm Designer Series Paper is available for free with a $50 product order during Sale-a-bration. Both catalogs begin Jan. 5, 2023.

Choose a free Sale-A-Bration product – like this farm themed paper – with every $50 or $100 you spend (before tax and shipping) January 5 – February 28, 2023.

Measurements

Full list of supplies needed, listed below. A die cutting machine is needed for this card.

Daffodil Delight Cardstock; 5 ½” h x 8 ½” w scored and folded on the long-side at 4 ¼”

Basic White Cardstock: 

  • scrap for sentiment label
  • 5 ¼” h x 4” w

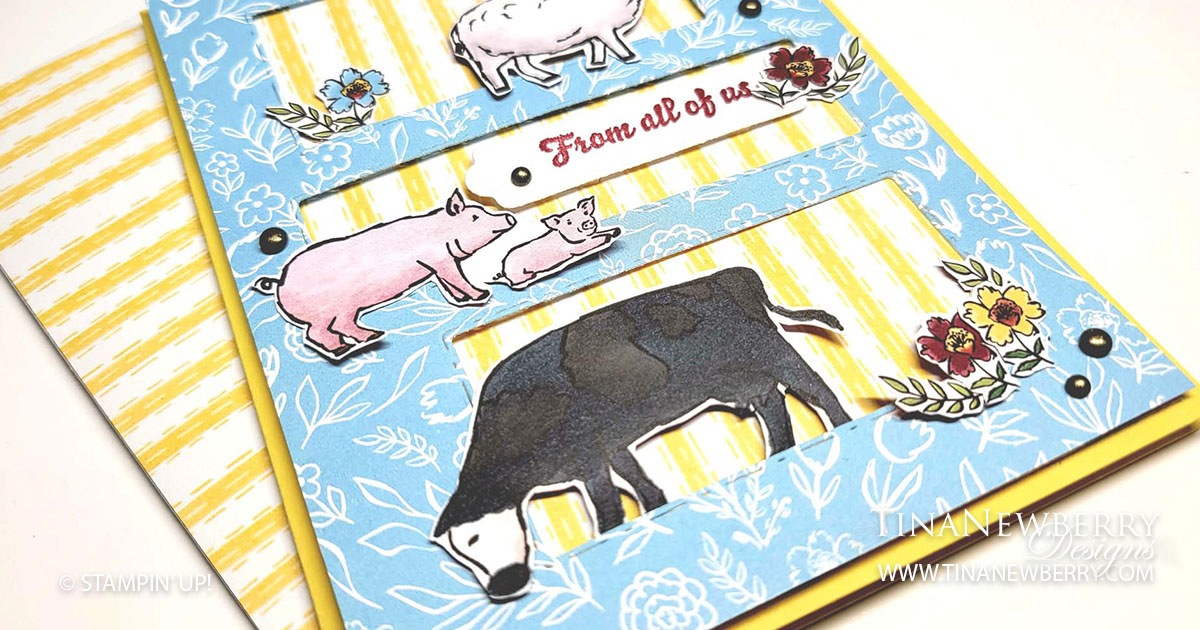
On the Farm Designer Series Paper (DSP):

  • Daffodil Delight Striped:5 ¼” h x 4” w
  • Balmy Blue Flower: 5 ¼” h x 4” w
  • Cow, sheep, pigs, and flowers

Let’s Create

  1. Affix all stamps to Acrylic Blocks.
  2. Fold the Card Base in half using a Bone Folder to sharpen the crease.
  3. Attach the Daffodil Delight Striped DSP to the from of the card base with Stampin’ Seal.
  4. Use the Picture This! Die to die cut the rectangles from the Balmy Blue DSP.
  5. Use Paper Snips to fussy cut out the animals and flowers. If you want a black cow with a white face, like mine, use the Basic Black Dark Stampin’ Blend to color the cow.
  6. Stamp the sentiment in Cherry Cobbler ink on the Basic White Cardstock and die cut with the label from the Seasonal Label Dies.
  7. Arrange the Balmy Blue, sentiment, animals, and flowers on the front of the card in a pleasing manner.
  8. Carefully attach the Balmy Blue die cut with Stampin’ Dimensionals.
  9. Attach the Sentiment with Stampin’ Dimensionals.
  10. Attach the animals and flowers with Stampin’ Seal, Mini Glue Dots and/or Stampin’ Seal as needed.
  11. Add some Rustic Metal Dots
  12. Stamp and decorate the remaining 5 ¼” hx 4” w Basic White Cardstock and attach to the inside with Stampin’ Seal.
  13. Decorate your envelope.
  14. So Fun!! ! Now who will you send it to?

Shopping List

This project also uses the On the Farm Bundle [160661] and On the Farm Sale-a-bration Designer Series Paper [160835] available Jan 5, 2023.

Recommended Stamper’s Toolkit ❤


Create Homemade Gift Wrap

Thank you for your interest in this project. Some projects are exclusive to subscribers who will receive passwords by email.

Are you a subscriber? Awesome! Check your email for the password and enter it here to view this project.

Not yet subscribed?  We’d love for you to join us.  Subscribe to my email list and receive news, information and inspiration by email.

I Never Met a Cookie I Didn’t Like

Cookie! Cookie! Cookie! Check out this cute chocolate chip card with a goal I can totally get behind. LOL.

Measurements

Full list of supplies needed, listed below. A die cutting machine is needed for this card.
Basic White Thick Cardstock: 5 1/2″ h x 8 1/2″ w folded to 5 1/2″ h x 4 1/4″ w
Basic White Cardstock:

  • 5 1/4″ h x 4″ w
  • scrap for sentiment tag
  • scrap for cookie

Early Espresso Cardstock: scrap for Cookies die cut

Let’s Create

  1. Affix all stamps to Acrylic Blocks.
  2. Fold the Card Base in half using a Bone Folder to sharpen the crease.
  3. Create the Background Layer
    • Lay Hand-Drawn Dots background stamp on the table- stamp-side up.
    • Use lightest ink pad (Crumb Cake) to ink up center of stamp.
    • Use Early Espresso to ink up left side of stamp.
    • Use Soft Suede to ink up right side of stamp.
    • Press 5 1/4″ h x 4″ w Basic White layer on top of stamp and burnish well.
  4. Attach an adhesive sheet to the back of the Early Espresso Cardstock and die-cut “Cookies”
  5. Die-Cut Tag from Basic White.
  6. Stamp sentiment on tag in Early Espresso.
  7. Remove backing from adhere “Cookies” sentiment and attach to sentiment label.
  8. Cut 24” Early Espresso Ribbon. Wrap it around 5 1/4″ h x 4″ w Basic White layer and tie a bow on the left.
  9. Adhere 5 1/4″ h x 4″ w Basic White layer to the card front with Stampin’ Dimensionals.
  10. Adhere sentiment label with Stampin’ Dimensionals.
  11. Stamp cookie in Crumb Cake on scrap basic White, and stamp chips in Early Espresso. Die-Cut cookie, and adhere to label with Stampin’ Dimensionals.
  12. Add a little gold gem to do the “i” in the die cut Cookie.
  13. Stamp and decorate the inside.
  14. Decorate your envelope.
  15. Yummy!!!! Who will love this card? Send it today.

Shopping List

This project also uses the Hand-Drawn Dots Background Stamp (#160508) available Jan. 5, 2023 in the January to April Mini Catalog

Recommended Stamper’s Toolkit ❤


Cute Owl Card For a Kind Friend

Customize the background colors to your favorite color palette. Choose any three ink pads you like.

Choose a free Sale-A-Bration product – like this Adorable Owls Stamp Set – with every $50 or $100 you spend (before tax and shipping) January 5 – February 28, 2023.

Measurements

Full list of supplies needed, listed below. A die cutting machine is needed for this card.
Basic White Thick Cardstock:

  • 5 1/2″ h x 8 1/2″ w scored at 4 1/2″ and folded to 5 1/2″ h x 4 1/4″ w
  • Scrap for owl

Basic White Cardstock:

  • 5 1/4″ h x 4″ w
  • Scrap for circle
  • Scrap for sentiment

Let’s Create

  1. Affix all stamps to Acrylic Blocks.
  2. Fold the Card Base in half using a Bone Folder to sharpen the crease.
  3. Create the Background
    • Lay Hand-Drawn Dots background stamp on the table.
    • Use lightest ink pad (Daffodil Delight) to ink up center of stamp.
    • Use Coastal Cabana to ink up left side of stamp.
    • Use Flirty Flamingo to ink up right side of stamp.
    • Press 5 1/4″ h x 4″ w Basic White layer on top of stamp and burnish well to ink the layer.
  4. DIe-Cut a circel from the Layering Circle Dies from Basic White Cardstock scrap
  5. Stamp owl on Basic White Thick scrap in Tuxedo Black ink.
  6. Color owl with Blends: Flirty Flamingo, Daffodil Delight, Bermuda Bay, and Polished Pink.
  7. Fussy cut owl and attach to circle with Stampin’ DImensionals.
  8. Stamp “friend” in Ruzedo Black Ink on scrap and cut into a rectangle shape.
  9. Stamp “Kind” in the upper left corner Tuxedo Black Ink.
  10. Cut 24” Pool Party Ribbon. Wrap it around stamped layer. Adhere layer to card front with Stampin’ Dimensionals.
  11. Adhere circle with owl to card front with Stampin’ Dimensionals.
  12. Adhere “friend” to bottom right corner with Multipurpose Liquid Glue.
  13. Sprinkle on the iridescent Rhinestones.
  14. Decorate your envelope.
  15. Adorable! Now send it to someone special.

Shopping List

This project also uses the following products available Jan. 5, 2023: Hand-Drawn Dots Background Stamp (#160508), Kind and Sincere Stamp Set (#160739), Adorable Owls Sale-a-bration Stamp Set (#160629)

Recommended Stamper’s Toolkit ❤


Hand Colored Encouragement Card

Thank you for your interest in this project. Some projects are exclusive to subscribers who will receive passwords by email.

Are you a subscriber? Awesome! Check your email for the password and enter it here to view this project.

Not yet subscribed?  We’d love for you to join us.  Subscribe to my email list and receive news, information and inspiration by email.