Make a Torn Strip Peekaboo Card

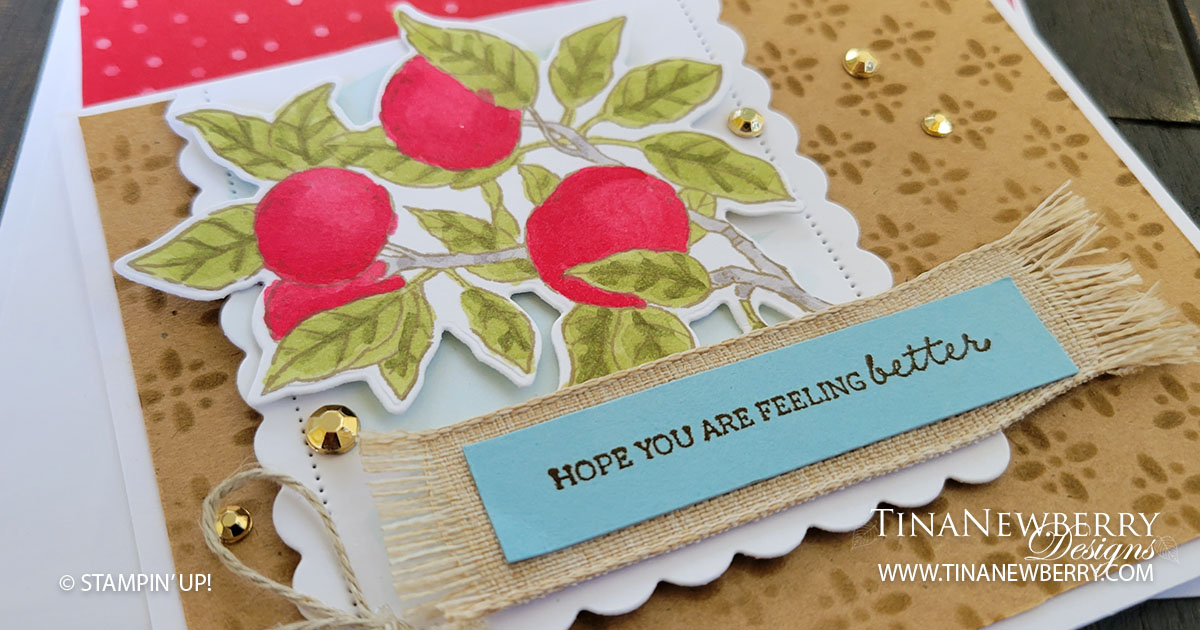
Yvonne Spikmans, of the Stampin’ Up! 2022 Artisan Design Team was one of the many talented designers who inspired me to get the Apple Harvest Bundle with her original design of this card. She’s way more talented than I am, but I sure had fun trying out this torn strip peekaboo card.

Measurements

Full list of supplies needed, listed below. A die cutting machine is needed for this card.
Basic White Thick Cardstock:

  • 5 1/2″ w x 8 1/2″ h folded to 5 1/2″ w x 4 1/4″ h for the Card Base.
  • Scrap for apples and flowers

Basic White Cardstock:

  • 3 1/2″ h x 4 1/2″ w
  • 3/4″ h x 3 1/2″w

So Saffron Cardstock: scraps for center of flowers.

2022-2023 6″ x 6″ Brights Designer Series Paper (DSP):

  • 3 1/2″ h x 5″ w Poppy Parade Pattern 1
  • 3 1/4″ h x 3 1/2″ w Poppy Parade Pattern 2

Let’s Create

  1. Affix all stamps to Acrylic Blocks.
  2. Fold the Card Base in half using a Bone Folder to sharpen the crease.
  3. Protect your work surface and use Tuxedo Black ink to stamp the apples randomly along the edges of the card base front.
  4. Carefully create two small tears about 2″ apart in the short edge of the 3 1/2″ h x 4 1/2″ w Basic White Cardstock. Then slowly work the two tears until they are each about 3″ long. Next flatten the torn flap and carefully roll it back on itself and secure with a Mini Glue Dot.
  5. Use Stampin’ Seal to attach the DSP pattern 2 onto the left edge of DSP pattern 1 with Stampin’ Seal.
  6. Use Stampin’ Dimensionals to attach the torn Basic White panel to the left edge of the DSP layer. Pattern 2 should show through the torn area and Pattern 1 should show on the right edge.
  7. Use Stampin’ Dimensionals to attach the DSP and torn panel to the front of the Card Base.
  8. Stamp sentiment in Poppy Parade ink on the 3/4″ h x 3 1/2″w Basic White Cardstock layer and trim the ends with the Lovely Labels Pick A Punch. Attach to the torn layer with Stampin’ Dimensionals.
  9. Use Tuxedo Black ink to stamp the whole apple on Basic White Thick scrap. Then use Poppy Parade, Granny Apple Green and Light Soft Suede to color the apple. Die cut out and attach to the card with Stampin’ Dimensionals.
  10. Die cut three flowers from Basic White Thick scrap and three flower centers from So Saffron scrap cardstock.
  11. Use dark Petal Pink Stampin’ Blend to color the center of the flowers and then use Multipurpose Liquid Glue to attach the So Saffron flower centers. Attach using Mini Glue Dots.
  12. Tie a bow with Sweet Sorbet twine and attach with a Mini Glue Dot.
  13. Sprinkle on the Solid Faceted Gems
  14. Stamp and decorate the inside.
  15. Decorate your envelope.
  16. Squeal! Now send it to someone special.

Shopping List


Recommended Stamper’s Toolkit ❤


Stenciled Background Friendship Card

Thank you for your interest in this project. Some projects are exclusive to subscribers who will receive passwords by email.

Are you a subscriber? Awesome! Check your email for the password and enter it here to view this project.

Not yet subscribed?  We’d love for you to join us.  Subscribe to my email list and receive news, information and inspiration by email.

Step It Up: Pretty Birds Bundle

They say birds of a feather flock together, and that’s true for this week’s cards we made with the Sending Smiles and Pretty Birds Bundles. Try stepping up your cards this week and if you’re not sure how, don’t be afraid to wing it!

CASUAL
We colored the bird image with Watercolor Pencils, then we created our own Designer Series Paper by stamping out the bird cage image on Basic White Cardstock, taking care to line up the chain of each bird cage with the base of the cage above it.

AVID
We stepped up our second card by adhering Mossy Meadow Cardstock to a Foam Adhesive Sheet, then used that to die cut the word “Sending.” We die cut the “Sending” word shadow in Vellum and adhered it behind the die-cut word and finished the card with some Brushed Metallic Dots.

ARTFULLY AVID
We used the Deckled Rectangles Dies to cut three rectangles from the Texture Chic Designer Series Paper, then we layered them on the card base, offsetting each layer. Next, we die cut the large bird cage three times from Crushed Curry Cardstock and once from Pearlescent Specialty Paper. We adhered all the die cuts together with the specialty paper on top, creating a thick die-cut piece. Finally, we created the “Sending” word shadow by blending Mossy Meadow and Soft Succulent ink on Basic White Thick Cardstock with Blending Brushes then adding a few water drops with a Stampin’ Spritzer.

Shopping List

Make Your Own Subtle Snowflake Background

Jazz up your background with a few snowflake watermarks. I’ll show you how!

This holiday season, treat yourself to the un-brrr-lievably adorable All Bundled Up Stamp Set

Measurements

Full list of supplies needed, listed below. A die cutting machine is needed for this card.

Garden Green Cardstock: 5 ½” h x 8 ½” w scored and folded on the long-side at 4 ¼” for the Card Base

Basic White Thick Cardstock:

  • Scrap for Moose

Basic White Cardstock:

  • 4” h x 5 1/2” w 
  • 4” x 3” scrap 
  • 3/4” h x 3 1/2” w

Sweetest Christmas 12” x 12” Designer Series Paper (DSP)

  • 4 3/4” h x 3 1/2” w

Let’s Create

  1. Affix all stamps to Acrylic Blocks.
  2. Fold the Card Base in half using a Bone Folder to sharpen the crease.
  3. Using Versamark Ink, Stamp the snowflake stamp in a random pattern around the outside edge of the front of the Card Base.
  4. Use Stampin’ Seal to attach the DSP to the front of the Card Base.
  5. Run the 4” x 3” scrap Basic White through the Stampin’ Cut and Emboss machine with the Scalloped Contour Die. 
  6. Wrap Pool Party ⅜ Sheer Ribbon around the bottom of the die cut and tie a bow in the middle. Attach Basic White die cut panel to the front of the card with Stampin’ Dimensionals.
  7. On the Basic White Thick scrap, stamp the Moose, in Tuxedo Black ink.  Use Stampin’ Blends to color in. I used: Soft Suede, Pool Party, and Real Red
  8. Use Paper Snips to fussy cut the Moose out.
  9. Attach the Moose with Stampin’ Dimensionals. 
  10. In garden Green ink stamp the sentiment on the ¾” x 3 ½” Basic White Carstcok piece and attach to the front of the card with Stampin’ Dimensionals at the far edges of the sentiment piece. Arrange so it is overlapping the die cut Basic White panel. 
  11. Sprinkle on some Gilded Gems.
  12. Stamp and decorate the 5 ¼” w x h” w Basic White for the inside and attach with Stampin’ Seal.
  13. Decorate your envelope.
  14. How cute?! Who will you send it to?

Shoping List

Recommended Stamper’s Toolkit ❤