Key to My Heart Alternative #1

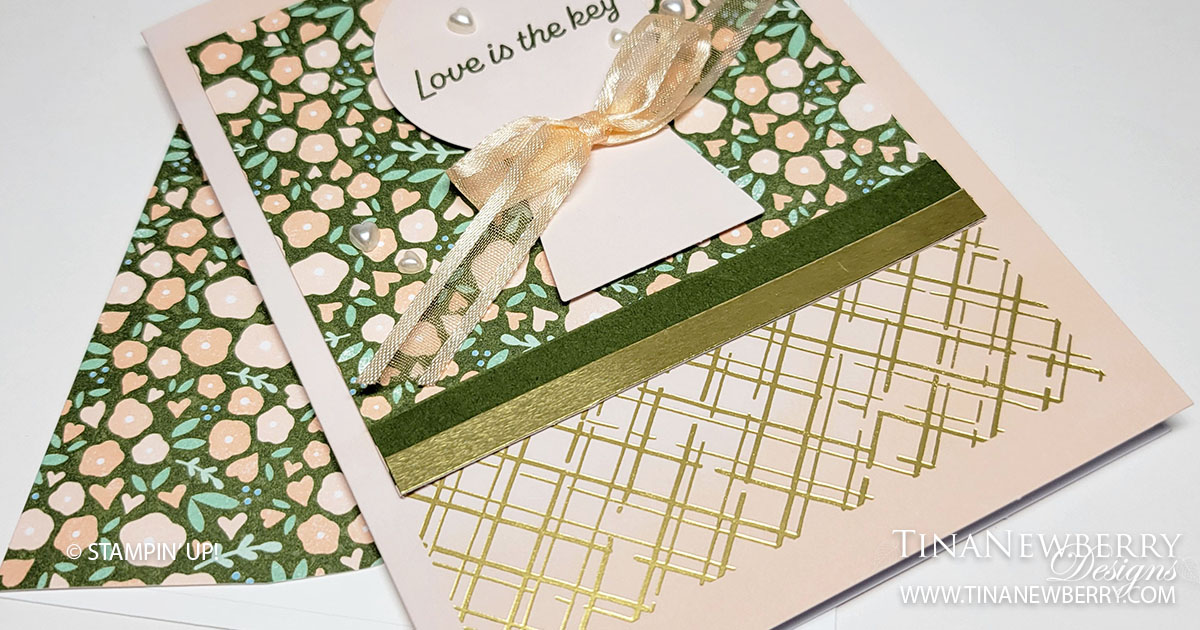
Add a few pieces from your stash to the Key to My Heart Paper Pumpkin Kit and create this simple sweet card for someone you love.

Let love in this season and get just what you need to make crafts filled with sweetness in our all-inclusive kit! • Everything you need to make 9 cards, 3 each of 3 designs, and 9 coordinating envelopes. • A special love-themed photopolymer stamp set! • 1 Fresh Freesia Ink Spot. • Unique padlock and key die cuts that you can mix and match to create something heartfelt!

Measurements

Full list of supplies needed, listed below.
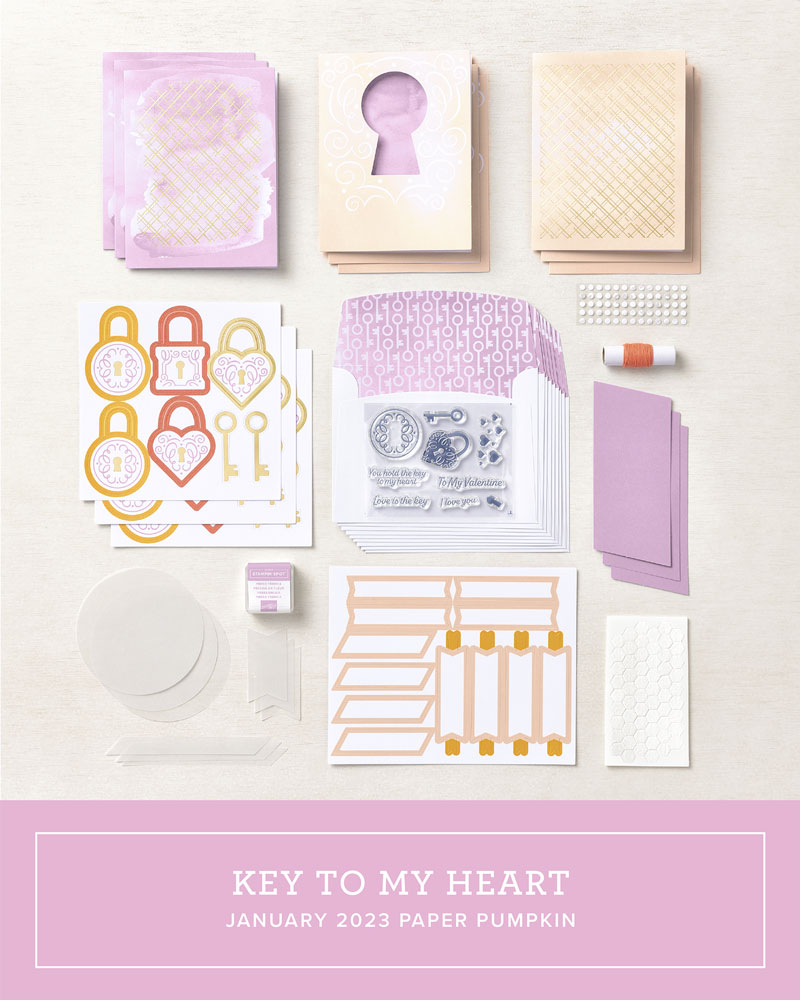
This kit uses components from the Dec. 2021 Key to My Heart Paper Pumpkin Kit.

Country Floral Lane Designer Series Paper (DSP): 3 3/4″ square

Mossy Meadow Cardstock: 1/4″ h x 3 3/4″ w

Gold Foil Sheets: 1/4″ h x 3 3/4″ w

Let’s Create

  1. Affix all stamps to Acrylic Blocks.
  2. Fold the Card Base in half using a Bone Folder to sharpen the crease.
  3. Attach the Country Floral DSP, Mossy Meadow Cardstock and Gold Foil using Stampin’ Seal.
  4. Stamp sentiment on key hole die cut from kit with Mossy Meadow ink.
  5. Wrap Pale Papaya Open Weave ribbon around the die cut and tie a bow. Secure into place with a Mini Glue Dot, if needed.
  6. Attach sentiment with Stampin’ Dimensionals.
  7. Sprinkle on the some heart-shaped pearls.
  8. Stamp and decorate the inside and attach with Stampin’ Seal.
  9. Decorate your envelope.
  10. So sweet! Now send it to someone special.

Shopping List

Recommended Stamper’s Toolkit

Product List
Order online from the convenience of your own home or send me your order and I’ll take care of you. ❤ Either way, please use the host code ANTD9UHS. Order online AND, if your order is $50 or more using host code ANTD9UHS between now and the end of the month you’ll receive a free pack of embellishment as a THANK YOU gift from me. ❤ If your order is over $150, skip the host code, earn Stampin’ Rewards for free stuff yourself and I’ll still send you a free pack of embellishment as a THANK YOU gift from me. ❤

From the North Pole Alternative #2

Thank you for your interest in this project. Some projects are exclusive to subscribers who will receive passwords by email.

Are you a subscriber? Awesome! Check your email for the password and enter it here to view this project.

Not yet subscribed?  We’d love for you to join us.  Subscribe to my email list and receive news, information and inspiration by email.

From the North Pole Alternative #3

Add a stenciled background to your tag on this festive card.

From the North Pole Paper Pumpkin Kit
Put some sparkle into this year’s Christmas giving with your From the North Pole Kit. Make this Christmas the merriest ever with 12 easy-to-make tags to adorn your pretty packages. Check out next month’s Paper Pumpkin Kit with exclusive Cards and Envelope Add-On.

Measurements

Full list of supplies needed, listed below. A die cutting machine is needed for this card.
Real Red Cardstock: 5 1/2″ h x 8 1/2″ w scored and folded at 4 1/4″

Basic White Cardstock:

  • 5 1/4″ h x 4″ w
  • 5″ h x 3 3/4″ w scrap
  • 1 1/2″ h x 2 1/4″ w

2022-2023 Brights Designer Series Paper: 3 1/4″ h x 1″ w

Black & White Designer Series Paper 3 1/4″ h x 1″ w

From The North Pole Kit: Candy Cane tag assembled according to instructions- except I left off the Open Me Tag and swapped Basic Black Baker’s Twine for the Mint Macaron Baker’s Twine

Let’s Create

  1. Affix all stamps to Acrylic Blocks.
  2. Fold the Card Base in half using a Bone Folder to sharpen the crease.
  3. Run the 5″ h x 3 3/4″ w Basic White scrap through the Stampin’ Cut & Emboss machine with the 4 3/4″h x 3 1/2″ w Stitched Rectangle die.
  4. Press an acrylic block onto the Real Red Stamp Pad to lift off some ink. Then using one of the sparkle snowflakes – white side up- for a stencil, apply Real Red ink with a Blending Brush to the die cut Basic White. Press down hard on the snowflake so it doesn’t move (ask me how I know!) to get a crisp stenciled image.
  5. Attach the stenciled die cut white panel to the card base with Stampin’ Seal.
  6. Carefully tear a little bit (like 1/4″) of the Real Red DSP from the right side toward you to achieve a white edge on the right side of the left over piece.
  7. Layer and attach the two pieces of DSP to the back of the assembled Candy Cane tag with Stampin’ Seal.
  8. Attach the tag with Stampin’ Dimensionals.
  9. Stamp the sentiment on the right side of the small Basic White panel in Real Red Ink. Wrap some Black Baker’s Twine around the left edge of the sentiment tag and secure in the back with a Mini Glue Dot. Attach the sentiment with a combination of Stampin’ Seal – where it overlaps the tag and Stampin’ Dimensionals where it overlaps the stenciled layer.
  10. Sprinkle on the Black Matte Dots.
  11. Stamp and decorate the 5 1/4″ h x 4″ w Basic White for the inside and attach with Stampin’ Seal.
  12. Decorate your envelope.
  13. How fun!! Who will you send it to?
Product List

Recommended Stamper’s Toolkit

Product List
Order online from the convenience of your own home or send me your order and I’ll take care of you. ❤ Either way, please use the host code ANTD9UHS. Order online AND, if your order is $50 or more using host code ANTD9UHS between now and the end of the month you’ll receive a free pack of embellishment as a THANK YOU gift from me. ❤ If your order is over $150, skip the host code, earn Stampin’ Rewards for free stuff yourself and I’ll still send you a free pack of embellishment as a THANK YOU gift from me. ❤