Seasonal Branches – Get Well Wishes

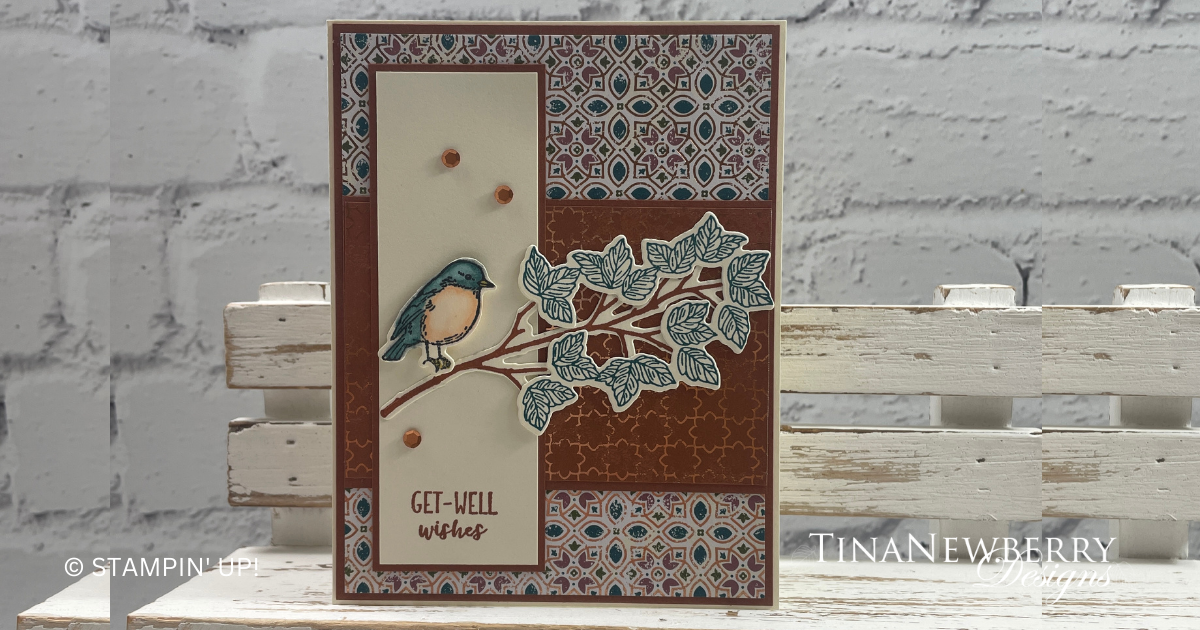
Send sweet get well wishes while showing off your pretty patterned paper with this simple stamping design.

Seasonal Branches Bundle
Create an arbor full of branches replete with leaves, flowers, fruit, and birds in just minutes when you use the Seasonal Branches Bundle. Stamp the images you want, then cut them out using the coordinating dies. It’s the easiest way to get beautiful boughs for your handmade cards and scrapbook pages.

Measurements

Full list of supplies needed, listed below. A die cutting machine is needed for this card.

MEASUREMENTS

Very Vanilla

  • 5 ½” x 8 ½”  scored and folded on the long-side at 4 ¼” 
  • 4 ⅝” x 1 ½”  
  • 4 ¼” x 3”  (for stamping and die cutting bird, branches and leaves)

Copper Clay

  • 4 ⅛” x 5 ⅜”
  • 5 x ⅝”
  • 4” x 2 ½”

All About Autumn Designer Series Paper

  • 5 ¼” x 4” (Pretty Peacock/Copper Clay/Gold Print)
  • 4 x 2 ⅝” (Copper Clay/Gold Print)


Let’s Create

  1. Affix all stamps to Acrylic Blocks.  
  2. Fold the Card Base in half using a Bone Folder to sharpen the crease.
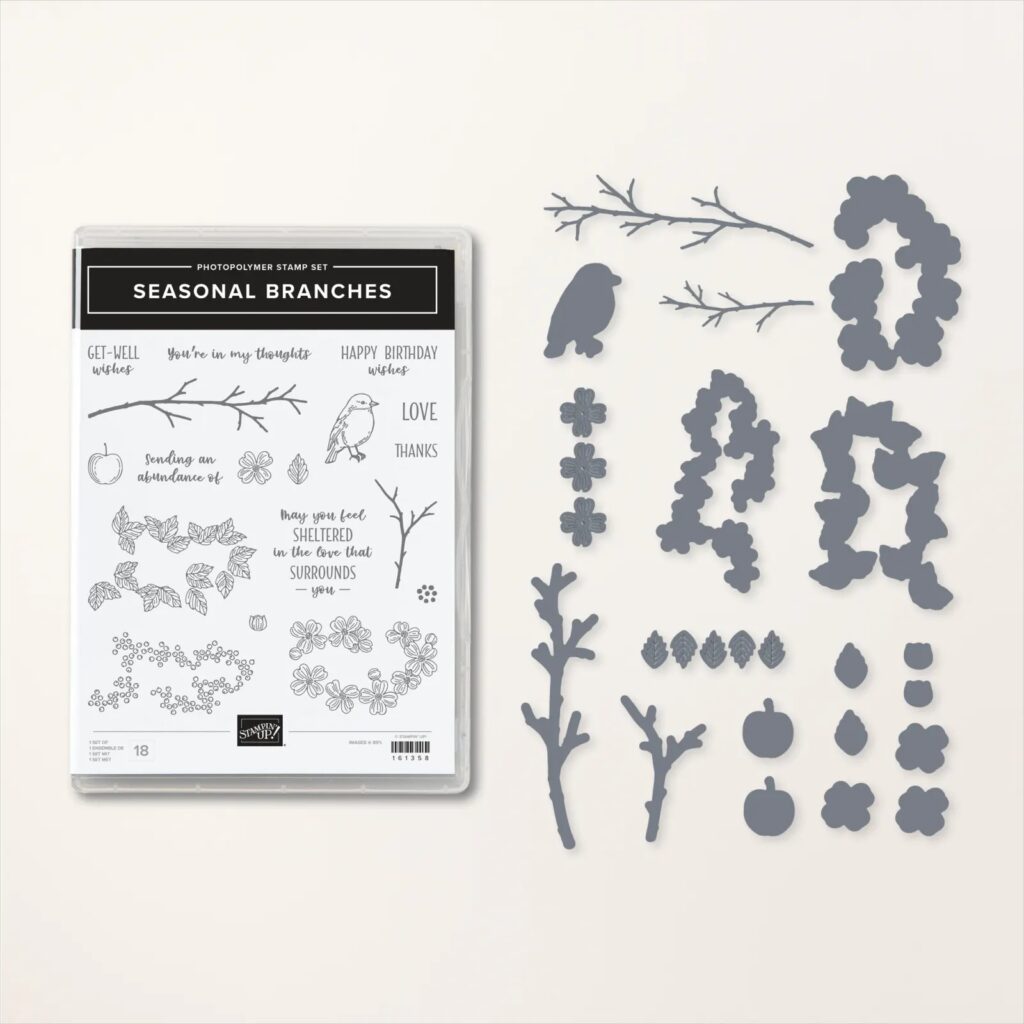
  3. Using the 4 ¼” x 3” Very Vanilla piece of cardstock, stamp the branch with Copper Clay ink pad, the “bunch” of leaves with Pretty Peacock ink pad, and the bird with Black Memento ink pad.  Color the bird using Stampin’ Blends – Pretty Peacock, Petal Pink and Daffodil Delight. Using the coordinating dies from the Seasonal Branches die set, die cut each of these images. 
  4. Using Copper Clay ink, stamp “Get-Well wishes” sentiment to the lower edge of the 4 ⅝” x 1 ½” piece of Very Vanilla cardstock.
  5. CARD ASSEMBLY:  Adhere the stamped 4 ⅝” x 1 ½” Very Vanilla piece of cardstock to the coordinating Copper Clay mat.  Adhere the 5 ¼” x 4” Designer Series Paper to the 5 ⅜” x 4 ⅛” Copper Clay panel, and adhere these layers to the folded card. Adhere the 4” x 2 ½” Copper Clay Designer Series Paper to the Copper Clay coordinating cardstock mat and adhere these layers to the card approximately an inch from the bottom.
  6. Adhere the stamped Very Vanilla layer to its coordinating Copper Clay mat and adhere these layers to the card towards the left side.  Adhere the branch to the card.  Position the leaves lining them up with the branches and tape down.  Using Stampin’ Dimensionals, adhere the bird to the branch. 
  7. Randomly place 3 Neutrals Adhesive Backed sequins to the card.
  8. Be sure to decorate the inside of the card and your envelope before sending a beautiful “Get Well” wish to someone special.

Shopping List

Recommended Stamper’s Toolkit ❤


Autumn Teaches Us That Change Can Be Beautiful

Every year Stampin’ Up! comes out with a pretty leaf bundle and every year I kick myself for not getting it. Not this year! Autumn Leaves is a versatil eDistinktive stamp set and die bundle. I had so much fun creating with this bundle. I suppose it would be nice with spring and summer colors too, but I went all in for hotumn here in FL.

Share the ambience of autumn with your friends and family this season using the Autumn Leaves Bundle. Add die-cut leaves and stamped leaf images to your paper crafting projects, perfect for stunning cards, decorated gift packaging, and elegant gift tags. Just cut out your paper using the detailed leaf-shaped or square-shaped dies to frame the sentiments or the leaf-shaped stamps.

Measurements

Full list of supplies needed, listed below. A die cutting machine is needed for this card.
Early Espresso cardstock: 5 1/2″ w x 8 1/2″ h folded to 5 1/2″ w x 4 1/4″ h
Basic White Cardstock:

  • 3 1/4″ h x 5 1/2″ w
  • 2 1/2″ h x 5 1/2″ w
  • 5 1/4″ h x 4″ w
  • scrap for sentiment

Pecan Pie Cardstock: 3 1/4″ h x 5 1/2″ w

Crushed Curry Cardstock: 3/4″ h x 3″ w

Let’s Create

  1. Affix all stamps to Acrylic Blocks.
  2. Fold the Card Base in half using a Bone Folder to sharpen the crease.
  3. Die cut the Pecan Pie panel with the zig zag border from the Basic Borders pack.
  4. Use a bone folder to smoosh and crinkle the two long edges of the 3 1/4″ h x 5 1/2″ w Basic White Panel.
  5. Stamp the large maple leaf on the 2 1/2″ h x 5 1/2″ w Basic White panel. To get the multi-colored look, stamp in Daffodil Delight ink, then add Pecan Pie to the stamp with a sponge dauber. Flick some Early Espresso ink from the Stampin’ Write marker onto the stamp and then press onto the center of the panel. Repeat until three images are on the panel.
  6. Use Stampin’ Seal+ to attach the stamped Basic White to the Zig Zag Pecan Pie and the Basic White with the smooshed edges. Attach these to the Card Base with Stampin’ Dimensionals.
  7. Run the Crushed Curry panel through the Stampin’ Cut & Emboss machine with the long dots die. Attach with Tear N’ Tape.
  8. Stamp the sentiments on scrap basic white and die cut.
  9. Attach the sentiment to the Crushed Curry panel with Stampin’ Dimensionals.
  10. Create a junk bow using.
  11. Sprinkle on the gems.
  12. Stamp and decorate the inside and attach with Stampin’ Seal.
  13. Decorate your envelope.
  14. Love it! Who will you send it to?

Shopping List

Recommended Stamper’s Toolkit ❤


Watercolor World – Happy Birthday

It’s fun to watercolor with the Watercolor World stamp. Heat emboss the stamp and then watercolor the background. Read on! I’ll show you how.

Watercolor World
It’s never been easier to color your world! Start with the Watercolor World Stamp and add the colors of your choice. The relaxed watercolor style lends itself beautifully to a variety of coloring techniques. Try inking the stamp in multiple colors using Classic Stampin’ Ink and Sponge Daubers or Stampin’ Write Markers. This large stamp covers the front of a standard-size card—all you need to do is stamp once and you have a card! If you want to do more, choose a favorite sentiment from another stamp set and customize your card for birthdays, thanks, thinking of you—whatever occasion comes up!

Measurements

Full list of supplies needed, listed below. A die cutting machine is needed for this card.
Blackberry Bliss Cardstock: 5 1/2″ w x 8 1/2″ h folded to 5 1/2″ w x 4 1/4″ h

Fluid 100 Watercolor Paper: 5 1/2″ w x 3 3/4″ h

Basic White Cardstock:

  • scrap for sentiment
  • 4″ h x 5 1/4″ w


Let’s Create

  1. Affix all stamps to Acrylic Blocks.
  2. Fold the Card Base in half using a Bone Folder to sharpen the crease.
  3. Stamp the Watercolor World stamp on the the Fluid 100 watercolor paper in Versamark ink. Sprink with white embossing powder and heat set with a heat tool.
  4. Press a spare block onto Bubble Bath ink. Use a Water Painter to add a few drops of water to the ink on the block, dip the Water Painter into the diluted ink and spread color onto the background of the Fluid 100 paper. It’s OK to paint right over the embossed image, just use a tissue or paper towel to lift any ink off the embossed image. Let it dry a bit and then repeat with Berry Burst and Blackberry Bliss ink until you have the desired look. Allow to dry between colors.
  5. Wrap ribbon around the watercolored panel and tie a bow. Secure with a Mini Glue dot, if needed.
  6. Stamp the sentiment in Blackberry Bliss ink, trim to size and attach with a Stampin’ Dimensional.
  7. Sprinkle on the gems.
  8. Stamp and decorate the 4″ h x 5 1/4″ w for inside and attach with Stampin’ Seal.
  9. Decorate your envelope.
  10. So pretty! Now send it to someone special.

Shopping List

Recommended Stamper’s Toolkit ❤


Watercolor World – Thank You

During the Thank You cards for Veterans Cards for Troops drive in August, I made sixteen cards similar to this one! They were so quick and easy to make and so patriotic. I’m loving this Watercolor World background stamp. ❤

Watercolor World
It’s never been easier to color your world! Start with the Watercolor World Stamp and add the colors of your choice. The relaxed watercolor style lends itself beautifully to a variety of coloring techniques. Try inking the stamp in multiple colors using Classic Stampin’ Ink and Sponge Daubers or Stampin’ Write Markers. This large stamp covers the front of a standard-size card—all you need to do is stamp once and you have a card! If you want to do more, choose a favorite sentiment from another stamp set and customize your card for birthdays, thanks, thinking of you—whatever occasion comes up!

Measurements

Full list of supplies needed, listed below. A die cutting machine is needed for this card.
Real Red Cardstock: 8 1/2 h x 5 1/2″ w folded to 4 1/4″ h x 5 1/2″ w

Basic White Cardstock:

  • 4″ h x 5 1/4″ w (2)
  • Scrap for sentiment

Let’s Create

  1. Affix all stamps to Acrylic Blocks.
  2. Fold the card base in half using a Bone Folder to sharpen the crease.
  3. Stamp the Watercolor World in Blueberry Bushel ink one of the 4″ h x 5 1/4″ w Basic White panels Attach to the card base with Stampin’ Seal.
  4. Stamp the sentiment on Basic White scrap and punch with the Lasting Label punch.
  5. Attach a piece of Real Red ribbon to the back with a Mini Glue Dot.
  6. Attach the sentiment and ribbon with Stampin’ Dimensionals.
  7. Sprinkle on the gems.
  8. Stamp and decorate the remaining 4″ h x 5 1/4″ w Basic White panel for the inside and attach with Stampin’ Seal.
  9. Decorate your envelope.
  10. Love it! Now send it to someone special.

Shopping List

Recommended Stamper’s Toolkit ❤