Hope Your Day is Just Right

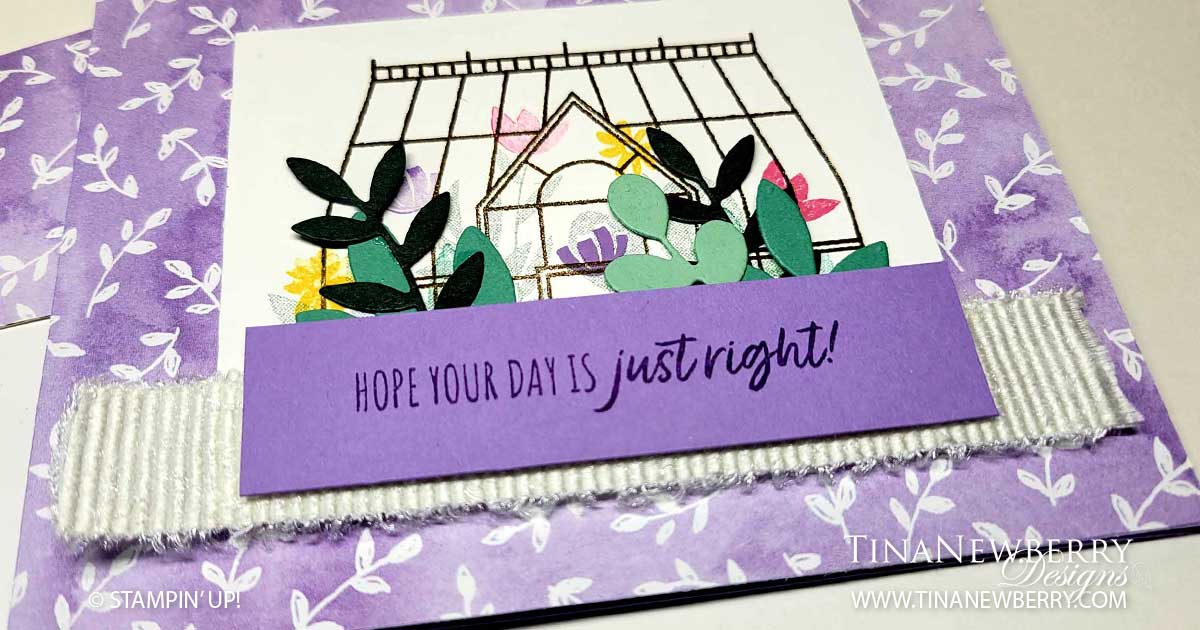
My Dad has a little greenhouse and this Garden Greenhouse so reminded me of him. Although I think he grows mostly vegetables in his, I just had to get this Bundle and make some pretty cards. Using the Stamping-Off technique, you can create the illusion of flowers in the background – as if they were in the back of the greenhouse – and then brighter flowers look closer up.

Measurements

Full list of supplies needed, listed below. A die cutting machine is needed for this card.

Highland Heather Cardstock:

  • 4 ¼” h x 11” w scored and folded at 5 ½” w for Card Base
  • ⅞” h x 3 ½” w for Sentiment

Basic White Cardstock:

  • 3” h x 8” w

Hand-Penned Designer Series Paper (DSP)

  • 4 ¼” h x 5 ½” w

Scraps

  • Evening Evergreen Cardstock
  • Just Jade Cardstock
  • Mint Macaron Cardstock

Let’s Create

  1. Affix all stamps to Acrylic Blocks.
  2. Fold the HIghland Heather Card Base in half using a Bone Folder to sharpen the crease.
  3. Use Stampin’ Seal to attach the Hand Penned DSP to the Card Base.
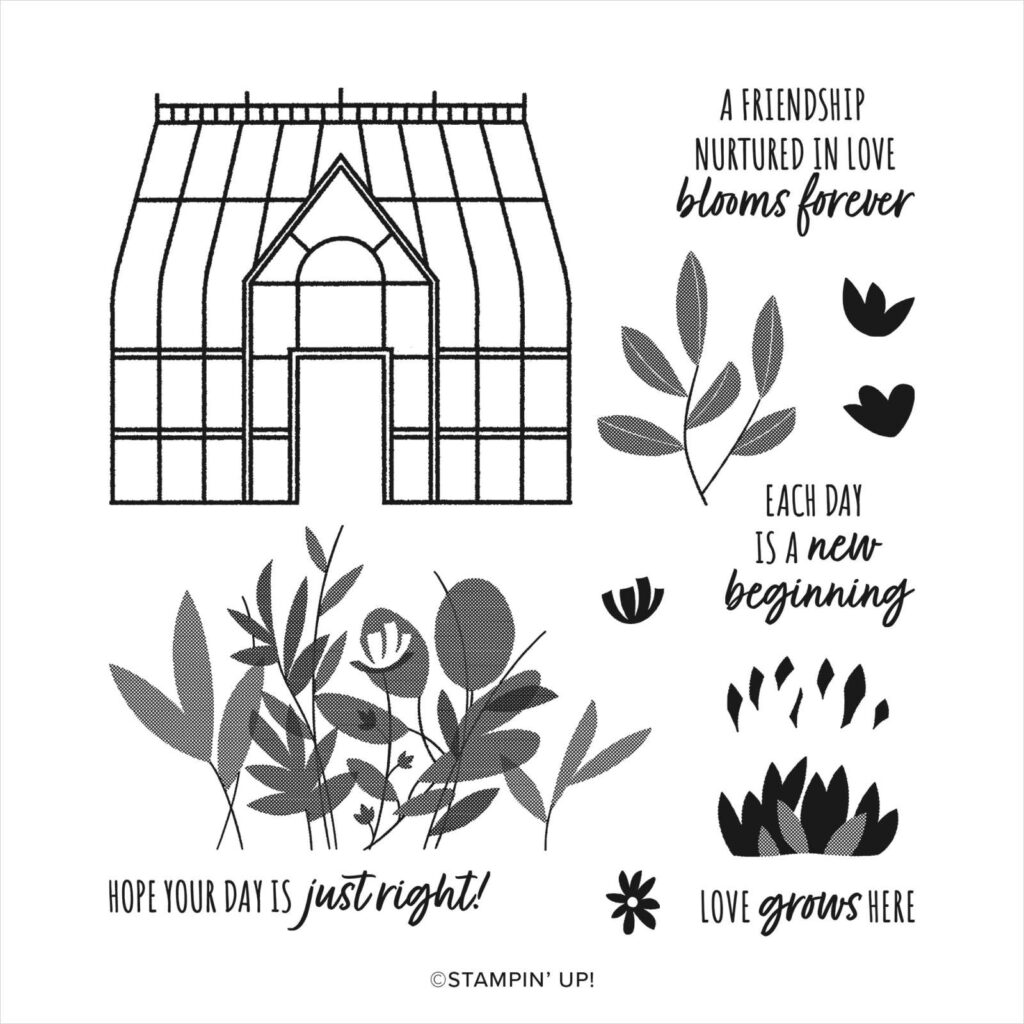
  4. On the Basic White Greenhouse layer, stamp the greenhouse in Soft Suede. Then use the large flower stamp to and stamp of the image in Evening Evergreen ink. Add little flowers in Highland Heather, Polished Pink and Daffodil Delight, some stamped off and some not.
  5. Attach the Greenhouse layer to the Card with Stampin’ Dimensionals.
  6. Die cut various leaves from the Evening Evergreen, Just Jade and Mint Macaron scraps. Arrange the leaves in front of the greenhouse and attach with Mini Glue Dots or Multipurpose Liquid Glue.
  7. Use Tear & Tape or Stampin’ Seal+ to attach a layer of White Frayed Ribbon.
  8. Stamp the sentiment in Gorgeous Grape Ink on the Highland Heather Sentiment Layer and attach with Stampin’ Dimensionals
  9. Stamp and decorate the inside.
  10. Decorate your  envelope.
  11. Love it! Who needs this pretty pick me up? Send it today.

Shopping List

Recommended Stamper’s Toolkit ❤


Happy Belated Birthday

Of course I HAD to make a white on white card with a little Designer Series Paper and trim for POPs of color. These little turtles are SO CUTE! Love! Love! Love!

Measurements

Full list of supplies needed, listed below. A die cutting machine is needed for this card.

Basic White Thick Cardstock:

  • 5 1/2” h x 8 1/2″ w folded to 4 1/4” w for Card Base
  • 3” square scrap for Turtle Punch

Basic White Cardstock:

  • 3/4″ h x 3 1/4″ w for Sentiment
  • 4 1/2″ h x 3 1/4″ w for embossed layer

Hand-Penned Designer Series Paper:

  • 3” square scrap for Turtle Shell

Let’s Create

  1. Affix all stamps to Acrylic Blocks.
  2. Fold the Card Base in half using a Bone Folder to sharpen the crease.
  3. Run the 4 1/2″ h x 3 1/4″ w basic White through the Die Cut & Emboss machine with the Dots embossing folder from the Checks & Dots Embossing Folders pack. 
  4. Wrap two strands of the Misty Moonlight Baker’s Twine from the Flowers For Every Season Trim Combo pack around the Embossed Layer, add a small piece of Fresh Freesia Open Weave Ribbon and tie a knot.  
  5. On 3” square Basic White Thick scrap stamp the Large Turtle with Tuxedo Black Memento Ink. Color head, neck, feet and tail with Old Olive Stampin’ Blends using light on body and dark on toes and use Light Balmy Blue Stampin’ Blend for the eye,  then punch out with the Turtle Punch. 
  6. On 3” square Hand-Penned DSP scrap stamp the Large Turtle with Tuxedo Black Memento Ink. Use Paper Snips to fussy cut the Shell, cutting just inside the line. Attach to Turtle with Multipurpose Liquid Glue so you can wiggle it into position.
  7. Attach to the Embossed Layer with Stampin’ Dimensionals.
  8. Attach Embossed Layer to Card Base with Stampin Dimensionals. 
  9. Stamp the Sentiment in Misty Moonlight ink on the 3/4″ h x 3 1/4″ w Basic White piece and then trim the ends with the Lovely Labels Pick a Punch. Attach with Stampin’ Dimensionals.
  10. Sprinkle on the gems.
  11. Stamp and decorate the 4″ h x 5 1/4″ w Basic White inside and attach with Stampin’ Seal.
  12. Decorate your envelope.
  13. Eek so cute! I might even purposely miss someone’s birthday so I can send this one. LOL. Who will you send it to?

Shopping List

Stamper’s Toolkit

You will also need adhesive, acrylic blocks, scissors and other basic PaperCrafting items from the Stamper’s Toolkit

Hello Little One

Don’t you just LOVE the cute turtles in the Turtle Friends Bundle? They have such happy little faces and this one is perfect for a new baby card. I couldn’t resist going pink and black and the Pattern Party Designer Series Paper pack delivered just the right patterns to keep the black light and airy.

Measurements

Full list of supplies needed, listed below. A die cutting machine is needed for this card.
Polished Pink:

  • 8 1/2″ h x 5 1/2″ w scored and folded at 4 1/4″ h for Card Base
  • 2″ x 2″ scrap for the Sentiment Matte

Pattern Party Designer Series Paper:

  • 3 3/4″ h x 5 1/2″w
  • 2 3/4″ h x 2 3/4″ w die cut with Scalloped Contours Dies and trimmed to 2 1/2″ square

Basic Black Cardstock:

  • min 1/2″ h x 5 1/2″ w (could be up to 3 15/16″ h)

Basic White Cardstock:

  • 4″ h x 5 1/4″ w for the inside
  • 2″ x 2″ scrap for the Sentiment die cut with the 1 5/8″ Smooth Edge Layering Circles Die

Let’s Create

  1. Affix all stamps to Acrylic Blocks.
  2. Fold the Card Base in half using a Bone Folder to sharpen the crease.
  3. Attach the Basic Black Cardstock to the 3 3/4″ h x 5 1/2″ w Pattern Party DSP leaving about 1/8″ showing and attach to the Card Base.
  4. Wrap Open Weave Polished Pink Ribbon around the Card Base and tie a bow slightly off center.
  5. Die Cut the 2″ x 2″ Basic White with the 1 5/8″ Smooth Edge Circle and the 2″ x 2″ Polished Pink with the 1 3/4″ Scalloped Circle Die.
  6. Stamp the Turtle in Tuxedo Black Memento Ink and the Shell and Sentiment in Polished Pink Ink on the Basic White 1 5/8″ Smooth Edge Circle and attach to the 1 3/4″ Polished Pink Scalloped Circle.
  7. Die cut the 2 3/4″ h x 2 3/4″ w Pattern Party DSP and trim to 2 1/2″ square.
  8. Attach the Matted Sentiment to the 2 1/2″ square Pattern Party DSP with Dimensionals and attach the 2 1/2″ square Pattern Party DSP to the Card Base with Dimensionals.
  9. Sprinkle on the gems.
  10. Stamp and decorate the 4″ h x 5 1/4″ w Basic White inside and attach with Stampin’ Seal.
  11. Decorate your envelope.
  12. Adorable! Who is having a baby girl?

Shopping List

Stamper’s Toolkit

You will also need adhesive, acrylic blocks, scissors and other basic PaperCrafting items from the Stamper’s Toolkit

Thank You for Inspiring Me

Recognize this layout? It’s the same card as yesterday, with a whole new look! You can easily swap up the paper and colors for a whole new card.

Measurements

Full list of supplies needed, listed below. A die cutting machine is needed for this card.

Fresh Freesia Cardstock:

  • 8 ½” x 5 ½”, scored at 4 ¼”
  • scrap for die cuts

Basic White:

  • 5 ¼” x 4” (2)
  • scrap for die cuts and label

Heart and Home Designer Sereis Paper:

  • 3 ¾” x 6”, tear at the ~4 “ mark (flowers)
  • 3 ¾” x 2 ½” (woodgrain)

Let’s Create

  1. Affix all stamps to Acrylic Blocks.
  2. Fold the Card Base in half using a Bone Folder to sharpen the crease.
  3. Adhere the woodgrain DSP to the bottom of one of the Basic White panels. Tear the flower DSP around the 4” mark and attach to the top of the Basic White Outside Layer. 
  4. Wrap ribbon around this DSP panel, leaving enough length to tie a bow. Adhere panel to the card front using Stampin Dimensionals.
  5. Die cut Tasteful Label die on Basic White scrap. Stamp sentiment on Tasteful Label die in Basic Gray. Adhere two Matte Dots.
  6. Attach sentiment panel to card front with Stampin’ Dimensionals. Keep the Dimensionals near the center of the sentiment, so you can tuck in your die-cuts later.
  7. Tie a nice bow to the left of the sentiment.
  8. Die cut some sprigs and leaves from Basic White and Fresh Freesie, the tuck them in and adhere around the Sentiment
  9. Stamp and decorate the inside and attach with Stampin’ Seal.
  10. Decorate your envelope.
  11. Beautiful! Now send it to someone special.

Shopping List

Recommended Stamper’s Toolkit ❤