Seasonal Branches – Thanks 1

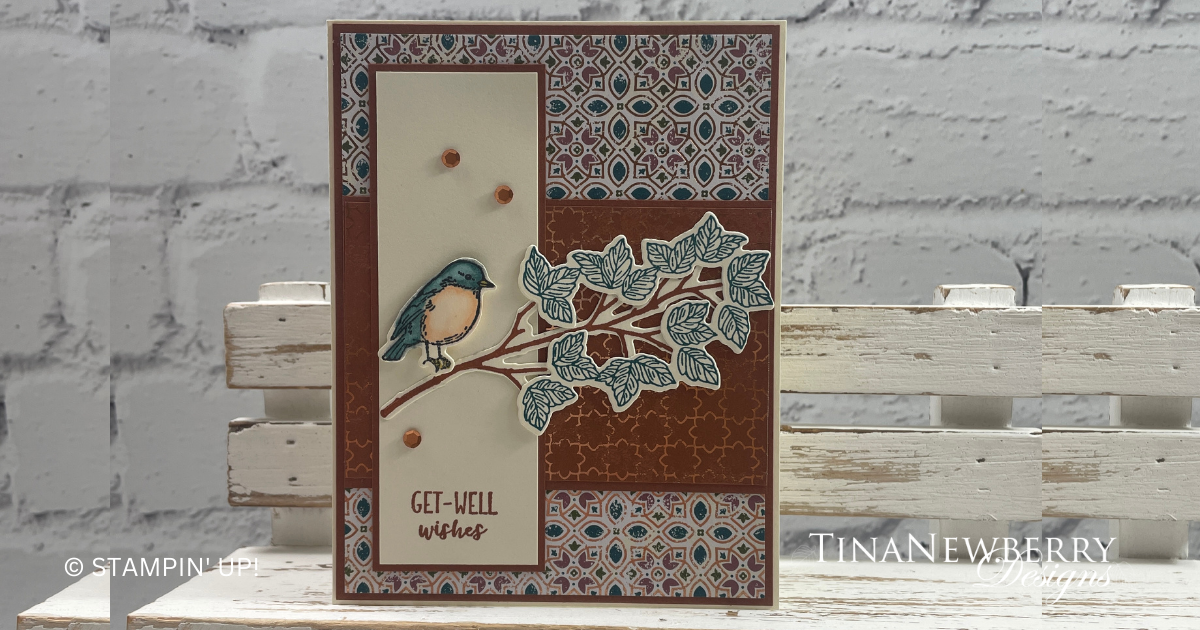
Calypso Coral and Garden Green might just be my new favorite color combo! I’m also loving the new Pecan Pie for this cute bird.

Seasonal Branches Bundle
Create an arbor full of branches replete with leaves, flowers, fruit, and birds in just minutes when you use the Seasonal Branches Bundle. Stamp the images you want, then cut them out using the coordinating dies. It’s the easiest way to get beautiful boughs for your handmade cards and scrapbook pages.

Measurements

Full list of supplies needed, listed below. A die cutting machine is needed for this card.

Basic White

  • 5 ½” x 8 ½”  scored and folded on the long-side at 4 ¼” 
  • 5 ¼” x 4” 
  • 3” x 3” (for die cutting deckled circle)
  • 1 ½” x 1 ½” (scrap for stamping and die cutting bird)

Calypso Coral

  • 5 ⅜” x 4 ⅛”
  • 1 ½” x 1 ½” (for die cutting 3 small flowers)

Garden Green

  • 3” x 3” (for die cutting circle)

Pecan Pie

  • 4” x 1 ½” (for die cutting branch)

Garden Walk Designer Series Paper

  • 3 ¼” x 2 ⅛”  (Floral Print)
  • 2 ¾” x 1 ⅞” (Green Strip)
  • 2 ¾” x 1 ¾” (Calypso Coral print)


Let’s Create

  1. Affix all stamps to Acrylic Blocks.
  2. Fold the Card Base in half using a Bone Folder to sharpen the crease.
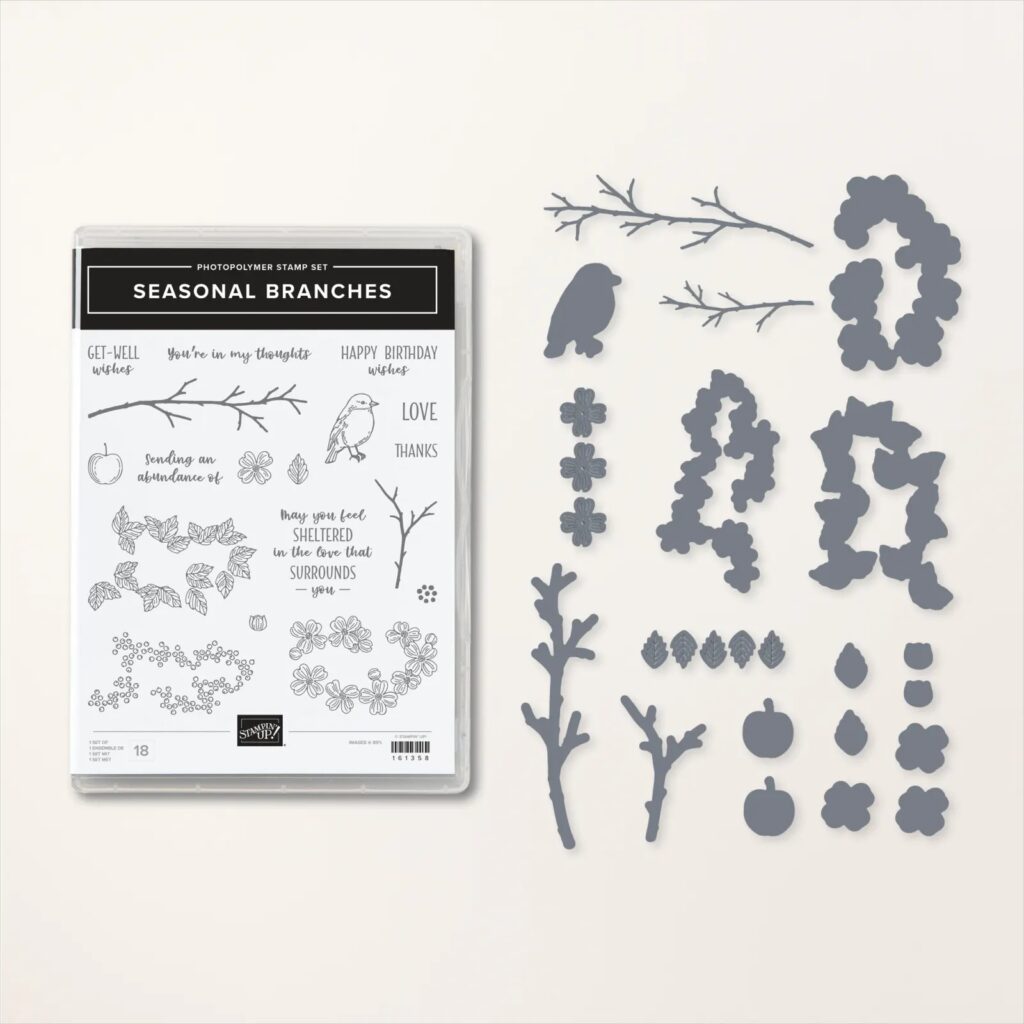
  3. Using Memento Black ink, stamp the bird on the small Basic White scrap.  Color using Stampin’ Blends – Calypso Coral (light & dark), Pecan Pie (light & dark) and Daffodil Delight (dark). Die cut using the bird die from the Seasonal Branches die set.
  4. Using the circle that measures about 2 ⅝” from the stylish shapes die set.  Cut a Garden Green circle.
  5. Using the deckled circle that measures about 2 ½” cut a circle using the 3” x 3” Basic White piece of cardstock.
  6. Using the longer branch from the Seasonal Branches die set and the Pecan Pie scrap of cardstock, cut one branch.
  7. Using the set of 3 flowers from the Seasonal Branches die set and the Calypso Coral scrap of cardstock, cut one set of 3 flowers.
  8. Using a Pecan Pie ink pad, stamp the “THANKS” onto the Basic White die cut deckled circle towards to lower right.
  9. Adhere the Pecan Pie branch to the circle just above the “thanks”.  Adhere the 3 flowers to the circle randomly placing them on the branch.
  10. Adhere the die cut bird towards the left side of the branch using Stampin’ Dimensionals.
  11. Adhere the Calypso Coral panel to the folded card base.
  12. Adhere the Basic White panel to the Calypso Coral.
  13. Place the 3 pieces of Designer Series Papers to the Basic White layer using the photo for placement. 
  14. Using Stampin’ Dimensionals, adhere the layered Circle to the center of the card.
  15. Place an iridescent pearl in the center of each of the Calypso Coral flowers.
  16. Be sure to decorate the inside of the card and your envelope before sending it off to someone special.
  17. Sprinkle on the gems.

Shopping List

Recommended Stamper’s Toolkit

Product List
Order online from the convenience of your own home or send me your order and I’ll take care of you. ❤ Either way, please use the host code ANTD9UHS. Order online AND, if your order is $50 or more using host code ANTD9UHS between now and the end of the month you’ll receive a free pack of embellishment as a THANK YOU gift from me. ❤ If your order is over $150, skip the host code, earn Stampin’ Rewards for free stuff yourself and I’ll still send you a free pack of embellishment as a THANK YOU gift from me. ❤

Seasonal Branches – Get Well Wishes

Send sweet get well wishes while showing off your pretty patterned paper with this simple stamping design.

Seasonal Branches Bundle
Create an arbor full of branches replete with leaves, flowers, fruit, and birds in just minutes when you use the Seasonal Branches Bundle. Stamp the images you want, then cut them out using the coordinating dies. It’s the easiest way to get beautiful boughs for your handmade cards and scrapbook pages.

Measurements

Full list of supplies needed, listed below. A die cutting machine is needed for this card.

MEASUREMENTS

Very Vanilla

  • 5 ½” x 8 ½”  scored and folded on the long-side at 4 ¼” 
  • 4 ⅝” x 1 ½”  
  • 4 ¼” x 3”  (for stamping and die cutting bird, branches and leaves)

Copper Clay

  • 4 ⅛” x 5 ⅜”
  • 5 x ⅝”
  • 4” x 2 ½”

All About Autumn Designer Series Paper

  • 5 ¼” x 4” (Pretty Peacock/Copper Clay/Gold Print)
  • 4 x 2 ⅝” (Copper Clay/Gold Print)


Let’s Create

  1. Affix all stamps to Acrylic Blocks.  
  2. Fold the Card Base in half using a Bone Folder to sharpen the crease.
  3. Using the 4 ¼” x 3” Very Vanilla piece of cardstock, stamp the branch with Copper Clay ink pad, the “bunch” of leaves with Pretty Peacock ink pad, and the bird with Black Memento ink pad.  Color the bird using Stampin’ Blends – Pretty Peacock, Petal Pink and Daffodil Delight. Using the coordinating dies from the Seasonal Branches die set, die cut each of these images. 
  4. Using Copper Clay ink, stamp “Get-Well wishes” sentiment to the lower edge of the 4 ⅝” x 1 ½” piece of Very Vanilla cardstock.
  5. CARD ASSEMBLY:  Adhere the stamped 4 ⅝” x 1 ½” Very Vanilla piece of cardstock to the coordinating Copper Clay mat.  Adhere the 5 ¼” x 4” Designer Series Paper to the 5 ⅜” x 4 ⅛” Copper Clay panel, and adhere these layers to the folded card. Adhere the 4” x 2 ½” Copper Clay Designer Series Paper to the Copper Clay coordinating cardstock mat and adhere these layers to the card approximately an inch from the bottom.
  6. Adhere the stamped Very Vanilla layer to its coordinating Copper Clay mat and adhere these layers to the card towards the left side.  Adhere the branch to the card.  Position the leaves lining them up with the branches and tape down.  Using Stampin’ Dimensionals, adhere the bird to the branch. 
  7. Randomly place 3 Neutrals Adhesive Backed sequins to the card.
  8. Be sure to decorate the inside of the card and your envelope before sending a beautiful “Get Well” wish to someone special.

Shopping List

Recommended Stamper’s Toolkit

Product List
Order online from the convenience of your own home or send me your order and I’ll take care of you. ❤ Either way, please use the host code ANTD9UHS. Order online AND, if your order is $50 or more using host code ANTD9UHS between now and the end of the month you’ll receive a free pack of embellishment as a THANK YOU gift from me. ❤ If your order is over $150, skip the host code, earn Stampin’ Rewards for free stuff yourself and I’ll still send you a free pack of embellishment as a THANK YOU gift from me. ❤

Watercolor World – Thank You

During the Thank You cards for Veterans Cards for Troops drive in August, I made sixteen cards similar to this one! They were so quick and easy to make and so patriotic. I’m loving this Watercolor World background stamp. ❤

Watercolor World
It’s never been easier to color your world! Start with the Watercolor World Stamp and add the colors of your choice. The relaxed watercolor style lends itself beautifully to a variety of coloring techniques. Try inking the stamp in multiple colors using Classic Stampin’ Ink and Sponge Daubers or Stampin’ Write Markers. This large stamp covers the front of a standard-size card—all you need to do is stamp once and you have a card! If you want to do more, choose a favorite sentiment from another stamp set and customize your card for birthdays, thanks, thinking of you—whatever occasion comes up!

Measurements

Full list of supplies needed, listed below. A die cutting machine is needed for this card.
Real Red Cardstock: 8 1/2 h x 5 1/2″ w folded to 4 1/4″ h x 5 1/2″ w

Basic White Cardstock:

  • 4″ h x 5 1/4″ w (2)
  • Scrap for sentiment

Let’s Create

  1. Affix all stamps to Acrylic Blocks.
  2. Fold the card base in half using a Bone Folder to sharpen the crease.
  3. Stamp the Watercolor World in Blueberry Bushel ink one of the 4″ h x 5 1/4″ w Basic White panels Attach to the card base with Stampin’ Seal.
  4. Stamp the sentiment on Basic White scrap and punch with the Lasting Label punch.
  5. Attach a piece of Real Red ribbon to the back with a Mini Glue Dot.
  6. Attach the sentiment and ribbon with Stampin’ Dimensionals.
  7. Sprinkle on the gems.
  8. Stamp and decorate the remaining 4″ h x 5 1/4″ w Basic White panel for the inside and attach with Stampin’ Seal.
  9. Decorate your envelope.
  10. Love it! Now send it to someone special.

Shopping List

Recommended Stamper’s Toolkit

Product List
Order online from the convenience of your own home or send me your order and I’ll take care of you. ❤ Either way, please use the host code ANTD9UHS. Order online AND, if your order is $50 or more using host code ANTD9UHS between now and the end of the month you’ll receive a free pack of embellishment as a THANK YOU gift from me. ❤ If your order is over $150, skip the host code, earn Stampin’ Rewards for free stuff yourself and I’ll still send you a free pack of embellishment as a THANK YOU gift from me. ❤

Carousel Happy Birthday

When I saw the Carousel Horses bundle, I knew I had to make some cards for Mum. She loves carousel horses so much she even once wrote a paper on their history. She has an antique real wooden carousel in their house. Did you know the wooden carved carousel horses were built with removeable ears? Yup. The ears were prone to breaking when transported, so they built them to be removed. Neato.

The Carousel Horses Bundle comes with Two-Step Stampin’ pieces, which means you can customize your carousel and horses however you want by mixing and matching manes, flowers, and saddles. The dies will cut out each of these pieces perfectly so you can add layers and depth to your crafts. It includes greetings for birthdays and celebratory sentiments for all your friends and family. This magical set is perfect for coloring and paper piecing techniques on projects for all your horse-loving friends!

Measurements

Full list of supplies needed, listed below. A die cutting machine is needed for this card.

Basic White Thick Cardstock: 

  • 5 1/2″ h x 8 1/2″ w folded to 5 1/2″ h x 4 1/4″ w
  • Scrap for carousel horse

Basic White Cardstock: 

  • 5 1/4″ h x 4″ w (2)
  • Scrap for sentiment banner

More Dazzle Specialty: scrap for stand


Let’s Create

  1. Affix all stamps to Acrylic Blocks.
  2. Fold the Card Base in half using a Bone Folder to sharpen the crease.
  3. Using a Blending Brush, lay down a bit of Bubble Bath ink in the center of one of the the  5 ¼” w x 4” h Basic White panels then run through the Stampin’ Cut & Emboss machine with the Merry Melody Embossing Folder.
  4. Stamp the large Carousel Horse in Crumb Cake ink on Basic White Thick Cardstock scap. Use Ivory, Balmy Blue, Melon Mambo, and Flirty Flamingo Stampin’ Blends to color the Carousel Horse. Die Cut.
  5. Die cut the Pole and Stand in the More Dazzle Specialty Paper. 
  6. Assemble the Pole, Stand, and Carousel Horse and attach with Stampin’ Dimensionals.
  7. Stamp the sentiment in Melon Mambo ink on scrap Basic White and then die cut with the banner die. 
  8. Attach the sentiment with Stampin’ Dimensionals and Stampin’ Seal.
  9. Double over and tie a knot into the top of a 8” piece of Azure Afternoon and attach to the top of the pole with a Mini Glue Dot.
  10. Sprinkle on some Opaque Ovals
  11. Stamp and decorate the remaining 5 ¼” w x 4” h for inside
  12.  Decorate your envelope.
  13. How fun! Send it today.

Shopping List

Recommended Stamper’s Toolkit

Product List
Order online from the convenience of your own home or send me your order and I’ll take care of you. ❤ Either way, please use the host code ANTD9UHS. Order online AND, if your order is $50 or more using host code ANTD9UHS between now and the end of the month you’ll receive a free pack of embellishment as a THANK YOU gift from me. ❤ If your order is over $150, skip the host code, earn Stampin’ Rewards for free stuff yourself and I’ll still send you a free pack of embellishment as a THANK YOU gift from me. ❤

Enjoy the Ride Carousel Horse Greeting Card

Some of the most beautiful carousels are shiny with gold. I was inspired to recreate the look and mimicked these ornaments from Mum’s tree.

The Carousel Horses Bundle comes with Two-Step Stampin’ pieces, which means you can customize your carousel and horses however you want by mixing and matching manes, flowers, and saddles. The dies will cut out each of these pieces perfectly so you can add layers and depth to your crafts. It includes greetings for birthdays and celebratory sentiments for all your friends and family. This magical set is perfect for coloring and paper piecing techniques on projects for all your horse-loving friends!

Measurements

Full list of supplies needed, listed below. A die cutting machine is needed for this card.

Basic White Thick Cardstock: 5 ½” h x 8 ½” w scored and folded at 4 ¼” w

Basic White Cardstock:

  • 5 ½” h x 4 ¼” w
  • Scrap for Carousel Horses and sentiment

Blueberry Cardstock:4 ¾” h x 3 ½” w

Vellum Basics: 4 ¾” h x 3 ½” w

Glorious Gingham Designer Series Paper (DSP): 5 ½” h x 4 ¼” w

Gold Foil Sheets: scrap for Carousel

Let’s Create

  1. Affix all stamps to Acrylic Blocks.
  2. Fold the Card Base in half using a Bone Folder to sharpen the crease.
  3. Attach the Glorious Gingham to the Card Base with Stampin’ Seal.
  4. Offset the Blueberry Bushel Cardstock and Vellum Basics panels. Attach with Stampin’ Seal. Adhesive shows behind vellum, so be careful to position the adhesive behind the Carousel and Carousel Horses.
  5. Die cut the Carousel in Gold Foil. 
  6. Stamp the Carousel Horses on scrap Basic White Cardstock in Versamark and heat emboss in gold. Color with Blueberry Bushel and Real Red Stampin’ Blends.
  7. Stamp the Sentiment on scrap Basic White Cardstock in Versamark and heat emboss in gold. Trim to size.
  8. Assemble the Carousel and Horses. Attach with Stampin’ Dimensionals.
  9. Attach the sentiment with Stampin’ Dimensionals
  10. Tie a double bow from the Sweet Sorbet Baker’s Twine and attach with a Mini Glue Dot.
  11. Sprinkle on Tinsel Gems Four Pack
  12. Stamp and decorate the remaining 5 ¼” w x 4” h for inside
  13. Decorate your envelope.
  14. Cute! Who will you send it to?

Shopping List

Recommended Stamper’s Toolkit

Product List
Order online from the convenience of your own home or send me your order and I’ll take care of you. ❤ Either way, please use the host code ANTD9UHS. Order online AND, if your order is $50 or more using host code ANTD9UHS between now and the end of the month you’ll receive a free pack of embellishment as a THANK YOU gift from me. ❤ If your order is over $150, skip the host code, earn Stampin’ Rewards for free stuff yourself and I’ll still send you a free pack of embellishment as a THANK YOU gift from me. ❤