Art in Bloom Step-by-Step

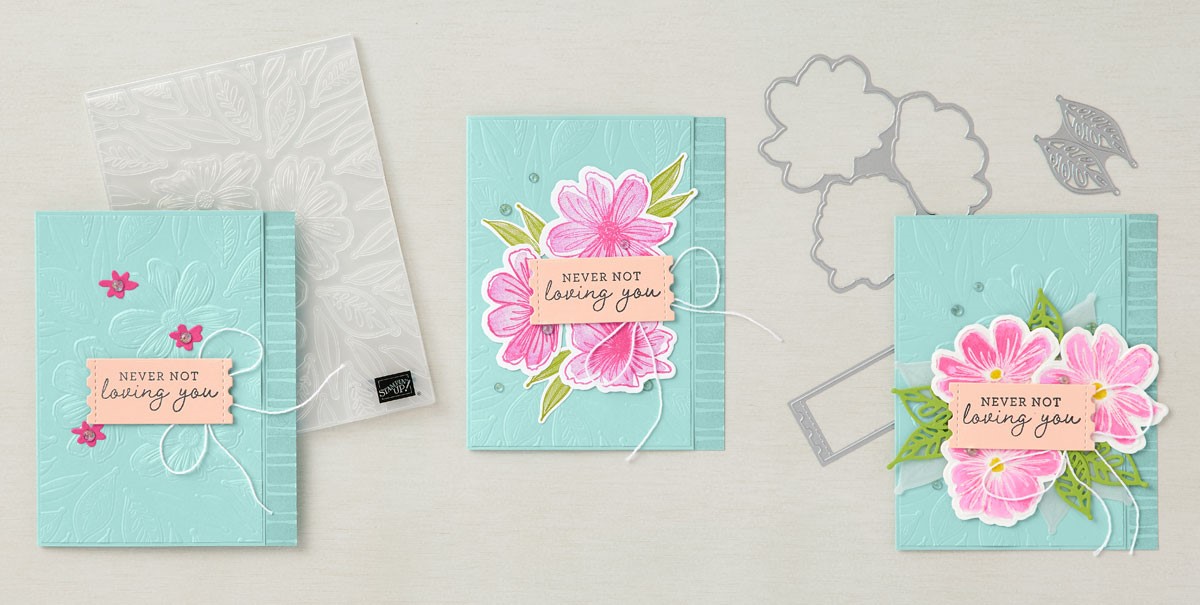
Never Not Loving You Card (4-1/4″ x 5″) featuring the Art in Bloom Bundle.

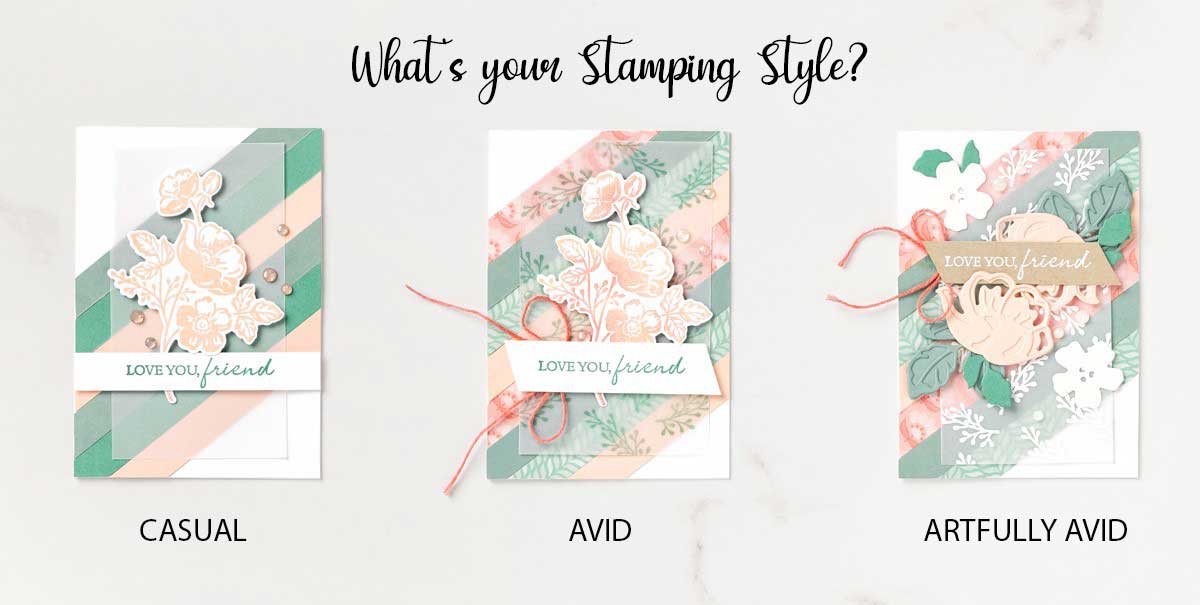
What’s Your Stampin’ Style?


CASUAL
Embossing Folders give you a fast way to add texture and depth to cardstock, and the process is so easy! Simply enclose your paper inside the folder and run it through your Stampin’ Cut & Emboss Machine. Embossing is relatively inexpensive and adds an extra element of tactile interest to your cards for extra enjoyment!

This Bloom Hybrid Embossing Folder has a hybrid design that combines two steps into one, and we think you’re going to love it. The coordinating dies fit inside the embossing folder so it can cut and emboss at the same time! Ta da! See them in action here!

To create our casual Art in Bloom Card, emboss a piece of Pool Party Cardstock using the Bloom Hybrid Embossing Folder—this time without the dies. Let the embossed cardstock be the centerpiece of this easy-to-make card. Add the label, some die-cut flowers, and a Baker’s Twine bow and you have a card that you can duplicate in multiple colors. Simply switch up the sentiment and use it for almost any occasion!

AVID
We stepped up our second card by adding two-step stamping and die-cutting using both the Hybrid Embossing Folder and the Bloom Dies in the Bloom Hydrib Embossing Folder & Die Bundle. Such a timesaver and the technique is so clean and easy.

The Magenta Madness and Granny Apple Green inks really pop against the Pool Party Cardstock , don’t you think? A light dusting of Genial Gems completes this card and adds just the right amount of bling.

ARTFULLY AVID
Our final card features the emboss resist technique for a painterly look that appears difficult but is in fact quite simple to achieve. Stamp the image in VersaMark ink, add White Stampin’ Emboss Powder, and heat emboss. Then, using a Blending Brush or Sponge Dauber, apply ink to your image, varying the pressure as you go to create variations in color depth. That’s it! We also added a sunshine-y floral center using Daffodil Delight Stampin’ Blends, then finished with ethereal-looking vellum leaves. Gorgeous!

Counting Sheep Step-by-Step

Q: What do you get when you cross a sheep with a porcupine?
A: A sheep that can knit its own sweaters.

We couldn’t resist sharing a corny sheep joke with you, because in case you haven’t “herd,” Sale-A-Bration is happening now. And . . . are “ewe” ready for this? From now – 30 September 2021, you can earn fabulous, FREE Sale-A-Bration products with a qualifying purchase—like the Counting Sheep Stamp Set and coordinating Sheep Dies.

Sheep Dies FREE with a $50 Purchase

CASUAL

Fühl dich geknuddelt Card (4-1/4″ x 5 1/2″) (10.5 x 14.9 cm)
For our casual project, we used just a few products to create a fun, simple card that anyone can make. Stamp and die-cut the sheep, add a little color with Smoky Slate Stampin’ Blends, create a dimensional background with 1″ x 3″ (2.5 x 7.6 cm) strips of Basic Gray Cardstock, then dapple the “sky” with Cute Stars Adhesive-Backed Sequins. Baa-adorable.

AVID

Tu es supeeerbe Card (4-1/4″ x 5 1/2″) (10.5 x 14.9 cm)
We fancied up the Avid card by embossing the Basic Gray Cardstock Strips with the Painted Texture 3D Embossing Folder. Our special trick? Add a little White Craft ink to the folder to leave cloudy impressions on the embossed paper.

ARTFULLY AVID

You’re Amazing Card (4-1/4″ x 5 1/2″) (10.5 x 14.9 cm)
For our final card we used Blending Brushes to add Basic Gray and Tuxedo Black Memento ink to a piece of Smoky Slate Cardstock. Once the inks were blended, we spritzed the cardstock with water, then splattered it with White Craft ink before cutting the paper into 1″ x 3″ (2.5 x 7.6 cm) strips. This time we used the inked embossing folder technique on the card base, giving it a marbled look that contrasts nicely with the darker cardstock strips beneath.
Do you have any fun projects you’ve made with Stampin’ Up! embossing folders? Share them with us on social media!

Shopping List

Shaded Summer Step-By-Step

Love You Friend Card (3-1/2″ x 5″) (9 x 12.7 cm)

CASUAL

Create striking yet easy-to-craft cards with our Shaded Summer Stamp Set and coordinating Summer Shadows Dies (found in our Sale-A-Bration brochure!). We adhered contrasting strips of cardstock one at a time, using Stampin’ SEAL on each strip to create a stunning focal point. (Our color combo? We used Just Jade, Petal Pink, and Soft Succulent Cardstock, but choose whichever combination you love best!) Then, simply stamp the floral image and sentiment and layer them over a piece of Vellum Cardstock to create dimensional interest. Artfully arrange a few Elegant Faceted Gems on your card for a glamourous finish . . . and there you have it! Easy elegance in just minutes.

AVID

Here’s a fun technique to add to your crafting repertoire! Did you know that you can customize the color of your baker’s twine by soaking it in a little rubbing alcohol with your choice of Classic Stampin’ Ink Refill? Or you can simply color the twine using a Stampin’ Blend. Once that’s done, add depth and sophistication to your avid card by applying a little Flirty Flamingo ink to the floral image with a Sponge Dauber. We also spiced up the Vellum Cardstock piece by heat setting the Just Jade images using a Heat Tool.

ARTFULLY AVID

Summer Shadows Dies FREE with $100 purchase

For our most posh and detailed project, we added a few delightfully dimensional die-cuts to send this card right over the top. Stamp the floral sprigs in VersaMark ink and White Stampin’ Emboss Powder, then heat set to achieve those final, stunning touches. Gorgeous!

Shopping List

Simple Stamping with Delicate Dahlias

You may want to imagine these dahlia images as dinner plate-sized blooms—because that’s how big some varieties grow in real life. They add instant beauty to any garden landscape with their candy colors, and because these flowers bloom into September in the Northern hemisphere, they can be stamped with abandon to create cards in warm autumn tones. 

This month’s “simple stamping” projects were a cinch!

  • You Inspire Me Card: Add a layer of Basic White Cardstock behind the stamped panel for extra dimension and pop. 
  • Du inspirierst mich Card: Stamp the line art flower multiple times to create a fantastic, intricate-looking background pattern.
  • Tu m’inspires Card: Stamp off Pacific Point ink to achieve lighter and darker tones for the Distinktive two-step image.

The simple stamping options are effortlessly blooming—and endless!

If you’re looking for gorgeous florals to add to your stamp collection, the Delicate Dahlias Sale-A-Bration Stamp Set is an excellent choice. And with just a $100 order, you can get this two-step Distinktive stamp set for FREE. Distinktive stamp sets are my FAVE!