May the spirit of the Lord fill your home this Easter and all the rest of your days. As we face new challenges through this pandemic, I’m wishing you a very Happy Easter that is filled with plenty of love and happiness, even as you may be separated from family and friends. Stay safe and healthy. God bless you and your family now and always.
“Praise be to the God and Father of our Lord Jesus Christ! In his great mercy he has given us new birth into a living hope through the resurrection of Jesus Christ from the dead.”
1 Peter 1:3:
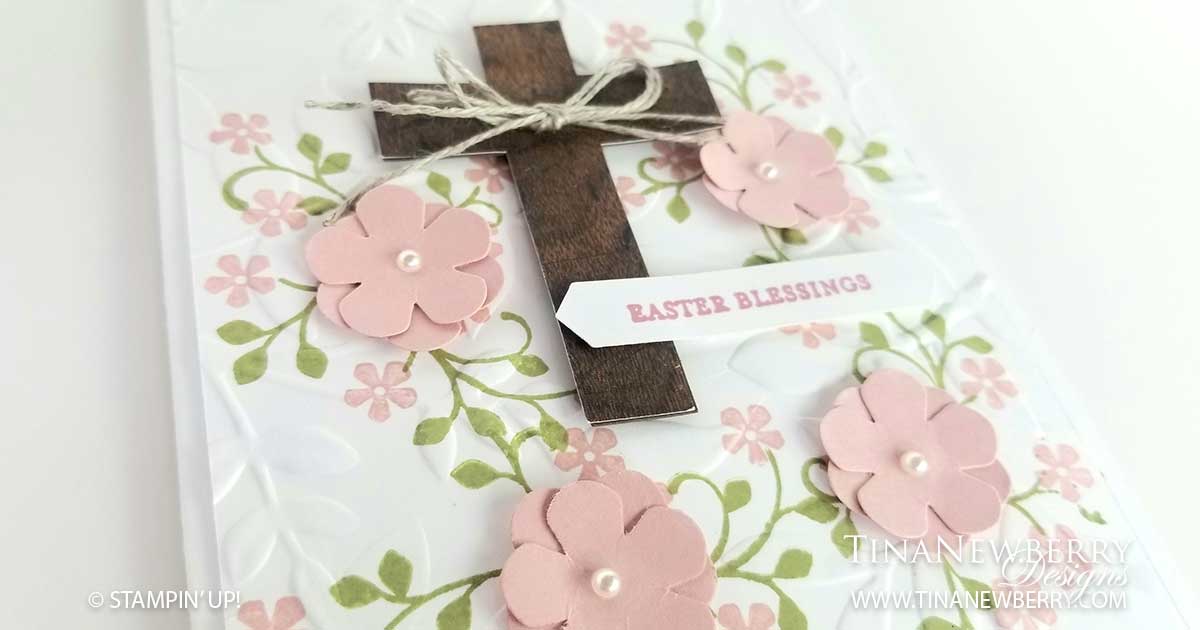
The design for this beautiful Easter Blessings card has been forming in my mind for several weeks. I’ve seen many cards with the sweetest baby chicks, bunnies and lambs and I was tempted to make one of those, but this design kept leaning toward something more serene. Yet when I sat down to make it, I still wasn’t quite sure where it would end up. I’m quite happy with it.
The colors I used are Whisper White, Blushing Bride, Rococo Rose and Pear Pizzaz. I combined these with the retired Wood Textures Designer Series Paper and the Layered Leaves 3D Embossing Folder, with a little Linen Thread and some Basic Pearls to dress it up a bit. My trusty Silhouette die cutting machine provided the crosses, which I cut twice- once with the Wood Textures paper and another one on on some old brown cardstock and then adhered them together for a sturdier cross.
Cutting Dimensions
- Cardbase: Whisper White Thick cardstock 8 1/2″ h x 5 1/2″ w folded to 5 1/2″ h x 4 1/4″ w
- Embossed Layer: Whisper White cardstock 5 1/4″ h x 4″w embossed with the Layered Leaves 3D Embossing Folder
- Cross: 2 1/2″ h x 2″ w cut with scissors or a die cutting machine from a brown or wood paper of your choice.
- Flowers: The Small Bloom punch was used to make the Rococo Rose offset flowers. Two punches for each flower.
Instructions
- Fold the cardbase in half using a bone folder to sharpen the crease.
- Before embossing, use the Thoughtful Blooms (or a flower and leaves stamp set of your choice) to stamp a background on the Embossed Layer rectangle with Pear Pizzaz for the leaves and Blushing Bride for the small flowers.
- Run the Embossed Layer rectangle through your embossing machine using the Layered Leaves 3D Embossing Folder or another folder of your choice.
- Apply Snail Adhesive to the back of the Embossed Layer and adhere to the front of the card base.
- Using the Small Bloom Punch, punch two blooms for each flower out of Rococo Rose cardstock. Hold each individual punched bloom in the cupped palm of your hand and press the center with a rounded tip of a Sharpie. Rotate the Sharpie in a circular motion in the cup of your hand, until the bloom is concave. Adhere two offset blooms with a Glue Dot and use another Glue Dot to adhere the finished bloom to the Embossed Layer. Finish with a Basic Pearl embellishment.
- Adhere two cross layers together with liquid glue. Allow to dry and then affix to the Embossed Layer with Dimensionals.
- Tie two lengths of Linen Thread into a bow, pulling one loop on each side smaller than the other. Adhere to the cross with a squished Glue Dot.
- Affix the Easter Blessings sentiment from the Itty Bitty Greetings Clear-Mount Stamp Set to Clear Acrylic Block D, apply Rococo Rose Ink to the sentiment and stamp image on Whisper White cardstock.
- Punch sentiment out with the Classic Label Punch. Adhere to Embossed folder with Dimensionals. Do not put Dimensionals where the label overlaps the cross.
- Now you are ready to send to a friend!
Products Used


Recommended Stamper’s Tool Kit


