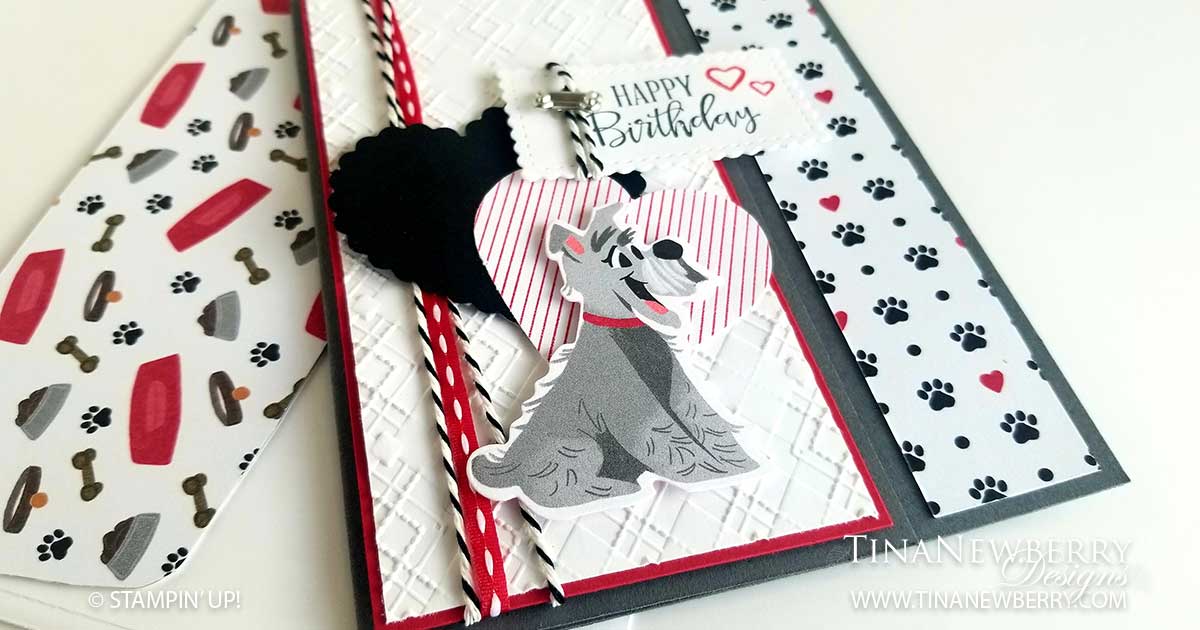
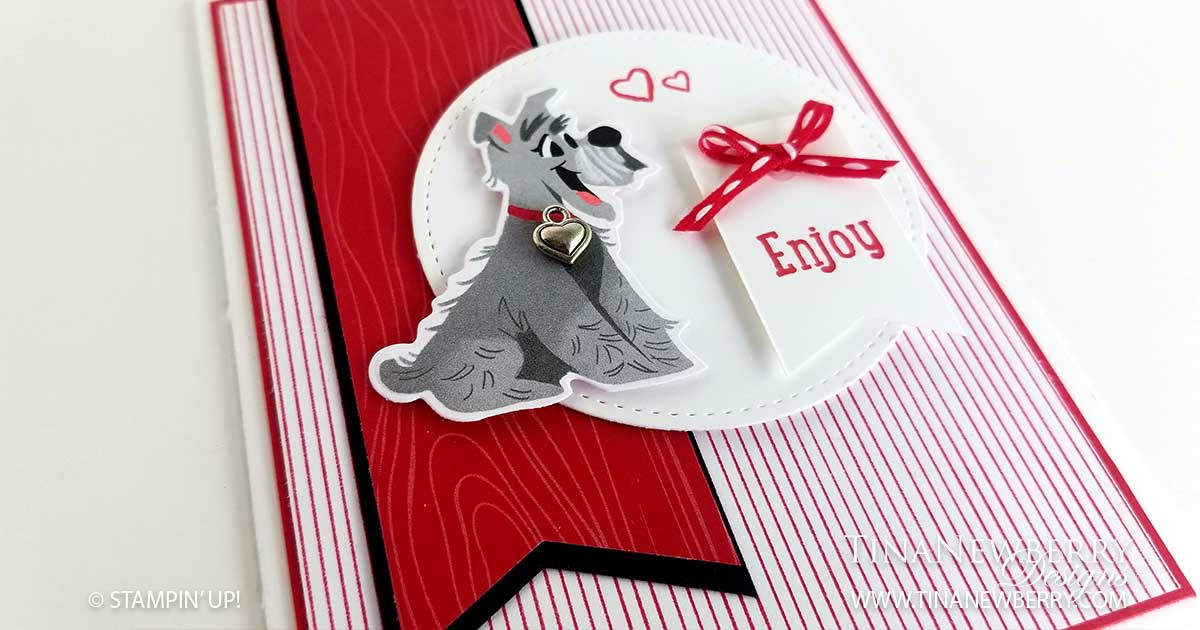
During this pandemic, I have had three friends get puppies and two family members adopt rescue pets. Today we are welcoming Petey, my cousins’ new rescue pup. Petey found them while they were on a get-away in another state. He continued to hang around their place, so they decided it was meant to be! Einstein and I went to the local pet store and had a fun time picking out treats and toys to send a Welcome to the Family care package to Petey. And well of course Petey needs a card! Playful Pets Suite was perfect for Petey’s card.
Full list of supplies needed, listed below. A die cutting machine is used for this card. Card Base: Whisper White Thick Cardstock 8 1/2 h” x 5 1/2″ w folded to 5 1/2″ h x 4 1/4″ w. Background Matte: Real Red Cardstock 5 1/4″ h x 4″ w Background:Playful Pets DSP 5 1/8″ h x 3 7/8″ w Banner Matte: Basic Black Cardstock 4 5/8″ h x 1 5/8″ w when trimmed to a banner tip Banner: Real Red from Regals DSP 4 1/2″ h x 1 1/2″ w when trimmed to a banner tip Circle: Whisper White Cardstock 3″ Stitched Circle using Stitched Shapes Dies Sentiment Banner: Whisper White Cardstock 1 3/4″ h x 1″ w when trimmed to a banner tip
Techniques for Making Banner Tips
Banner Tips are much easier to make than you might think. The first method requires a pair of scissors. On the edge you want to be a banner tip, find the center. Use the scissors to cut perpendicular to the edge about 1/2″ to 3/4″. Then cut up from each corner to the top of the cut you just made removing a triangular piece from both sides. When you are cutting a Matte for a banner, cut both the Matte and the Banner together to ensure matching banner tips. For the second method, use the Truly Tailored Punch. Flip the punch over, insert your Banner and Banner Matte so they slightly pass through the first edge of the punch and squeeze to trim the banner tip.
Affix all stamps to Acrylic Blocks.
Fold the Card Base in half using a Bone Folder to sharpen the crease.
Attach the Background Matte, Background, Banner Matte and Banner using Stampin’ Seal.
Stamp the Hearts onto the Circle with Real Red ink.
Attach the Circle using Stampin’ Dimensionals.
Stamp the Sentiment on the Sentiment Banner with Real Red Ink and attach the Sentiment Banner with Stampin’ Dimensionals.
Make a bow with the red trim and affix with a Mini Glue Dot.
Die cut the dog from the Playful Pets Designer Series Paper and attach with Stampin’ Dimensionals.
Attach a heart trinket to the dogs collar with a Mini Glue Dot.
So cute! Now send it to someone special. Mine is going to my cousins Joyce and Mike’s new pup, Petey.
Order online from the convenience of your own home or send me your order and I’ll take care of you. ❤ Either way, please use the host code ANTD9UHS. Order online AND, if your order is $50 or more using host code ANTD9UHS between now and the end of the month you’ll receive a free pack of embellishment as a THANK YOU gift from me. ❤ If your order is over $150, skip the host code, earn Stampin’ Rewards for free stuff yourself and I’ll still send you a free pack of embellishment as a THANK YOU gift from me. ❤
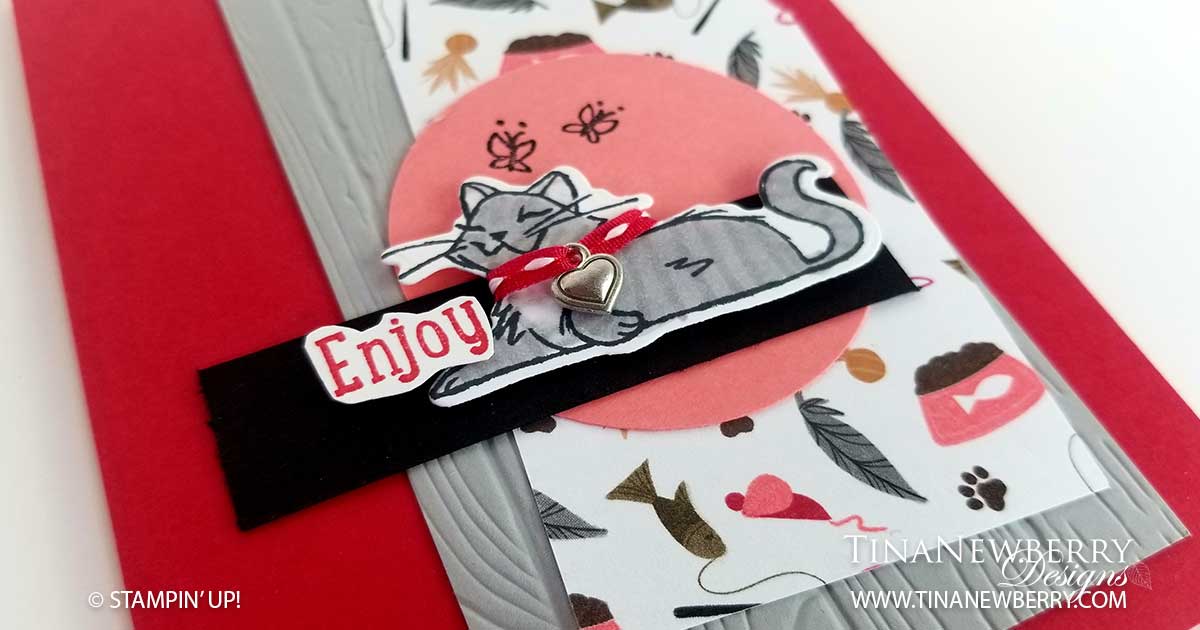
My parents rescued a new kitty, Ashley (Hillary!). We were preparing a Welcome Ashley care package to send to them. The Pampered Pets stamp set and Pets Dies made it easy to pull together this adorable kitty card to include in the package. Just look at the cute little heart on her collar. I made these with the Playful Pets Trim Combo Pack and the Playful Pets Trinkets. One item # makes it easy to buy the whole Playful Pets Suite and I saved 10% by buying the Stamp Set and Die Bundle.
Full list of supplies needed, listed below. A die cutting machine is needed for this card. Card Base: Real Red Cardstock 8 1/2 h” x 5 1/2″ w folded to 5 1/2″ h x 4 1/4″ w. Background:Smoky Slate 4 3/4″ h x 2 3/4″ w run through the Pinewood Planks Embossing Folder Pattern Background: Playful Pets Designer Series Paper 3 7/8″ h x 2 1/4″ w Decorative Circle: Flirty Flamingo Cardstock 2 1/4″ Decorative Strip: Basic Black Cardstock 3/4″ h x 3″ w
Affix all stamps to Acrylic Blocks.
Fold the Card Base in half using a Bone Folder to sharpen the crease.
Use Snail Adhesive to attach the Background, Pattern Background, Decorative Circle, and Decorative Strip.
Stamp the Cat Image in Tuxedo Memento Ink on scrap Whisper White and die cut it out.
Create Cat Collar with Red Trim and Heart Trinket, use Stampin’ Seal to affix to the cat.
Stamp the Sentiment in Real Read ink on scrap Whisper White and use Paper Snip scissors to fussy cut it out.
Order online from the convenience of your own home or send me your order and I’ll take care of you. ❤ Either way, please use the host code ANTD9UHS. Order online AND, if your order is $50 or more using host code ANTD9UHS between now and the end of the month you’ll receive a free pack of embellishment as a THANK YOU gift from me. ❤ If your order is over $150, skip the host code, earn Stampin’ Rewards for free stuff yourself and I’ll still send you a free pack of embellishment as a THANK YOU gift from me. ❤
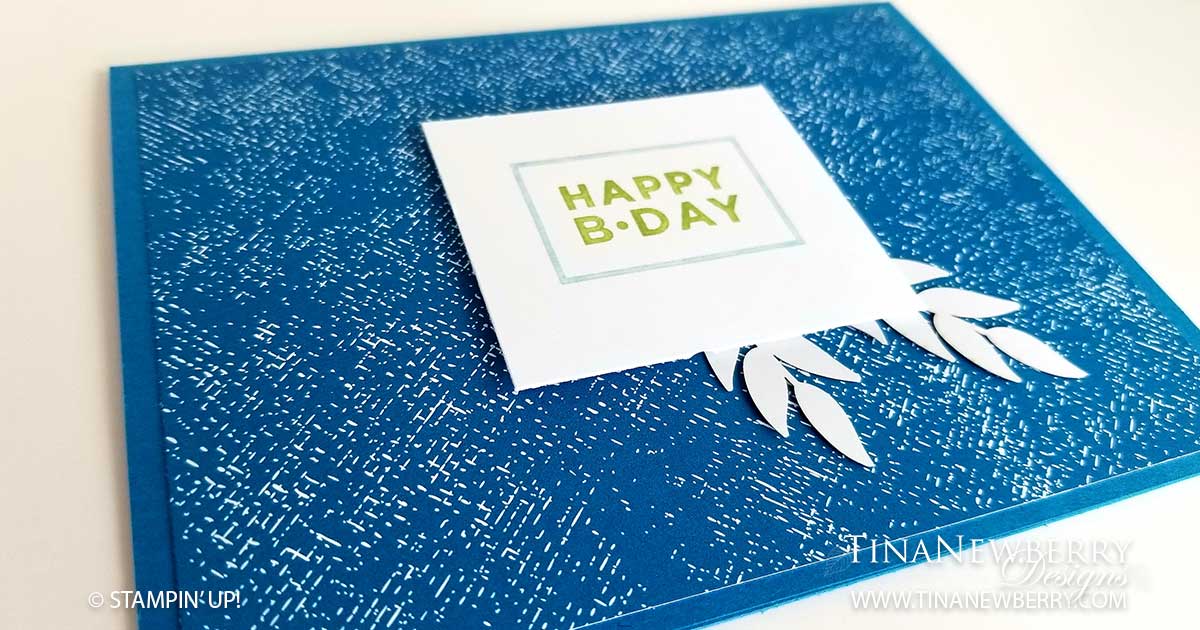
This one’s for the boys! This super simple, cute card took me just 10 minutes to make. I used my resources with the printed paper, some markers and the white side of the Forever Greenery Gold Foil Die Cuts. The Happiest of Birthdays Stamp Set pulled it all together. Now, if only I could stamp straight! LOL.
Full list of supplies needed, listed below. Card Base: Pacific Point Cardstock 8 1/2 h” x 5 1/2″ w folded to 4 1/4″ h x 5 1/2″ w. Background:Brights DSP 4″ h x 5 1/4″ w Sentiment Layer:Whisper White Cardstock 2″ h x 2 1/4″ w
Affix the stamp to an Acrylic Block.
Fold the Card Base in half using a Bone Folder to sharpen the crease.
Attach the Background Layer to the Card Base using Stampin’ Seal.
Use the Stampin’ Write Markers to color the Sentiment. When you are done, huff on the stamp to re-wet it and stamp the Sentiment onto the Sentiment Layer.
Affix the leaves or sprigs of your choice with Multipurpose Liquid Glue or Stampin’ Seal.
Attach the Sentiment Layer to the Card using Dimensionals
Ta Da! Who will you send it to?
Learn the Markering Technique
The products listed in this video are out of date, but the techniques work just as well on current Stampin’ Write Markers.
Order online from the convenience of your own home or send me your order and I’ll take care of you. ❤ Either way, please use the host code ANTD9UHS. Order online AND, if your order is $50 or more using host code ANTD9UHS between now and the end of the month you’ll receive a free pack of embellishment as a THANK YOU gift from me. ❤ If your order is over $150, skip the host code, earn Stampin’ Rewards for free stuff yourself and I’ll still send you a free pack of embellishment as a THANK YOU gift from me. ❤


 Designer Series Paper")


")


 Designer Series Paper")
