Happy Thanksgiving

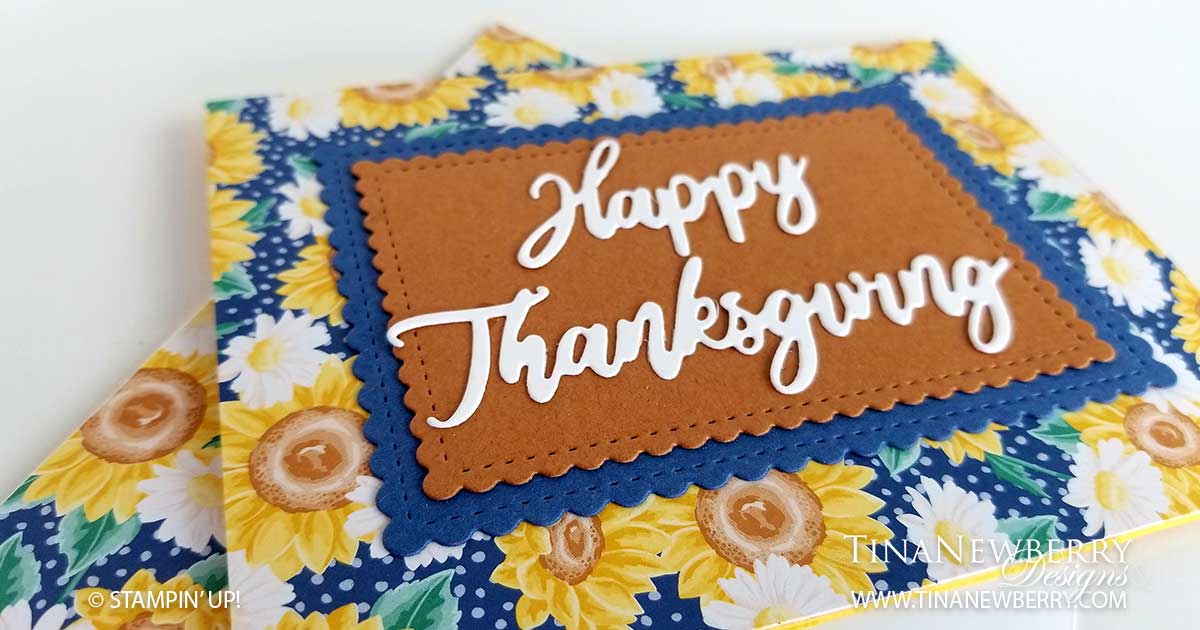
A little patterned paper, some fall colors and Word Wishes Dies are all you need to make this #simplestamping card! Pick some festive fall colors, die cut some words and pretty labels and that’s it for this one. The Word Wishes Dies coordinate with A Wish for Everything stamp set and they’re great as a stand alone, as seen on this card.

Full list of supplies needed, listed below. A die cutting machine is needed for this card.
Card Base: Bumble Bee Cardstock 8 1/2 h” x 5 1/2″ w folded to 4 1/4″ h x 5 1/2″ w.
Background: Flowers for Every Season DSP 4 1/4″ h x 5 1/2″ w.
Sentiment Matte: Misty Moonlight Cardstock 4″ h x 3″ w with the Stitched So Sweetly Die
Sentiment Layer: 
Cinnamon Cider Cardstock 2 1/2″ h x 3 1/2″ w with the Stitched So Sweetly Die
Sentiment: Whisper White Cardstock die cut with the Word Wishes Dies

  1. Affix all stamps to Acrylic Blocks.
  2. Fold the Card Base in half using a Bone Folder to sharpen the crease.
  3. Attach all layers using Stampin’ Seal.
  4. Die cut the Sentiment and attach with Fine Tip Liquid Glue
  5. Decorate the Inside Layer and attach.
  6. Decorate the envelope.
  7. That’s It! Who will you send it to?

Shopping List

Recommended Stamper’s Toolkit

Product List
Order online from the convenience of your own home or send me your order and I’ll take care of you. ❤ Either way, please use the host code ANTD9UHS. Order online AND, if your order is $50 or more using host code ANTD9UHS between now and the end of the month you’ll receive a free pack of embellishment as a THANK YOU gift from me. ❤ If your order is over $150, skip the host code, earn Stampin’ Rewards for free stuff yourself and I’ll still send you a free pack of embellishment as a THANK YOU gift from me. ❤

Happy Halloween

A Wish for Everything stamp set is my fall back for all holidays and special days. With 38 cling stamps, I can easily mix-n-match sentiments to fit any occasion. For this card, I paired A Wish for Everything’s Happy Halloween with a piece of Halloween paper from the Magic in This Night Designer Series Paper pack and the rest of this card is all cardstock!

Full list of supplies needed, listed below. A die cutting machine is needed for this card.
Card Base: Whisper White Thick Cardstock 4 1/4″ h x 11″ w folded to 4 1/4″ h x 5 1/2″ w.
Background: Whisper White Cardstock 4″ h x 5 1/4″ w
Pattern: Magic in This Night DSP 3 3/4″ h x 3″w
Sentiment Matte: Black Glitter Paper 3″ h x 4″ w with the Stitched So Sweetly Dies
Sentiment Layer: 
Whisper White Cardstock 2 1/2″ h x 3 3/4″ w

  1. Affix all stamps to Acrylic Blocks.
  2. Fold the Card Base in half using a Bone Folder to sharpen the crease.
  3. Run the Background through the Stampin’ Cut & Emboss machine with the Scripty Embossing Folder and attached with Stampin’ Seal+.
  4. Attach the Pattern layer with Stampin’ Seal.
  5. Stamp the Sentiment in Pumpkin Pie Ink.
  6. Attach the Sentiment to the Matte with Stampin’ Seal+ or Tear N Tape and attach to the card with Stampin’ Seal.
  7. Cut three ovals. Use a sponge dauber to color outer edge of the top one with Pumpkin Pie ink, then assemble with Stampin’ Seal and Dimensionals for the top one.
  8. Fussy Cut a stem from Old Olive Cardstock and adhere with a glue dot.
  9. Attach Pumpkin to the card with Stampin’ Seal.
  10. Use the Dark Basic Black Stampin’ Blend to color the Linen Thread. Then tie a double layer into a bow and attach with a Mini Glue Dot.
  11. Decorate the envelope.
  12. Boo! Now send it to someone special.

Shopping List

Recommended Stamper’s Toolkit

Product List
Order online from the convenience of your own home or send me your order and I’ll take care of you. ❤ Either way, please use the host code ANTD9UHS. Order online AND, if your order is $50 or more using host code ANTD9UHS between now and the end of the month you’ll receive a free pack of embellishment as a THANK YOU gift from me. ❤ If your order is over $150, skip the host code, earn Stampin’ Rewards for free stuff yourself and I’ll still send you a free pack of embellishment as a THANK YOU gift from me. ❤

Design inspired by Ronda Wade.

Wishes for A Lifetime of Love & Happiness

Thank you for your interest in this project. Some projects are exclusive to subscribers who will receive passwords by email.

Are you a subscriber? Awesome! Check your email for the password and enter it here to view this project.

Not yet subscribed?  We’d love for you to join us.  Subscribe to my email list and receive news, information and inspiration by email.

I Wished and You Came True

I saw a beautiful sunset and wanted to capture the colors on this pretty, quick and easy card. I used sponge brayers to layer on the color and a paper frame to section off the edges before I laid down the color. Then it was just stamp of the flower, a stamp and punch for the sentiment and plain cardstock base. Super fast and easy.

Full list of supplies needed, listed below. A die cutting machine is needed for this card.
Card Base: Highland Heather Cardstock 8 1/2 h” x 5 1/2″ w folded to 5 1/2″ w x 4 1/4″ h.
Background Layer: Whisper White Cardstock 5 1/2″ h x 4 1/4″ w
Sentiment Layer: Whisper White Cardstock with the Everyday Label Punch

  1. Affix all stamps to Acrylic Blocks.
  2. Fold the Card Base in half using a Bone Folder to sharpen the crease.
  3. Cut a frame out of scrap Whisper White Cardstock using the Stitched Rectangle Dies and set it on the Background Layer. I used painters tape to hold it in place.
  4. Use a brayer to lay down the Petal Pink ink first. You want to roll the brayer in a back and forth motion across the short side of the card. Start on the outer edge and work your way down. Once you have the Petal Pink as dark as you wan it, add some Highland Heather in the same manner. For my card, I wanted it to be lightest at the bottom of the card. If I had wanted it to be lightest at a horizon point in the middle of the card, I could have started the Petal Pink from the bottom up and the Highland Heather from the top down, leaved it white or lightest before they met. Remove the frame,
  5. Stamp the Dandelion and Sentiment in Memento Black ink.
  6. Attach the Sentiment with Stampin’ Dimensionals.
  7. Wrap the Background with ribbon and add a bow before attaching with Stampin’ Dimensionals.
  8. Color the Basic Pearls using the Dark Highland Heather Stampin’ Blend pen and attach.
  9. Decorate the Inside Layer and attach.
  10. Decorate the envelope.
  11. How pretty and easy to make! Now send it to someone special.
Shopping List

Recommended Stamper’s Toolkit

Product List
Order online from the convenience of your own home or send me your order and I’ll take care of you. ❤ Either way, please use the host code ANTD9UHS. Order online AND, if your order is $50 or more using host code ANTD9UHS between now and the end of the month you’ll receive a free pack of embellishment as a THANK YOU gift from me. ❤ If your order is over $150, skip the host code, earn Stampin’ Rewards for free stuff yourself and I’ll still send you a free pack of embellishment as a THANK YOU gift from me. ❤

Sending You Well Wishes

Stamping on a subtly textured paper, like this stucco paper from the In Good Taste DSP pack, adds interest to any card without taking away from the beauty of this Dandelion Wishes stamp set. I love the way the artist captured the downy petals blowing in the wind.

Full list of supplies needed, listed below. A die cutting machine is needed for this card.
Card Base: Misty Moonlight Cardstock 4 1/4″ h x 11″ w folded to 4 1/4″ h x 5 1/2″ w.
Background: Misty Moonlight Cardstock 4″ h x 5 1/4″ w
Sentiment Background: Pool Party Cardstock 3 1/3″h x 4 1/8″ w
Sentiment Layer: 
In Good Taste Specialty DSP 3″ h x 4 1/8″ w
Ribbon: 12″ Whisper White Crinkle Ribbon

  1. Affix all stamps to Acrylic Blocks.
  2. Fold the Card Base in half using a Bone Folder to sharpen the crease.
  3. Emboss the Background with the Dandelion Embossing Folder and tie the Ribbon around it.
  4. Stamp the Dandelion and Sentiment on the Sentiment Layer in Misty Moonlight Ink.
  5. Attach the Sentiment Layer to the Sentiment Background with Stampin’ Seal and attach to Background with Stampin’ Dimensionals.
  6. Attach the Background with Stampin’ Dimensionals.
  7. Add Artistry Blooms Sequins.
  8. Decorate the Inside Layer and attach.
  9. Decorate the envelope.
  10. So Sweet! Who will you sent it to?

Product List

Recommended Stamper’s Toolkit

Product List
Order online from the convenience of your own home or send me your order and I’ll take care of you. ❤ Either way, please use the host code ANTD9UHS. Order online AND, if your order is $50 or more using host code ANTD9UHS between now and the end of the month you’ll receive a free pack of embellishment as a THANK YOU gift from me. ❤ If your order is over $150, skip the host code, earn Stampin’ Rewards for free stuff yourself and I’ll still send you a free pack of embellishment as a THANK YOU gift from me. ❤

Design inspired by Ronda Wade.