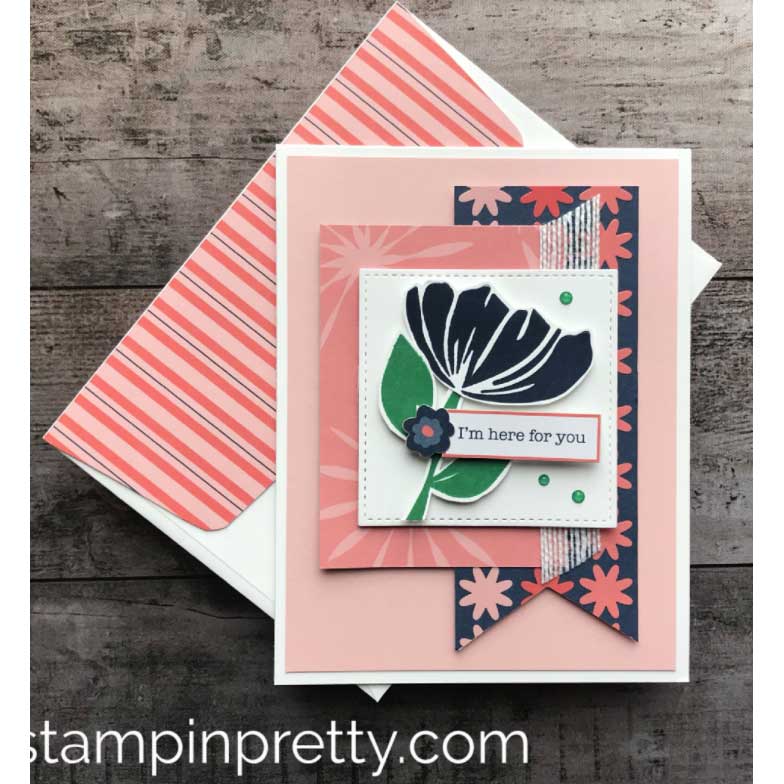
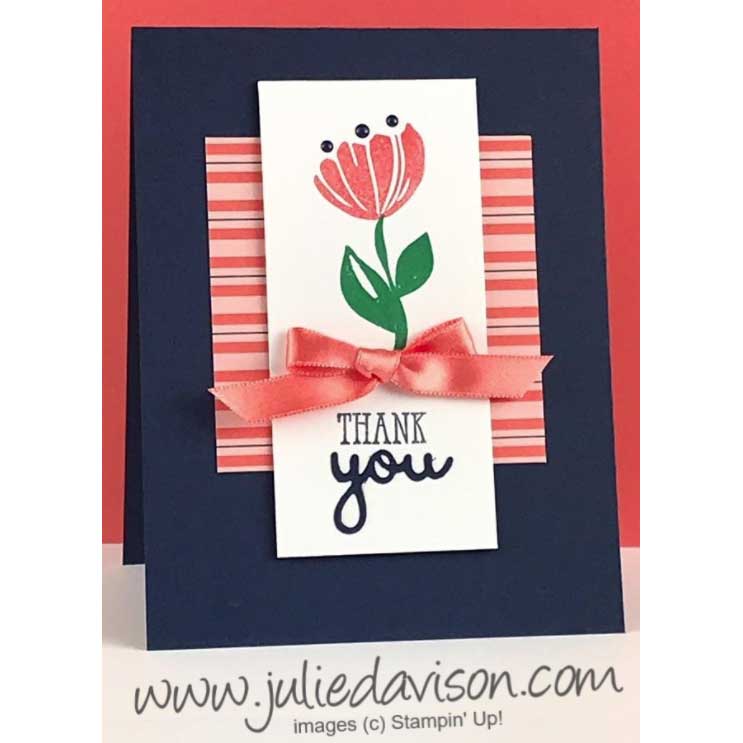
This card makes me SO HAPPY! The colors, the layout. So fun! I can’t wait to send this to a friend. My inspiration for this pretty card came from Mary Fish. She made the super cute card below with the Bloom By Bloom Bundle a few years ago and I couldn’t wait to recreate it.
Full list of supplies needed, listed below. A die cutting machine is needed for this card. Card Base: Basic White Thick Cardstock 5 1/2″ h x 8 1/2″ w folded to 5 1/2″ h x 4 1/4″ w Background: Flirty Flamingo Cardstock 5 1/4″ h x 4″ w Decorative Banner: Sweet Symmetry Designer Series Paper 5″h x 2″ w Decorative Rectangle: Sweet Symmetry Designer Series Paper 3 3/8″h x 1 1/2″ w Flower Background: Basic White Cardstock 2 3/4″h x 2 3/4″ w Flower, Stem and Leaves: Basic White Cardstock scrap Sentiment Layer: Basic White Cardstock 3/4″h x 1 7/8″ w Sentiment Matte: Flirty Flamingo Cardstock 7/8″h x 2 1/8″ w Inside (optional): 5 1/4″ h x 4″ w
Let’s Create
Affix all stamps to Acrylic Blocks.
Fold the Card Base in half using a Bone Folder to sharpen the crease.
Use adhesive of your choice to attach the Decorative Banner.
Use Tear & Tape to attach a 4 1/2″ piece of Just Jade ribbon.
Use Stampin’ Dimensionals to attach the Decorative Rectangle.
On scrap Basic White Cardstock, stamp the flower inn Night of Navy ink and the Stem, the small flower in Flirty Flamingo ink and Leaves in Just Jade ink, then use your Paper Snips to cut the out. Assemble the large Flower, Stem and Leaves on the Flower Background Basic White Cardstock and then use Stampin’ Dimensionals to attach.
Stamp the Sentiment in Night of Navy ink on the Basic White Sentiment Layer. Attach to the Flirty Flamingo Sentiment Matte with Stampin’ Dimensionals.
Add the small Flower using a Dimensional. Add a Metallic Pearl to the center.
Punch out two sprigs inn Just Jade Cardstock from the Symmetrical Stems Border Punch and attach with Mini Glue Dots.
Sprinkle on a Metallic Pearl and some Playing with Patterns Resin Dots.
You’re Done!! That’s GREAT! Who will you send it to?
Sometimes inspiration comes from not only other papercrafters, but other products. When I first saw the In Symmetry Stamp Set, I was reminded of the Bloom by Bloom stamp set we had a few years ago. There were several beautiful cards I had seen from the Bloom by Bloom set that I still wanted to make, like this one from Julie Davison! It’s super simple- only 3 layers- and I love it! I used the Sweet Symmetry Designer Series Paper, a little ink and some Just Jade ribbon and that’s it. So fun.
Measurements
Full list of supplies needed, listed below. A die cutting machine is needed for this card. Card Base: Night of Navy Cardstock 5 1/2″ h x 8 1/2″ w folded to 5 1/2″ h x 4 1/4″ w Background: In Symmetry Designer Series Paper 3″ h x 3 1/2″ w Sentiment Layer: 4 1/4″h x 2 1/4″ w Inside Layer (Optional): Basic White Cardstock 5 1/2″ h x 4 1/4″ w
Let’s Create
Affix all stamps to Acrylic Blocks.
Fold the Card Base in half using a Bone Folder to sharpen the crease.
Stamp the Flower in Bumble Bee Ink, the Stem and Leaves in Just Jade and the Sentiment in Night of Navy, all on the Sentiment Layer.
Attach the Background using the adhesive of your choice.
Attach the Sentiment Layer with Stampin’ Dimensionals.
Tie a Bow from the Just Jade & Gold 3/8″ (1 cm) Ribbon and use a Mini Glue Dot to attach to the Sentiment Layer.
Punch a few sprigs from Just Jade Cardstock and sprinkle those around your card – attaching with Mini Glue Dots.
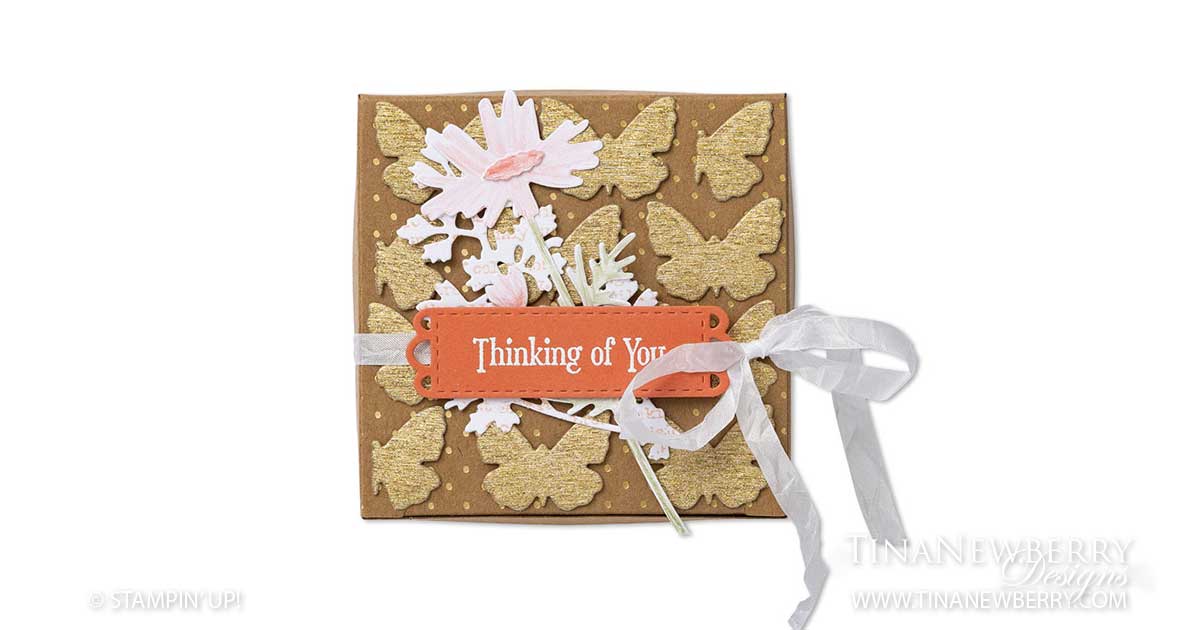
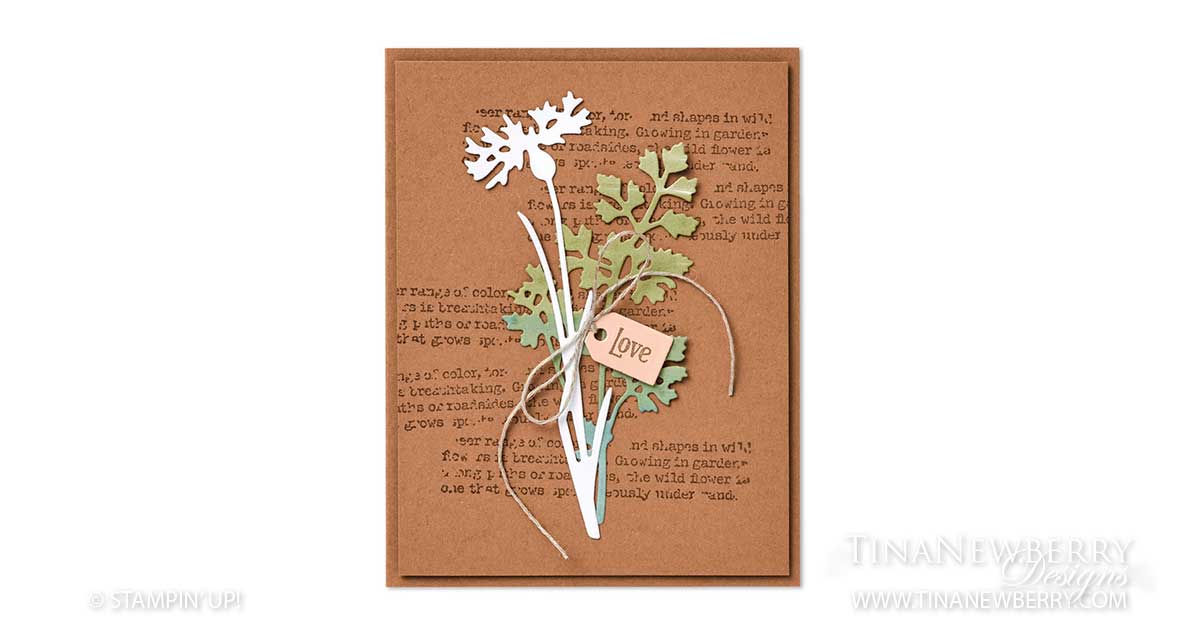
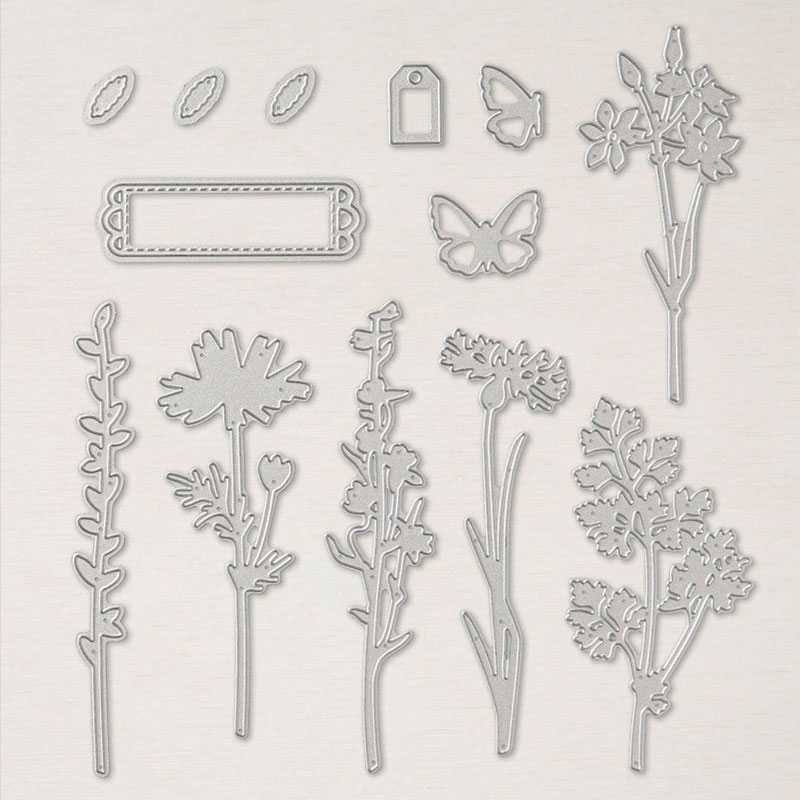
Cinnamon Cider cardstock lends a kraft paper look to this card, and the script stamp with garden related words, on the background gives some interest for this quick and easy #simplestamping card. The die set has 13 beautiful botanical, butterfly and tag dies just perfect for layers and accents.
Quiet Meadow Bundle – Save 10% when you buy the Stamp Set and Dies as a Bundle
Measurements
Full list of supplies needed, listed below. A die cutting machine is needed for this card. Card Base: Cinnamon Cider Cardstock 5 1/2″ h x 8 1/2″ w folded to 5 1/2″ h x 4 1/4″ w Background: Cinnamon Cider Cardstock 5 1/4″ h x 4″ w Dandelion and Leafy Die: Basic White Cardstock scrap 4 3/4″ h x 2 3/4″ w (cut 2) Sentiment Layer: Petal Pink Cardstock trimmed with the Tag Die
Let’s Create
Affix all stamps to Acrylic Blocks.
Fold the Card Base in half using a Bone Folder to sharpen the crease.
Use Cinnamon Cider ink to randomly stamp the script stamp on the Cinnamon Cider Background.
On Dandelion and Leafy Die piece of Basic White Cardstock use the light shade from the Mossy Meadow Stampin’ Blends Combo Pack to color part of the panel. Stop halfway down the panel, then swap your Stampin’ Blends marker for the dark shade from the Soft Succulent Stampin’ Blends Combo Pack. Color the rest of the panel, starting slightly above the center to create an overlap of the two colors.
Use the wide, leafy die from the Meadow Dies to cut the card panel.
Use the adhesive of your choice to attach the die to the Cinnamon Cider Background.
Die cut a Dandelion from Basic White Cardstock and use the adhesive of your choice to attach to the Cinnamon Cider Background.
Stamp the sentiment in Cinnamon Cider ink on the the Petal Pink scrap and die cut with the Tag Die.
Tie a Linen Thread bow to the Love Tag and attach to the Card with a Mini Glue Dot.
")


 Designer Series Paper")
 Braided Ribbon")


")


")


