Memory Keeping: Whimsical Trees

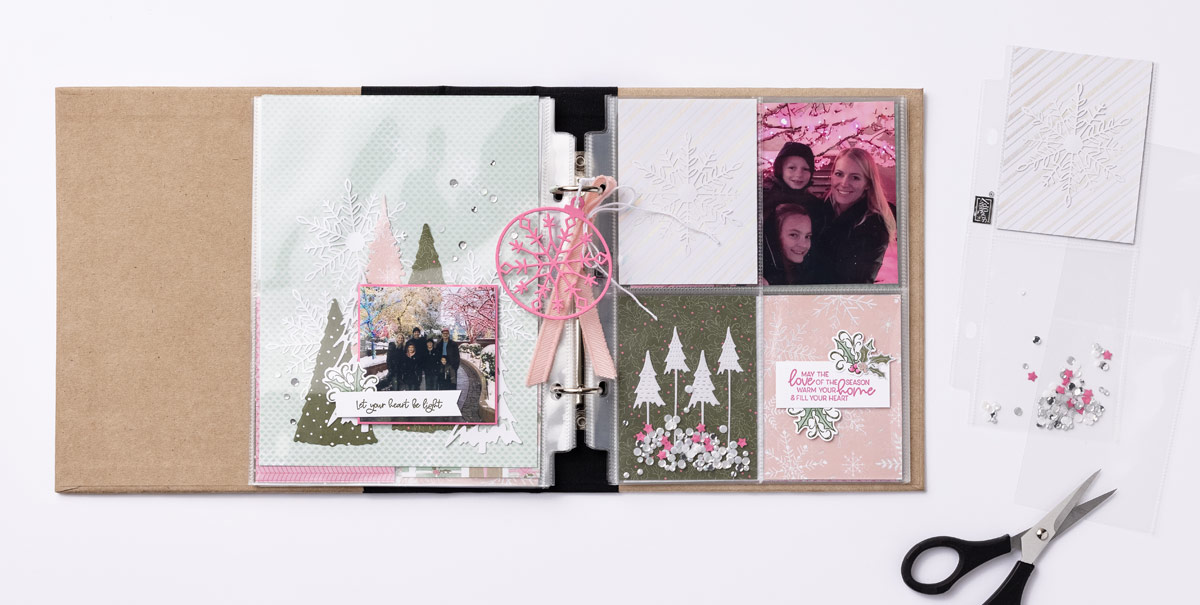
Christmastime memory keeping is a great way to preserve family traditions and keep heartwarming moments with loved ones alive for years to come. That means it’s time to start gathering supplies to make your own pretty pages!

Variety Pack 6″ x 8″ (15.2 x 20.3 cm) Photo Pocket Pages can be your best friend as you start planning your yule-centric project. Pro tip: Not every pocket needs to hold a photo! In fact, you’ll probably want to dedicate a few pocket spaces for design elements alone, allowing you to create a pleasing mix of Christmas-themed photos and art.

Our concept artist also cut Designer Series Paper to fit the pockets, then embellished the paper with die-cuts from the Whimsical Tree Stamp Set. (Notice how one pocket features a tree cut in half, with pieces strategically placed on the top and bottom of the photo to make it appear taller!)

And do you love the bauble die-cut tied to the binder rings with a bit of Baker’s Twine? The loop of Blushing Bride 3/8″ (1 cm) Frayed Grosgrain Ribbon placed behind it adds an extra smidge of beauty.

Are you inspired to start your own Christmas pages? We are, too! Share your project on the Customer PaperCrafty Time Group—we’d love to see your work!

Cherish the Season

Such a clever idea. Create your own background by using the punch as a stencil! You’ll have an evergreen forest background in no time on this #simplestamping card.

Measurements

Garden Green

  • 5 1/2″ h x 8 1/2″ w scored and folded at 4 1/4″ w

Basic White

  • 5 1/4″ h x 4″ w for front background
  • 5 1/4″ h x 4″ w for inside
  • scrap for pine trees
  • scrap for stencil

Basic Black

  • scrap for sentiment

Let’s Create

  1. Fold the Card Base at the scrore line and sharpen the crease on the fold with a Bone Folder.
  2. Punch a stencil from Basic White scrap using the Evergreen Border Punch.
  3. Use the Evergreen stencil, a Blending Brush and a Gardren Green ink pad to create an Evergreen Forest on the 5 1/4″ h x 4″ w front background layer.
  4. Use Stampin’ Seal to attach the stenciled layer to the Card Base.
  5. Stamp three Evergreen trees onto scrap Basic White using Versamark Ink. Then sprinkle with Silver Embossing Powder and use a Heat Tool to heat emboss.
  6. Use Paper Snips to fussy cut the trees.
  7. Arrange the three trees on the Card and attach with Stampin’ Seal and/or Stampin’ Dimensionals for the desired effect.
  8. Stamp Sentiment on Basic Black Cardstock with Versamark ink. Then sprinkle with White Embossing Powder and use a Heat Tool to heat emboss. Trim the Sentiment into two pieces and attach with Stampin’ Dimensionals.
  9. Stamp and Decorate the 5 1/4″ h x 4″ w inside layer and attach.
  10. Decorate your envelope.
  11. Well done! Who will you send it to?

Shopping List

Stamper’s Toolkit

You will also need adhesive, acrylic blocks, scissors and other basic PaperCrafting items from the Stamper’s Toolkit

Merry Christmas

Such a pretty card in non-traditional colors! I love the caribbean vibe the colors provide for these traditional Christmas tree images. So fun! Make this one yourself in minutes.

Measurements

  • Coastal Cabana Cardstock
    • 7″ h x 8 1/2″ w scored and folder on the short side to 3 1/2″ h x 8 1/2″ w
    • 3 1/2″ h x 3 1/2″ w scrap
  • Gold Foil
    • 2 1/2″ h x 8″ w
  • Basic White Cardstock
    • 3 1/4″ h x 6 1/2″ w
    • 3 1/2″ w x 1″ h scrap
    • 3 1/4″ h x 8 1/4″ w (inside layer)

Let’s Create

  1. Affix Tall Pine Tree and Merry Christmas Stamps to Acrylic Blocks.
  2. On the 3 1/4″ h x 6 1/2″ w Basic White Cardstock, stamp the Pine Trees. Start with the Bumble Bee tree in the center and work your way out to the edge stampin 7 Trees in all. Finished colors (from left to right) Melon Mambo, Poppy Parade, Petal Pink, Bumble Bee, Garden Green. Coastal Cabana, Pacific Point.
  3. Stamp three Stars in Versamark ink and heat emboss with Gold Embossing Powder.
  4. Stamp the Sentiment in Versamark ink on the 3 1/2″ w x 1″ h scrap and heat emboss with Gold Embossing Powder. Trim as desired.
  5. Run the 2 1/2″ h x 8″ w Gold Foil layer through the Stampin’ Emboss Machine with the Snowflake Embossing Folder, then use Paper Snips to banner tip the ends.
  6. Run the 3 1/2″ h x 3 1/2″ w Coastal Cabana scrap through the Stampin’ Cut & Emboss Machine with the 3″ h x 1″ w Stitched Rectangle Die. Repeat for a total of 2 Stitched Rectangles.
  7. Fold the Card Base and use a Bone Folder to sharpen the crease.
  8. Use Stampin’ Seal to attach the 2 Stitched Rectangles and the Gold Foil.
  9. Use Stampin’ Dimensionals to attach the Pine Tree layer and Sentiment.
  10. Sprinkle with Metallic Pearls.
  11. Stamp and decorate the 3 1/4″ h x 8 1/4″ w (inside layer).
  12. Decorate your envelope.
  13. Pretty! Now put it in the mail.

Shopping List

Stamper’s Toolkit

You will also need adhesive, acrylic blocks, scissors and other basic PaperCrafting items from the Stamper’s Toolkit

Two-Step Stamping

To make all these lovely Christmas cards we used the two-step stamping technique—that involves stamping certain images in layers over each other. This technique is so simple, but it adds beautiful depth and texture to any card.

The Magic in the Air card is small and would look adorable on a Christmas gift. To make this card, use Evening Evergreen ink to stamp the entire base with the tiny berries stamp from the Christmas Season Stamp Set in the July–December 2021 Mini Catalogue. Then, use the two-step stamp technique to make the leaves: simply stamp the base image first in Just Jade ink, then stamp the top layer in Evening Evergreen ink. Finally, add berries below the leaf and use the Christmas to Remember Stamp Set to add a sentiment, which you can then adhere to the card with Stampin’ Dimensionals.

The Joyeux Noël card is so easy to make that you could get all your Christmas cards done in one sitting! Start with the pinecones by stamping the base layer in Crumb Cake and the top layer in Soft Suede. Next, stamp the long greenery pieces in between the two pinecones and then stamp your sentiment.

To make the Een kleurrijke kerst card, use the stamping-off technique to stamp the base of the holly leaves. Next, use the same color ink to stamp the layered image over the leaves. Finally, add some berries and a leaf, then stamp a sentiment in the center of the card.

Products Used on These Projects