Rainbow Thank You

My favorite white-on-white card with a pop of color. Super cute and super easy to make.

Measurements

Full list of supplies needed, listed below. A die cutting machine is needed for this card.
Card Base: Basic White Thick Cardstock 5 1/2″ h x 8 1/2″ w folded to 5 1/2″ h x 4 1/4″ w

Basic White Thick  Cardstock 8 ½” x 5 ½”, scored on the long side at 4 ¼” for Card Base

Basic White Cardstock

  • 4” x 5 ¼” (2)
  • scrap 4″ w x ~2 1/2″ h

Pumpkin Pie, Mango Melody and Bumble Bee Cardstock: Scraps for Rainbow

Polished Pink Cardstock scrap

Let’s Create

  1. Affix all stamps to Acrylic Blocks.
  2. Fold the Basic White Thick Card Base in half using a Bone Folder to sharpen the crease.
  3. Adhere 4” x 5 ¼” Basic White layer to card front with liquid glue.
  4. Die cut Cloud layer from Basic Borders Dies and adhere to the Basic White Layer with liquid glue.
  5. Die cut the small Rainbow from Pumpkin Pie, Mango Melody and Bumble Bee Cardstock.
  6. Use Rainbow die as a guide to place your Pumpkin Pie, Mango Melody and Bumble Bee Cardstock rainbow arcs to achieve balanced placement. Adhere rainbow arcs with very thin traces of liquid glue.
  7. Die cut Heart from Give it a Whirl dies with Polished Pink Cardstock.
  8. Place a mini-Stampin’ Dimensional on the back of the heart, and position the heart in the center of the rainbow
  9. Stamp cute teeny-tiny thank you sentiment in Memento Black in a little cloud pocket.
  10. Sprinkle on the Opals.
  11. Stamp and decorate 4” x 5 ¼” Basic White layer for the inside and attach with Stampin’ Seal.
  12. Decorate your envelope.
  13. So cute! Now send it to someone special.

Shopping List

Stamper’s Toolkit

You will also need adhesive, acrylic blocks, scissors and other basic PaperCrafting items from the Stamper’s Toolkit

Sending You Rainbows of Happiness

Spread joy with the Rainbow of Happiness bundle This bright and cheery stamp set and matching dies is sure brighten anyone’s day. And now through February 28, 2022 you can earn the coordinating Sunshine & Rainbows paper free with your order through Sale-a-bration rewards.

Measurements

Full list of supplies needed, listed below. A die cutting machine is needed for this card.

Misty Moonlight:  8 1/2” x 5 1/2”, Score at 4 1/4” Card Base

Basic White:

  • 4” x 5 1/4” (2)
  • 2 3/4″ Circle
  • scrap for Clouds

Vellum: 3″ Circle

Let’s Create

  1. Affix all stamps to Acrylic Blocks.
  2. Fold the Card Base in half using a Bone Folder to sharpen the crease.
  3. Stamp largest rainbow arc on Basic White circle in Mango Melody. Stamp next smallest arc in Magenta Madness. Stamp next smallest arc in Coastal Cabana. Stamp sentiment in Magenta Madness over the Mango Melody arc.
  4. Adhere DSP to bottom of Basic White layer. Wrap ribbon around layer and tie in a bow.
  5. Adhere Basic White panel to card front with liquid glue.
  6. Adhere Vellum circle with Stampin’ Dimensionals.
  7. Adhere rainbow circle with Stampin’ DImensionals.
  8. Build clouds with stacked Stampin’ Dimensionals around the base of the rainbow.
  9. Add some glitz to the clouds with WInk of Stella.
  10. Sprinkle on the Opals.
  11. Stamp and decorate the inside and attach with Stampin’ Seal.
  12. Decorate your envelope.
  13. So cute! Now share this happy happy card!

Shopping List

Stamper’s Toolkit

You will also need adhesive, acrylic blocks, scissors and other basic PaperCrafting items from the Stamper’s Toolkit

Is it OK to CASE?

Is It Okay to CASE?
If you are new to papercrafting, you may not have heard the term CASEing. “CASE” is an acronym used by papercrafters that means Copy and Share Everything. You’ll find you can be inspired by your surroundings: the trees, birds, flowers, that pretty picture you bought for you living room, kitchen towels, other artists, a new rug or paper or gift wrapping. Inspiration is everyewhere

When we say “copy,” we mean “allow yourself to be influenced by” another papercrafter’s projects. Be assured: It’s perfectly okay to do! Focus on some aspect of their handiwork that you absolutely love and use it to inspire your own creation.

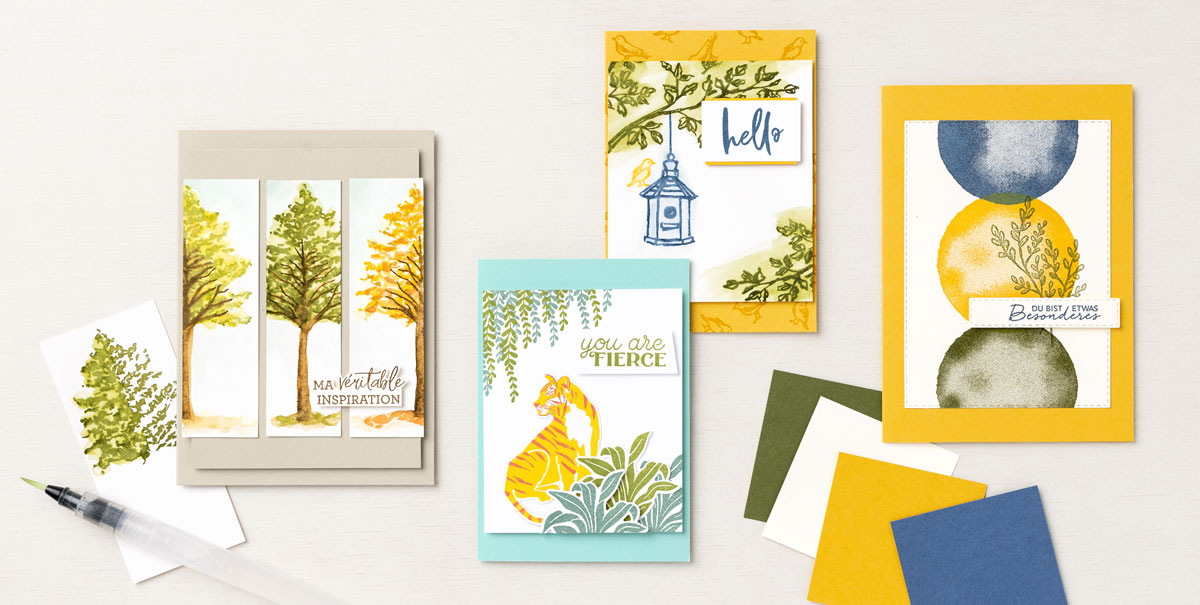
Our concept artist CASEd a captivating “looks-hard-but-it’s-easy” technique to create the Ma Veritable Inspiration card. The trick here is to use a Water Painter to brush over the treetops and trunk to give them that watercolored look. Tip: Add more color to the tree leaves by picking up color from the ink pad.

The Du Bist Etwas Besonderes card features an inspirational, CASEd color combo. Begin by stamping a circle in the lightest ink—Bumblebee—then add the Misty Moonlight and Mossy Meadow circles to complete the composition. For crisp images, place the cardstock over a Stampin’ Pierce Mat before stamping.

Our last project, the You Are Fierce card, features a “wildly” creative, CASEd layout. We used the stamp set’s greenery images to create that purr-fect jungle vibe (and to fill in the corners). We die cut the tiger from Designer Series Paper. Isn’t he cute? Finish by layering the sentiment on top.