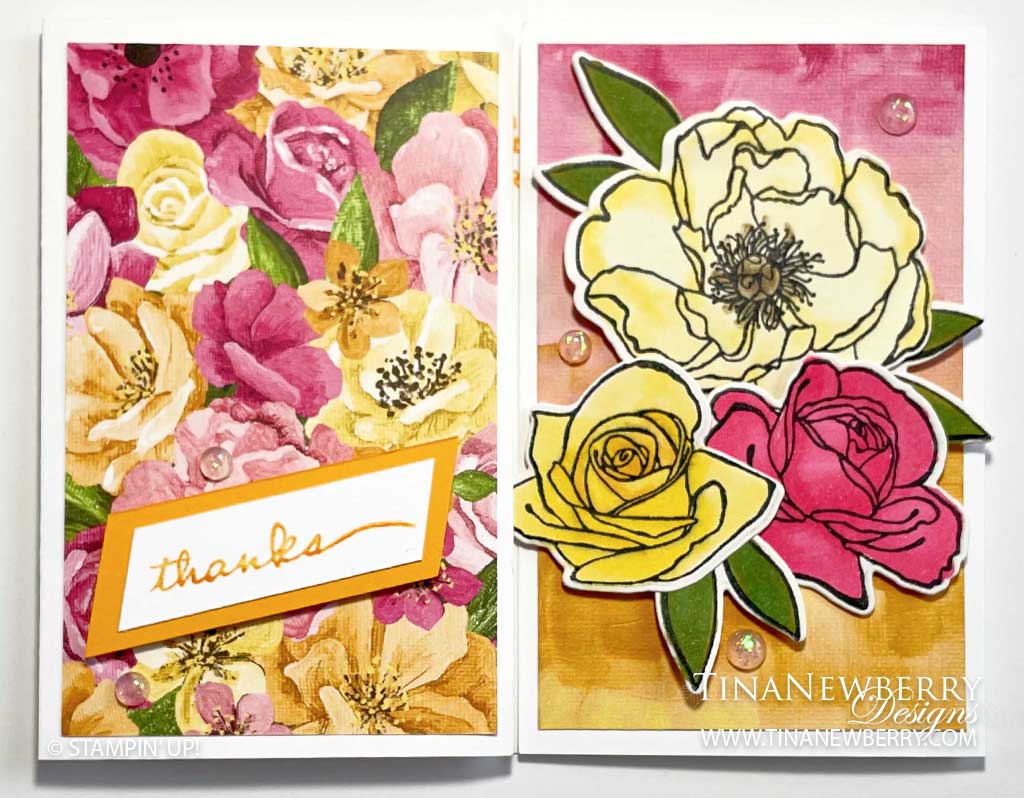
Show how thankful you are with a stunning gate fold Thanks card in bright yellows and pinks using the Hues of Happiness Suite. Make a statement when you stamp the flowers, color in your favorite colors and die cut them out.
Measurements
Full list of supplies listed below. A die cutting machine is needed for this project.
Basic White Thick Cardstock: 4 ¼” h x 11” w folded to 4 1/4″ h x 5 1/2″ w for Card Base
Basic White Cardstock:
- Scrap: ½” h x 2 ½” w
- 5 1/4″ h x 4″ w
Mango Melody Cardstock Scrap: ¾” h x 3” w
Shimmery White Cardstock: Scraps
Hues of Happiness Designer Series Paper (DSP): 4″ h x 2 ½”w – 2 complementary prints
Let’s Create
- Affix all stamps to acrylic blocks.
- Score the Basic White Thick card base at 2 ¾” and 8 ¼”. Fold at score lines and sharpen the score line with a Bone Folder to create the gate fold.
- Stamp the 3 rose images, and 3 sets of leaf clusters with Memento Tuxedo Black Stamp Pad onto Shimmery White card stock. Set this aside to dry.
- Adhere the 2 layers of Hues of Happiness DSP onto the card front flaps.
- Use the Mango Melody Stampin’ Pad to stamp the “thanks” sentiment onto the Basic White scrap. Use scissors to cut diagonal slants on each end.
- Take the Mango Melody card stock scrap and trim it to frame around the “thanks” layer. Attach to the “thanks” layer with Stampin’ Seal.
- Die cut the stamped roses and leaves with a die cutting machine.
- Now color:
- Use the Light So Saffron Stampin’ Blends to color the largest rose. Use the Light Daffodil Delight Stampin’ Blends to fill in with shading.
- Color the center of this rose with the Light Crumb Cake Stampin’ Blends.
- Color the mid-size rose with the Light Flirty Flamingo Stampin’ Blends and use the Dark Flirty Flamingo Stampin’ Blends to add shadow depth.
- Color the tightest rose bloom with the Light Daffodil Delight Stampin’ Blends and the Dark Daffodil Delight Stampin’ Blends to shade the deeper crevices.
- On the die cut leaves use the Light Old Olive Stampin’ Blends and Light Shaded Spruce Stampin’ Blends to create a blended color to complement the leaves in the Hues of Happiness DSP.
- Use Stampin’ Dimensionals to adhere the roses and leaves as a cluster on the right side flap.
- Use Stampin’ Dimensionals to adhere the sentiment onto the left side flap.
- Stamp and decorate the remaining Basic White cardstock and adhere to the inside with Stampin’ Seal.
- Embellish the card front with Opal Rounds.
- Now let’s decorate the envelope! Cut a 1” x 4 ⅜” strip of Hues of Happiness DSP. Adhere this layer onto the front of the envelope with Stampin’ Seal.
- So Pretty! Who do you need to thank today?
Shopping List
Recommended Stamper’s Toolkit
Stamper’s Toolkit
You will also need adhesive, acrylic blocks, scissors and other basic PaperCrafting items from the Stamper’s Toolkit


")


 Designer Series Paper")


")

