CASE—Copy And Share Everything!

Let’s get crafty! Take some time this week to CASE—Copy And Share Everything. Not sure how? We can show you!

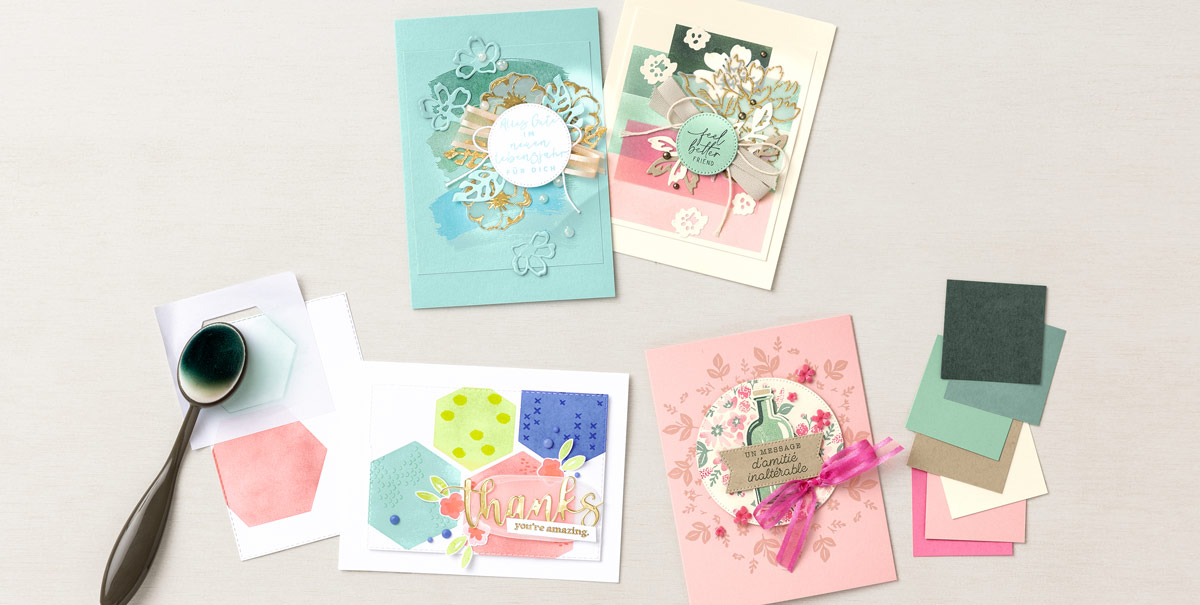
For our Alles Gute im neuen Lebensjahr für dich card we CASEd the layout by stamping out a multicolored card base. We then used Gold Stampin’ Emboss Powder to heat emboss the flower image on Vellum and die cut those flowers. Using Pool Party Cardstock and Distressed Gold Specialty Paper, we die cut more flowers and leaves to add some pop. After adding some twine and ribbon, and we finished it off with a sentiment and some Opal Rounds.

We loved the color combination for our Feel Better card so much that we decided to copy it in our Un message d’amitié inalterable card. First, we inked the flower image in Blushing Bride, and used a sponge dauber to add Polished Pink directly to the stamp. Next, we stamped out the flower centers and some leaves in Soft Succulent. We used Mint Macaron to stamp out the solid bottle image and Evening Evergreen to stamp out the shadow image. We added one more dash of color using Crumb Cake Cardstock for the sentiment.

For our Thanks card we CASEd the technique by using Masking Paper to color different shapes on the card background. We did this by die cutting different sizes of hexagons from Masking Paper. Starting with the largest hexagon, we placed the die-cut Masking Paper on the Basic White Cardstock, then applied ink with a Blending Brush. We repeated this with the other sizes of hexagons.

Product List

Happiest Birthday Wishes

Tropical foliage is my favorite! Large lush leaves in an array of greens make me so happy. I can’t explain it. The Artfully Composed Suite with the Artfully Layered Bundle is my happy place! I really like the look of two different fonts as seen in the sentiments and this color combo using the new Parakeet Party and Orchid Oasis is stunning.

Artfully Layered – Save 10% on the stamp and die bundle

Measurements

Full list of supplies needed, listed below. A die cutting machine is needed for this card.

Basic White Thick: 5 ½” h x 8 ½” w scored and folded on the long-side at 4 ¼” for Card Base

Basic White: 

  • 4” h x 3 ¼” w
  • 4″ h x 5 1/4″ w for inside
  • Scrap for leaves and sentiment die cut

Orchid Oasis: scrap for die cutParakeet Party: scrap for leaf

Let’s Create

  1. Affix all stamps to Acrylic Blocks.
  2. Fold the Card Base in half using a Bone Folder to sharpen the crease.
  3. In Shaded Spruce ink stamp leaves on Card Base and on 4 x 3 ¼” Basic White layer. 
  4. 4 x 3 ¼” Basic White layer, also stamp paragraph stamp in Orchid Oasis and more leaves in Parakeet Party.
  5. On Basic White scrap, stamp leaf outline in In Shaded Spruce ink and leafy stamp in Granny Apple Green. Then use Shaded Spruce Stampin’ Blends to color in the leaf outline and then die cut. Fussy cut the Granny Apple Green leafy piece. 
  6. Die cut the border in Orchid Oasis cardstock and attach to the edge of the 4 x 3 ¼ Basic White stamped piece.
  7. Wrap linen thread around the 4 x 3 ¼” Basic White piece twice and tie a bow to the far left side.
  8. Attach adhesive sheets to the back of a piece of Parakeet Party Cardstock and then Die cut the palm leaf. Remove the backing and adhere the Parakeet Party leaf to a piece of white cardstock to hold all the pieces together.
  9. Arrange the three leaves, trimming excess as needed, and secure to each other with Mini Glue dots. Then attach to card with Stampin’ Dimensionals. 
  10. Stamp the sentiment on Basic White scrap and die cut out with the stitched rectangle die. Attach with Stampin’ Dimensionals
  11. Sprinkle on the Iridescent Rhinestones.
  12. Stamp and decorate the 4″ h x 5 1/4″ w Basic White inside and attach with Stampin’ Seal.
  13. Decorate your envelope.
  14. Stunning! Who can you celebrate today?

Shopping List

Recommended Stamper’s Toolkit

Product List
Order online from the convenience of your own home or send me your order and I’ll take care of you. ❤ Either way, please use the host code ANTD9UHS. Order online AND, if your order is $50 or more using host code ANTD9UHS between now and the end of the month you’ll receive a free pack of embellishment as a THANK YOU gift from me. ❤ If your order is over $150, skip the host code, earn Stampin’ Rewards for free stuff yourself and I’ll still send you a free pack of embellishment as a THANK YOU gift from me. ❤

You’re Plain Awesome Masculine Card

Thank you for your interest in this project. Some projects are exclusive to subscribers who will receive passwords by email.

Are you a subscriber? Awesome! Check your email for the password and enter it here to view this project.

Not yet subscribed?  We’d love for you to join us.  Subscribe to my email list and receive news, information and inspiration by email.

Parts & Pieces: Artfully Layered

If a trip to the tropics isn’t in your budget, a visit to your crafting space with the Artfully Layered Bundle in hand might be the next best thing. This breezy bundle might not include the chatter of parrots or the pungent smell of a tangled jungle, but it will transport you to your creative happy place—where stamping with gorgeous results is as easy as 1, 2, 3!

The handiest thing about these cards? They all share the same color combos and use the same parts and pieces. The genius lies in the arrangement of the card front elements. We simply rearranged paper layers and popped up pieces with Stampin’ Dimensionals to create distinct looks for each card.

  • Card base: 3″ x 5″ (7.6 x 12.7 cm) Coastal Cabana Cardstock
  • Card front: 2-1/2″ x 5″ (6.4 x 12.7 cm) Coastal Cabana Cardstock
  • Label: 1-1/4″ x 2-1/2″ (3.2 x 6.4 cm) Melon Mambo Cardstock

Add a bit of Simply Elegant Trim or Baker’s Twine to your cards to enhance the updated shabby chic look. Our concept artist chose shimmery Opal Rounds to scatter over her creations, but you can always tap your own embellishment stash to brighten your projects.

Have fun creating these cards—and add your own twist! A fresh color combo could lead you into an entirely new creative adventure with this fabulous bundle, so take a chance and see where it leads!

Shopping List

Strong & Courageous Masculine Card

Send words of encouragement to a special man with the He’s the Man Designer Series patterned paper and a sentiment from the Vintage Tools stamp set.

Measurements

Full list of supplies needed, listed below. A die cutting machine is needed for this card.

Very Vanilla Cardstock

  • 11”h x 4 ¼” w – scored at 5 ½” for the Card Base
  • 2 ⅝” x 1 ¼” (Smallest Deckled Die cut for behind main sentiment)
  • 1 ⅝” x ½” (for small sentiment on lower right of card)
  • 5 ¼” x 4” for inside

Early Espresso Cardstock

  • 5 ¼” x 4”
  • 3 ¼” x ½” (Banner behind sentiment)

He’s the Man Designer Series Paper (DSP):

  • Lighter color (background layer) 5 ⅛” x 3 ⅞”
  • 4 ¼” x 2” (Cajun Craze color for Tag) 
  • 2” x 1” (dark brown – top of tag)
  • ⅜” x 2” (sahara sand color – along top of tag)
  • “Strong and Courageous” sentiment is from the Die Cut sheet of He’s The Man DSP

Let’s Create

  1. Affix all stamps to Acrylic Blocks.
  2. Fold the Card Base in half using a Bone Folder to sharpen the crease.
  3. Flag the bottom edge of the 4 ½” x 2” Cajun Craze Designer Series Paper (DSP)
  4. Attach small He’s the Man strips the top edge of banner. Wrap a double strand of Linen Thread and tie in a knot to the top of the banner.
  5. Adhere the 5 ¼” x 4” Early Espresso layer to the folded Vanilla cardfront. Then adhere the 5 ⅛” x 3 ⅞” DSP background layer to the cardfront.
  6. Use Stampin’ Dimensionals to attach the layered banner to the top edge centering side to side.
  7. Stamp the sentiment “You’re all that and more” using Early Espresso ink pad on 1 ⅝” x ½” Very Vanilla Cardstock.
  8. Die cut the 2 ⅝” x 1 ¼” Very Vanilla using the smallest of the deckled rectangle dies. 
  9. Flag the ends of the 3 ¼” x ½” Early Espresso Cardstock and attach behind the Very Vanilla deckled rectangle.  Attach the pre cut Strong and Courageous die (from the die cut sheet of the DSP) onto the deckled rectangle.  Adhere these layers to your card front using Stampin’ Dimensionals.
  10. Adhere the small sentiment to the lower right of the card.
  11. Scatter a few Rustic Metallic Dots to your card.
  12. Stamp and decorate the 5 ¼” x 4” Very Vanilla for the inside and attach with Stampin’ Seal.
  13. Decorate your envelope.
  14. Love it! Now send it to someone special.

Shopping List

Recommended Stamper’s Toolkit

Product List
Order online from the convenience of your own home or send me your order and I’ll take care of you. ❤ Either way, please use the host code ANTD9UHS. Order online AND, if your order is $50 or more using host code ANTD9UHS between now and the end of the month you’ll receive a free pack of embellishment as a THANK YOU gift from me. ❤ If your order is over $150, skip the host code, earn Stampin’ Rewards for free stuff yourself and I’ll still send you a free pack of embellishment as a THANK YOU gift from me. ❤