Technique Focus—Stamping on Designer Series Paper

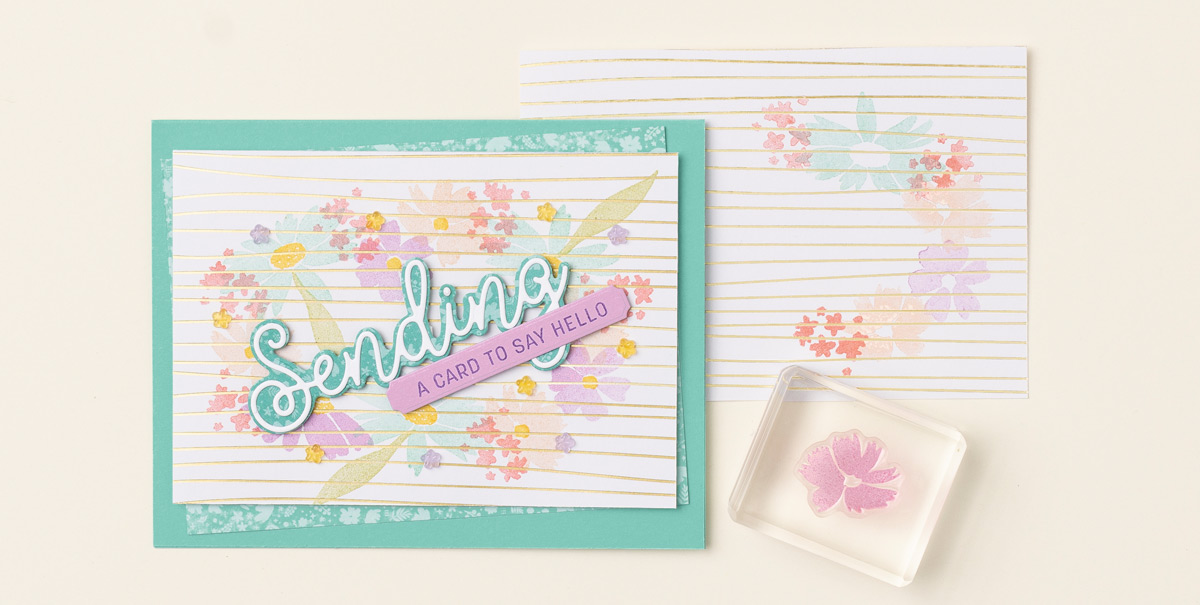
Designer Series Paper isn’t like regular cardstock—it has unique designs and textures. Because of these features, sometimes we forget that we can stamp on it just like cardstock! When we made this week’s card, we decided to do just that—we stamped on the Designer Series Paper, and we loved the way it turned out!

When we started making this card, we didn’t want our flower images to outshine the Silver & Gold Designer Series Paper—we only wanted to enhance it. So, using different flowers and a few leaves from the Sending Smiles Bundle, we stamped off the floral images before we stamped on the paper. Next we adhered the Designer Series Paper to our card base and added a few Fun Flowers Resin Shapes, which were just the right colors and shapes to match our stamped flowers. Then, we die cut “Sending” and the “Sending” word shadow and adhered them to the card base using Stampin’ Dimensionals.

This project uses the Silver & Gold Designer Series Paper from Sale-a-bration, but you can use any Designer Series Paper. What will you make?

Wishing You an Adventurous Journey

Stampin’ Up! Artisan Design Team member, Yvonne Spikman, was so clever to use the boater from the kayak stamp with the rowboat from the Adventurous Journey stamp set and diorama die cuts for the water! I used her general design with a bit of creative liberty to make this card design my own. Sometimes the most relaxing card making comes from re-creating something beautiful someone else made. CASE=Copy and Share Everything.

Adventurous Journey
Don’t make crafting an “oar-deal”—discover new designs and ideas with the Adventurous Journey Stamp Set! Celebrate birthdays, new beginnings, and more with the adventurers in your life.

Measurements

Full list of supplies needed, listed below. A die cutting machine is needed for this card.
Basic White Thick Cardstock:

  • 11″ h x 4 1/4″ w folded to 5 1/2″ h x 4 1/4″ w
  • scrap for boat, boater w/ oars

Basic White Cardstock: scrap for sentiment tags

2022-2023 Brights Designer Series Paper (DSP): scrap for diorama die cuts

Let’s Create

  1. Affix all stamps to Acrylic Blocks.
  2. Fold the Card Base in half using a Bone Folder to sharpen the crease.
  3. Die cut two pieces of Pacific Point DSP with large Diorama Dies.
  4. Stamp the boat and kayak on Basic White Scrap in Soft Suede ink. Color the row boat with Light and Dark Soft Suede. Color the boater and oars from the kayak image with Light and Dark each of Soft Suede, Crumb Cake and Parakeet Party.
  5. Use Paper Snips to carefully cut out the boater and the row boat.
  6. Use a Stampin’ Dimensional to attach the boater to the row boat.
  7. Arrange the Pacific Point die cuts on the front of the card base. Use a pencil to lightly mark where two spots on the Card Base where you have room to add ripples.
  8. Remove the die cuts and stamp ripples in Night of Navy ink on the card base and a few on the die cuts.
  9. Attach Pacific Point die cuts with Stampin’ Dimensionals.
  10. Attach the row boat with Stampin’ Dimensionals
  11. On Basic White scrap, stamp the sentiment in Night of Navy Ink. Then carefully cut out into strips and attach with Stampin’ Dimensionals.
  12. Sprinkle on the Fine Sparkle Adhesive Backed Gems.
  13. Stamp and decorate the inside.
  14. Decorate your envelope.
  15. Awesome! Now send it to someone special.

Shopping List

Recommended Stamper’s Toolkit

Product List
Order online from the convenience of your own home or send me your order and I’ll take care of you. ❤ Either way, please use the host code ANTD9UHS. Order online AND, if your order is $50 or more using host code ANTD9UHS between now and the end of the month you’ll receive a free pack of embellishment as a THANK YOU gift from me. ❤ If your order is over $150, skip the host code, earn Stampin’ Rewards for free stuff yourself and I’ll still send you a free pack of embellishment as a THANK YOU gift from me. ❤

Wishing You An Adventurous Birthday

My good friend is an avid kayaker and paddle boarder and I just knew I had to make a card for her birthday. When a card by Tami White, I couldn’t wait to adapt it for my friend. I love how Tami used Window Sheets to create water and the Diorama Dies for the waters edge is brilliant. I can’t wait to send this card.

Adventurous Journey
Don’t make crafting an “oar-deal”—discover new designs and ideas with the Adventurous Journey Stamp Set! Celebrate birthdays, new beginnings, and more with the adventurers in your life.

Measurements

Full list of supplies needed, listed below. A die cutting machine is needed for this card.
Coastal Cabana Cardstock:

  • 5 1/2″ w x 8 1/2″ w folded to 5 1/2″ h x 4 1/4″ w for Card Base
  • 5 1/2″ w x 4 1/4″ h

Basic White Cardstock:

  • 1″ h x 3 1/6″ w
  • 5 1/4″ w x 4″ h

Basic White Thick Cardstock: scrap for kayak

Window Sheets: 5 1/4″ w x 4″ h

Let’s Create

  1. Affix all stamps to Acrylic Blocks.
  2. Fold the Card Base in half using a Bone Folder to sharpen the crease.
  3. Run the 5 1/2″ w x 4 1/4″ h Coastal Cabana through the Stampin’ Cut & Emboss Machine with the Diorama Die. And then run it through with the Stripes Embossing Folder.
  4. Attach the Window Sheet to the back of the die cut and embossed Coastal Cabana panel using Tear N’ Tape.
  5. On the Basic White Thick Cardstock, stamp the kayak image with Tuxedo Black ink and color. I used:
    1. Real Red Light and Dark for the kayak
    2. Balmy Blue Light and Dark for the shirt
    3. Soft Suede Light and Dark for the Oar
    4. Daffodil Delight Light and Dark for the Hat.
    5. With Basic Black Dark, I added hair.
  6. Use Paper Snips to cut out the kayak and Stampin’ Dimensionals to attach the kayak to the Window Sheet.
  7. Arrange the Window Sheet layer on top of the Card Base and use a pencil to make a light mark on the card front below the oars.
  8. Remove the Window Sheet Layer and use Coastal Cabana Ink to stamp ripples where you marked on the card front.
  9. Attach the Window Sheet layer to the card front using Stampin’ Dimensionals.
  10. To the left of the 1″ h x 3 1/6″ w Basic White layer, stamp your sentiment in Real Red.
  11. Wrap some Linen Thread around the right side of the sentiment tag and tie a bow.
  12. Attach the sentiment with Stampin’ Dimensionals, being careful to avoid Dimensionals over the Window Sheet.
  13. Sprinkle on some Fine Sparkle Adhesive Gems.
  14. Stamp and decorate the inside and attach with Stampin’ Seal.
  15. Decorate your envelope.
  16. So adventurous! Now put it in the mail.

Shopping List

Recommended Stamper’s Toolkit

Product List
Order online from the convenience of your own home or send me your order and I’ll take care of you. ❤ Either way, please use the host code ANTD9UHS. Order online AND, if your order is $50 or more using host code ANTD9UHS between now and the end of the month you’ll receive a free pack of embellishment as a THANK YOU gift from me. ❤ If your order is over $150, skip the host code, earn Stampin’ Rewards for free stuff yourself and I’ll still send you a free pack of embellishment as a THANK YOU gift from me. ❤

To CASE is to Love

Thank you for your interest in this project. Some projects are exclusive to subscribers who will receive passwords by email.

Are you a subscriber? Awesome! Check your email for the password and enter it here to view this project.

Not yet subscribed?  We’d love for you to join us.  Subscribe to my email list and receive news, information and inspiration by email.