Stenciled Background Friendship Card

Thank you for your interest in this project. Some projects are exclusive to subscribers who will receive passwords by email.

Are you a subscriber? Awesome! Check your email for the password and enter it here to view this project.

Not yet subscribed?  We’d love for you to join us.  Subscribe to my email list and receive news, information and inspiration by email.

Step It Up: Pretty Birds Bundle

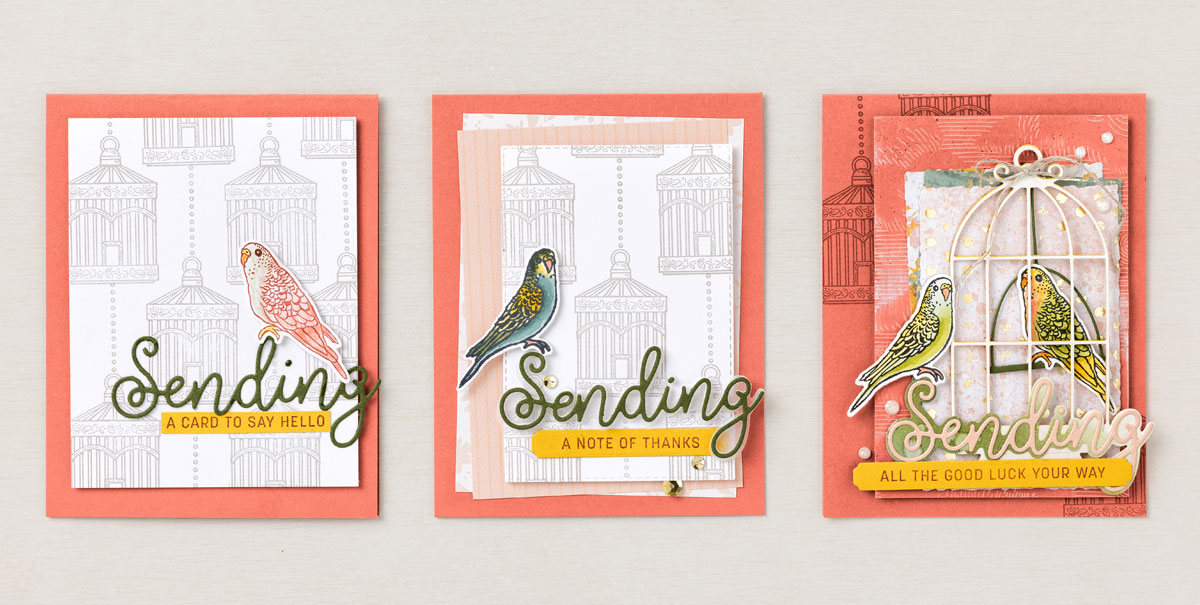
They say birds of a feather flock together, and that’s true for this week’s cards we made with the Sending Smiles and Pretty Birds Bundles. Try stepping up your cards this week and if you’re not sure how, don’t be afraid to wing it!

CASUAL
We colored the bird image with Watercolor Pencils, then we created our own Designer Series Paper by stamping out the bird cage image on Basic White Cardstock, taking care to line up the chain of each bird cage with the base of the cage above it.

AVID
We stepped up our second card by adhering Mossy Meadow Cardstock to a Foam Adhesive Sheet, then used that to die cut the word “Sending.” We die cut the “Sending” word shadow in Vellum and adhered it behind the die-cut word and finished the card with some Brushed Metallic Dots.

ARTFULLY AVID
We used the Deckled Rectangles Dies to cut three rectangles from the Texture Chic Designer Series Paper, then we layered them on the card base, offsetting each layer. Next, we die cut the large bird cage three times from Crushed Curry Cardstock and once from Pearlescent Specialty Paper. We adhered all the die cuts together with the specialty paper on top, creating a thick die-cut piece. Finally, we created the “Sending” word shadow by blending Mossy Meadow and Soft Succulent ink on Basic White Thick Cardstock with Blending Brushes then adding a few water drops with a Stampin’ Spritzer.

Shopping List

Make Your Own Subtle Snowflake Background

Jazz up your background with a few snowflake watermarks. I’ll show you how!

This holiday season, treat yourself to the un-brrr-lievably adorable All Bundled Up Stamp Set

Measurements

Full list of supplies needed, listed below. A die cutting machine is needed for this card.

Garden Green Cardstock: 5 ½” h x 8 ½” w scored and folded on the long-side at 4 ¼” for the Card Base

Basic White Thick Cardstock:

  • Scrap for Moose

Basic White Cardstock:

  • 4” h x 5 1/2” w 
  • 4” x 3” scrap 
  • 3/4” h x 3 1/2” w

Sweetest Christmas 12” x 12” Designer Series Paper (DSP)

  • 4 3/4” h x 3 1/2” w

Let’s Create

  1. Affix all stamps to Acrylic Blocks.
  2. Fold the Card Base in half using a Bone Folder to sharpen the crease.
  3. Using Versamark Ink, Stamp the snowflake stamp in a random pattern around the outside edge of the front of the Card Base.
  4. Use Stampin’ Seal to attach the DSP to the front of the Card Base.
  5. Run the 4” x 3” scrap Basic White through the Stampin’ Cut and Emboss machine with the Scalloped Contour Die. 
  6. Wrap Pool Party ⅜ Sheer Ribbon around the bottom of the die cut and tie a bow in the middle. Attach Basic White die cut panel to the front of the card with Stampin’ Dimensionals.
  7. On the Basic White Thick scrap, stamp the Moose, in Tuxedo Black ink.  Use Stampin’ Blends to color in. I used: Soft Suede, Pool Party, and Real Red
  8. Use Paper Snips to fussy cut the Moose out.
  9. Attach the Moose with Stampin’ Dimensionals. 
  10. In garden Green ink stamp the sentiment on the ¾” x 3 ½” Basic White Carstcok piece and attach to the front of the card with Stampin’ Dimensionals at the far edges of the sentiment piece. Arrange so it is overlapping the die cut Basic White panel. 
  11. Sprinkle on some Gilded Gems.
  12. Stamp and decorate the 5 ¼” w x h” w Basic White for the inside and attach with Stampin’ Seal.
  13. Decorate your envelope.
  14. How cute?! Who will you send it to?

Shoping List

Recommended Stamper’s Toolkit

Product List
Order online from the convenience of your own home or send me your order and I’ll take care of you. ❤ Either way, please use the host code ANTD9UHS. Order online AND, if your order is $50 or more using host code ANTD9UHS between now and the end of the month you’ll receive a free pack of embellishment as a THANK YOU gift from me. ❤ If your order is over $150, skip the host code, earn Stampin’ Rewards for free stuff yourself and I’ll still send you a free pack of embellishment as a THANK YOU gift from me. ❤

Make A Diamond Flip Fun Fold Card

Surprise your loved ones with a cute diamond flip fun fold card. Easily make this fun design with any stamp set and designer series paper for any occassion.

This holiday season, treat yourself to the un-brrr-lievably adorable All Bundled Up Stamp Set

Measurements

Full list of supplies needed, listed below.

Tahitian Tide Cardstock: 4 ¼” h x 11” w scored and folded at 5 ½” and 2 ⅛”

Basic White Thick Cardstock: scrap for Moose, Racoon & Bird

Basic White Cardstock: 

  • 2 ¾” square 
  • 2 ⅞” square
  • 4 ⅛” h x 3 ¼” w (2)
  • 4 ⅛” h x 5 ⅜” w

Storybook Gnomes 12”x12” Designer Series Paper (DSP):

  • 4” h x  3 ⅛” w (2)
  • 4” h x 5 ¼” w
So cute!

Let’s Create

  1. Affix all stamps to Acrylic Blocks.
  2. Fold the Card Base in half using a Bone Folder to sharpen the crease.
  3. Lay the Card Base horizontally on your work surface. On the short-side to the left of the score at 2 ⅛” make a mark with a pencil. 
  4. Place the Card Base in your Trimmer lining up the score line and the mark you made with a pencil. Cut off a small triangle from the corner. Repeat on the other side.
  5. On the largest panel (5 ½” x 4 ¼”) adhere the 4 ⅛” h x 5 ⅜” w Basic White panel and the 4” h x 5 ¼” w DSP with Stampin’ Seal. 
  6. On the 2 ⅛” x 4 ¼” panel of the Card Base attach one of the 4 ⅛” h x 3 ¼” w Basic White panels and one of the 4” h x  3 ⅛” w  DSP panels with Stampin’ Seal.
  7. Fold the Card Base at the 5 ½” score line.
  8. On the 2 ⅛” x 4 ¼” panel on the front of the Card Base attach the second 4 ⅛” h x 3 ¼” w Basic White panel and the 4” h x  3 ⅛” w  DSP panel with Stampin’ Seal.
  9. Now fold the triangular piece of the Card Base, back so it is overlapping the front DSP.
  10. Turn the 2 ¾” square Basic White to a diamond and stamp your sentiment in the middle-right of the diamond.
  11. Attach the Basic White diamond to the triangular piece of the Card Base, making sure to only put adhesive where the triangle will cover the triangular piece.
  12. On the Basic White Thick scrap, stamp the Moose, Raccoon and Bird in Tuxedo Black ink.  Use Stampin’ Blends to color in. I used:
    1. Moose: Soft Suede, Crumb Cake, Tahitian Tide, Real Red
    2. Raccoon:  Smoky Slate, Gray Granite, Black, Tahitian Tide, Real Red
    3. Bird: Daffodil Delight, Tahitian Tide, Crumb Cake
  13. Use Paper Snips to fussy cut the animals out.
  14. Attach the Moose with Stampin’ Dimensionals and the Racoon and Bird with Stampin’ Seal.
  15. Lay the remaining 2 ⅞” square Basic White piece on the inside of the card, turned to make a diamond. If you want to stamp the inside diamond piece, do so now. 
  16. Close the card, and reposition the inside diamond, as needed so it does not show when the card is closed. Carefully open the card and use Stampin’ Seal to attach the inside diamond.
  17. Sprinkle on some Fine Sparkle Adhesive Backed Gems.
  18. Decorate your envelope.
  19. Adorbs! Who will you send it to?

Shopping List

Recommended Stamper’s Toolkit

Product List
Order online from the convenience of your own home or send me your order and I’ll take care of you. ❤ Either way, please use the host code ANTD9UHS. Order online AND, if your order is $50 or more using host code ANTD9UHS between now and the end of the month you’ll receive a free pack of embellishment as a THANK YOU gift from me. ❤ If your order is over $150, skip the host code, earn Stampin’ Rewards for free stuff yourself and I’ll still send you a free pack of embellishment as a THANK YOU gift from me. ❤