CASE—Copy And Share Everything


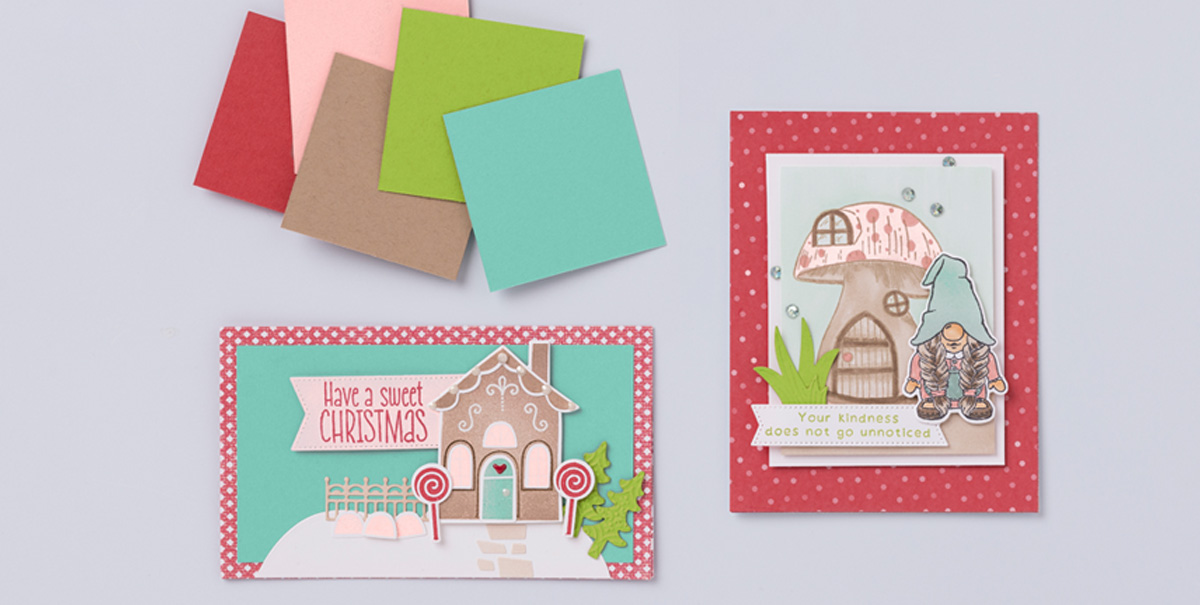
It might be a little too early to celebrate Christmas, but it’s never too early to CASE a card! We CASEd the color scheme from a card in the July-December 2022 Mini Catalog—and we loved the way it turned out!

For this card we used the Kindest Gnomes Bundle from the July–December 2022 Mini Catalog and we focused on five main colors: Blushing Bride, Coastal Cabana, Crumb Cake, Granny Apple Green, and Sweet Sorbet. We started off by using some Sweet Sorbet In Color 6″ x 6″ (15.2 X 15.2 cm) Designer Series Paper Assortments as our background. We layered on some Basic White Cardstock, and we colored an additional panel with Coastal Cabana.

We loved the colors of our gingerbread house in our Have a Sweet Christmas card, and we wanted to copy those colors in our toadstool house. We colored the top of the mushroom with Blushing Bride and used the Blushing Bride Stampin’ Write Marker to make the dots. Then we colored the base of the mushroom and the gnome’s hair with Crumb Cake. We also colored her hat and little apron with Coastal Cabana. Then we die cut some leaves and we stamped out our sentiment in Granny Apple Green. Isn’t it cute?

If you’re looking for a way to shake things up, try your hand at copying and sharing everything!

Product List

Create a Peekaboo Tag Card

Create and element of surprise with your peekabook tag card and an adorable bow for added fun!

Celebrate the most magical time of the year with the Snowman Magic Bundle that helps you create unique, fun, and oh-snow-charming seasonal crafts. The stamps and dies coordinate perfectly so you can accessorize and layer each look from snowmen to snowscapes.

Measurements

Full list of supplies needed, listed below. A die cutting machine is needed for this card.

Basic White Cardstock:

  • 8 ½” w x 5 ½” h scored and folded on the long side at 4 ¼” for Card Base
  • 3 ⅛” x 2”
  • 1 ⅝” x 2”
  • scrap for stamping and die cutting snowman, hat and bow tie.

Cherry Cobbler Cardstock:

  • 5 ⅜” h x 4 ⅛” w
  • 3 ⅝” x 2 ⅛” 

Lights Aglow Designer Series Paper (DSP):

  • 5 ¼” h x 4” w (Light color of colored polka dot lines)
  • 4” w x ⅞” h (Cherry Cobbler print with tone on tone lines of polka dots print)
  • 4” w x ⅜” h (Cherry Cobbler print with tone on tone lines of polka dots print)
  • 5” h x 6” w (Cherry Cobbler Star Print, For Die cutting Envelope Pocket)
  • 1” h x 3 ¼” w (Light color with colored polka dot lines,  For Die cutting Bow)
  • 1 ½” w x 1 ⅞” h (Cherry Cobbler print with tone on tone lines of polka dots print)

Gold Foil Scrap for die cutting Gold Snowflake

Early Espresso scrap for die cutting snowman arms       

Let’s Create

  1. Affix all stamps to Acrylic Blocks.
  2. Fold the Card Base iat 4 ¼” using a Bone Folder to sharpen the crease.
  3. Use Stampin’ to adhere
    • the 5 ⅜” h x 4 ⅛” w Cherry Cobbler Panel onto the folded card front.
    • the 5 ¼” h x 4” w Light Colored DSP to the card.
    • the 2 narrow strips of DSP – 1” h x 3 ¼” w and 1 ½” w x 1 ⅞” h – to the card as shown in the photo.  
  4. Using the Mini Pocket Envelope Die, cut an envelope from the Lights Aglow DSP measuring 5” x 6”
  5. Fold the envelope along the score lines and adhere the pocket together with Stampin’ Seal.
  6. Using the 1” h x 3 ¼”w lighter color DSP, cut the bow using the die included in the Mini Pocket Envelope die set.  I just cut a narrow strip to wrap around the center of the bow.  Use Stampin’ Seal or Mini Glue Dots to tape it all together. 
  7. Using the smallest snowflake die from the Snowman dies, cut a small snowflake from a gold foil scrap. 
  8. On the Basic White piece of cardstock that measures 3 ⅛” x 2” stamp the trees towards the bottom edge using a Soft Succulent Ink pad.
  9. Stamp the Sentiment on this same cardstock using Cherry Cobbler ink.
  10. Adhere this stamped panel the the Cherry Cobbler cardstock measuring 3 ⅝” x 2 ⅛”  leaving an equal size border along both sides and the bottom.  The top border will be quite a bit larger to allow for a hole to be punched and a ribbon pull.
  11. Using the Label Me Fancy punch, punch a small hole in the top of this tag. (If you have our retired ⅛” circle punch, this works well too.) Slip both ends of a piece of gold cord measuring about 5 inches through the back of the hole and into the loop on the front.  
  12. On a scrap of Basic White Cardstock, using Black Memento ink, stamp the snowman, stamp the snowman’s face in black directly onto the snowman. Color the snowman’s nose using the Pumpkin Pie Stampin’ Blend.  Die cut the snowman using the die from the Snowman die set. 
  13. On a scrap of Basic White cardstock stamp the hat with black ink and color the hat band using the Cherry Cobbler Stampin’ Blend.  Stamp the bow tie using Cherry Cobbler ink. Die cut.
  14. Die cut the snowman arms from Early Espresso cardstock. 
  15. Die cut the small frame from 1 ½” x 1 ⅞” Cherry Cobbler DSP. Adhere this to the Basic White panel in similar size.  You may need to do a little trimming to get the Basic White piece to frame the die cut piece nicely.
  16. Assemble your snowman die cuts onto this piece using a small amount of Multipurpose Liquid Glue.
  17. Adhere the gold snowflake to the upper right corner of this panel and tape to the assembled pocket envelope. Using a mini glue dot, position the bow just above the snowman panel.  Place your stamped tag with the gold cord into the pocket. Adhere the pocket onto the card at a slight angle, using Stampin’ Seal. 
  18. Using the White Pearlized Enamel Effects, Put a large drop onto the center of the bow and a smaller drop onto the center of the snowflake.  NOTE: This will take awhile to dry. It will take a couple of hours to dry to the touch…. But it will actually take days to dry so they don’t smash down. A little hint – You can pre make these dots on wax paper or on your silicone mat ahead of time.  I would leave them for up to a week to dry completely.  They peel off easily and can be placed on your card with either a glue dot or a small drop of liquid glue.
  19. Decorate the inside of your card, as well as the envelope and send your card off to wish someone a special holiday! 

Shopping List

Recommended Stamper’s Toolkit

Product List
Order online from the convenience of your own home or send me your order and I’ll take care of you. ❤ Either way, please use the host code ANTD9UHS. Order online AND, if your order is $50 or more using host code ANTD9UHS between now and the end of the month you’ll receive a free pack of embellishment as a THANK YOU gift from me. ❤ If your order is over $150, skip the host code, earn Stampin’ Rewards for free stuff yourself and I’ll still send you a free pack of embellishment as a THANK YOU gift from me. ❤

Create a Framed Snowy Scene In Minutes

Create snow flurries in minutes – for a card that looks like you spent hours – with the Snowman Magic bundle. Read on for details.

Celebrate the most magical time of the year with the Snowman Magic Bundle that helps you create unique, fun, and oh-snow-charming seasonal crafts. The stamps and dies coordinate perfectly so you can accessorize and layer each look from snowmen to snowscapes.

Measurements

Full list of supplies needed, listed below. A die cutting machine is needed for this card.

Very Vanilla Cardstock:

  • 5 ½” w x 8 ½” h scored and folded on the long-side at 4 1/4″for Card Base
  • 5 1/4″ h x 4″ w for inside

Early Espresso Cardstock: 5 ⅛”w x 4 ⅞” h
Pearlescent Specialty Paper: 4 ⅞” w x 3 ⅝” h
Lights Aglow Designer Series Paper (DSP): 4 ¼” w x 3” h
Early Espresso Cardstock Scrap: 2 ¾” x 2” (for die cutting tree)


Let’s Create

  1. Affix all stamps to Acrylic Blocks.
  2. Fold the Very Vanilla Card Base in half using a Bone Folder to sharpen the crease.
  3. Using the Snowman Dies cut the frame using Pearlescent specialty paper, centering it with an even border. Save the middle scrap for stamping the small bird on.
  4. Place Stampin’ Seal adhesive on the backs of snowflakes and the side edges of the frame and adhere the Lights Aglow DSP to the back. The width is exactly 3” which is the same as the opening in the frame. So be sure to line it up correctly. (Note: Since the Lights Aglow paper is 6×6, this allows you to get 2 cards from each piece. If this isn’t an issue for you, you may consider cutting your Lights Aglow panel a smidge larger than 3”.)
  5. Using Early Espresso ink pad, Stamp the sentiment just to the left of center – leaving room for the tree on the left side.
  6. Adhere these panels to your Early Espresso panel using Stampin’ Seal. Use Stampin’ Dimensional to adhere these layers to your folded card base.
  7. Stamp the bird using Real Red ink pad onto the scrap of Pearlescent paper from the center of the die cut frame and cut out using the bird die from the Snowman Dies.
  8. Cut an Early Espresso tree using the tree die from the Snowman Dies.
  9. Adhere the the tree to the right side of the card, using Stampin’ Seal.
  10. Using a Stampin’ Dimensional adhere the bird to the tree.
  11. Place a Champagne Rhinestone in the center of several of the snowflakes.
  12. Stamp and decorate the inside and attach with Stampin’ Seal.
  13. Decorate your envelope.
  14. How pretty! Now send it to someone special.

Shopping List

Recommended Stamper’s Toolkit

Product List
Order online from the convenience of your own home or send me your order and I’ll take care of you. ❤ Either way, please use the host code ANTD9UHS. Order online AND, if your order is $50 or more using host code ANTD9UHS between now and the end of the month you’ll receive a free pack of embellishment as a THANK YOU gift from me. ❤ If your order is over $150, skip the host code, earn Stampin’ Rewards for free stuff yourself and I’ll still send you a free pack of embellishment as a THANK YOU gift from me. ❤

Fond of Autumn Step-by-Step

BEGINNER

Creating simple yet stunning note cards has never been easier than with our fabulous Fond of Autumn Bundle to inspire you. Send thanks and happy thoughts using the gorgeous images in the Fond of Autumn Stamp Set—or make a stack of stamped cards to give as gifts!

To create the beginner version of our Just a Note card, start by folding Very Vanilla Cardstock in half; stamp the floral, leaf, and acorn images in Soft Suede ink on another layer of Very Vanilla Cardstock, then adhere it to the card front. Add a simple sentiment plus a few pretty gems from the Leaf Label & Amber Gem Combo Pack to finish off this timeless card.

CASUAL

We stepped up our second card by coloring in the images with Watercolor Pencils (Old Olive and Early Espresso), then used the curvy banner die from the Autumn Bouquet to cut out our sentiment.

AVID

For our most detailed card, we colored our images as before using Watercolor Pencils, but this time applied water using our Water Painters for a beautiful watercolor affect. We then die cut the watercolored images and pieced them together to create a lovely collage for added dimension and texture.

Shopping List