Make a Two-Color Image With Ease

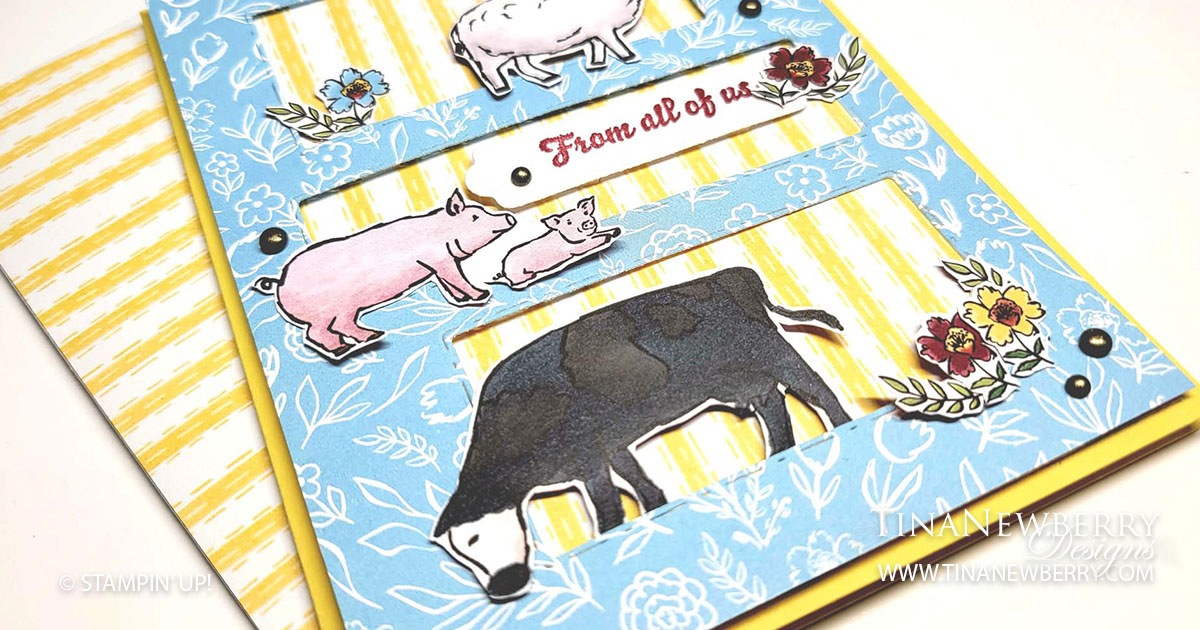
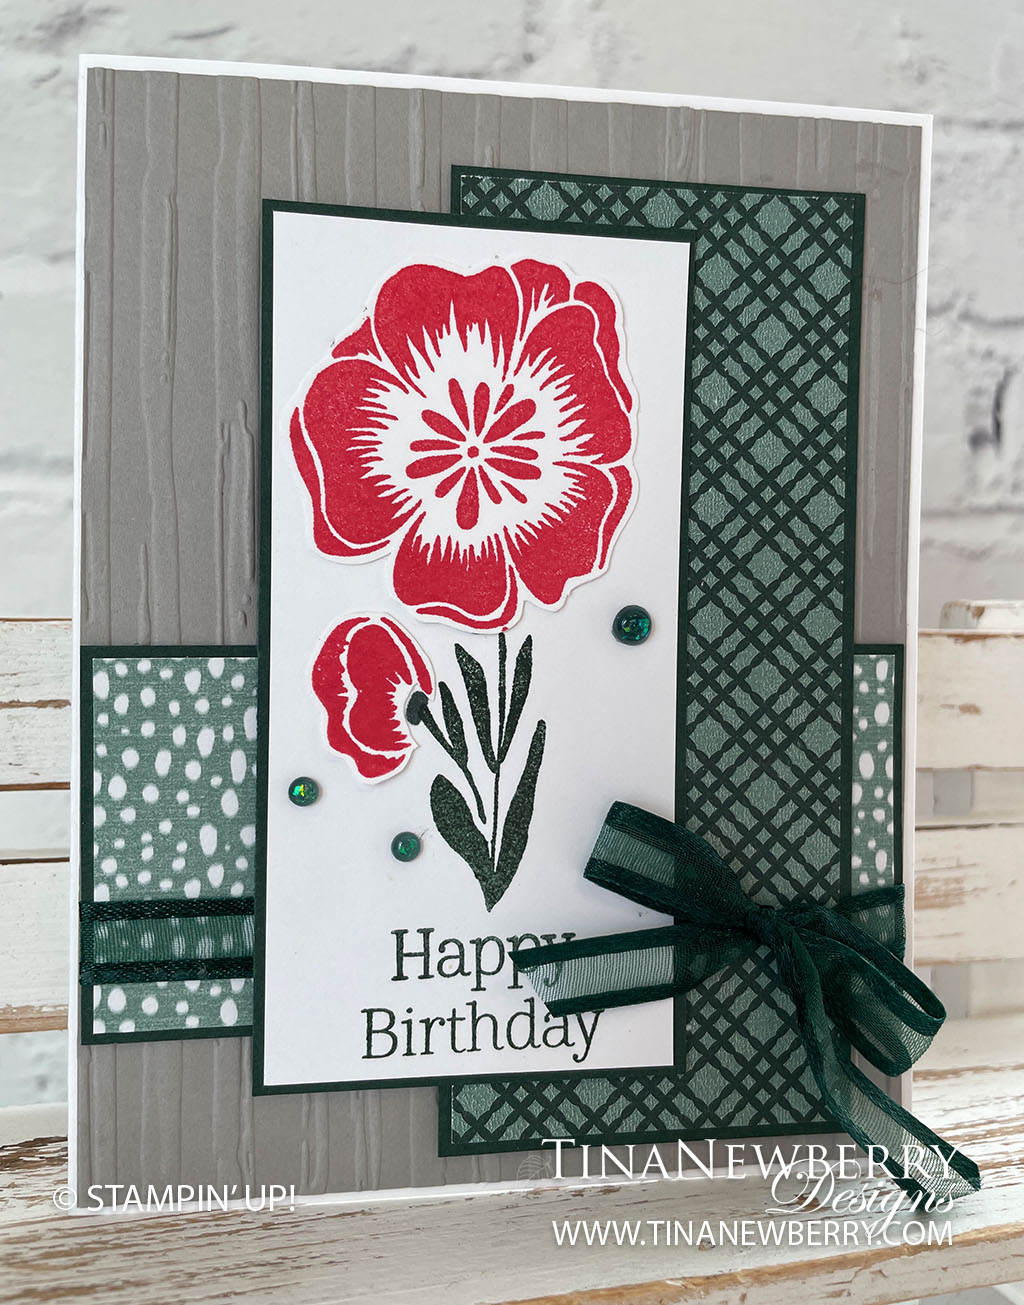
One of the challenges of stamping is creating multi-color images with one stamp. In this case, the stamp is a flower with stems. Who wants a green flower or peach stems? Here’s a quick and easy technique to get your flowers and stems in their natural color families.

Create timeless designs with the Lovely in Linen Suite! Each piece is carefully designed to work with and complement one another, from the rustic floral designs on the paper to the coordinating elegant everyday stamp sentiments.

Measurements

Full list of supplies needed, listed below. A die cutting machine is needed for this card.

Basic White:

  • 5 ½” x 8 ½”  scored and folded on the long-side at 4 ¼” 
  • 4” x 3 ¾” 
  • 4 x 3 ½” (for stamping flowers and fussy cutting) 
  • 2 ½” x 1” (for stamping and die cutting sentiment)

Pale Papaya:

  • 5 ⅜” x 4 ⅛” 

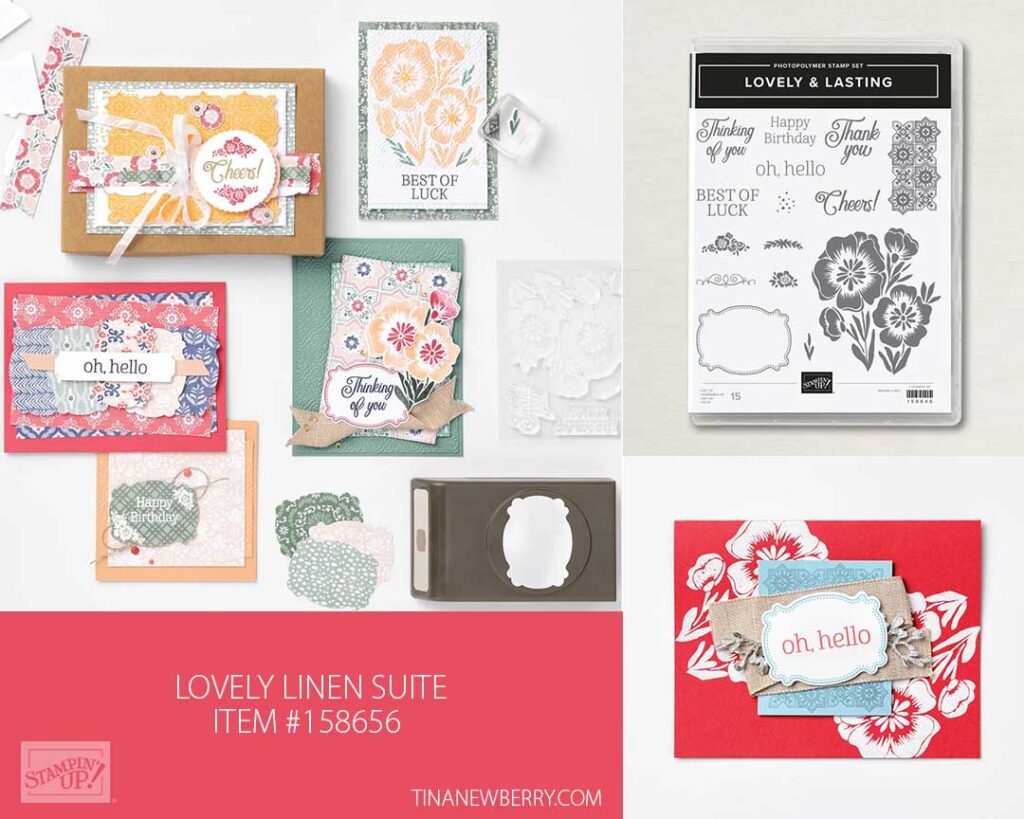
Lovely Linen Designer Series Paper: 

  • 4” x 2 ½” (Pale Papaya Print)

Let’s Create

  1. Affix all stamps to Acrylic Blocks.
  2. Fold the Card Base in half using a Bone Folder to sharpen the crease.
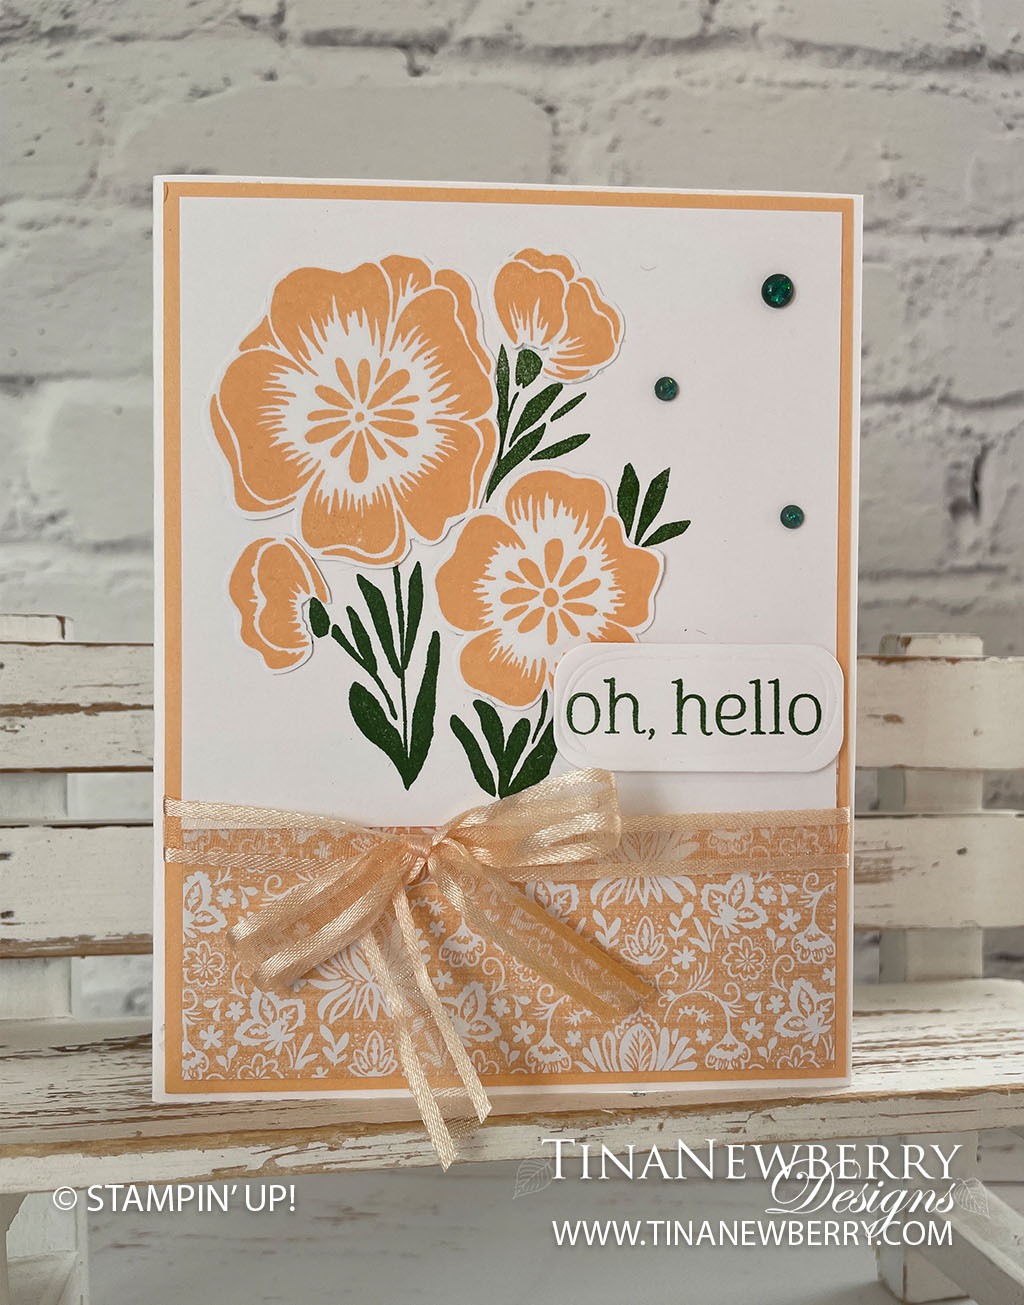
  3. Stamp the Flower Image towards the left onto the 4” x 3 ¾” Basic White cardstock using Garden Green ink.
  4. Stamp the Flower image onto the 4” x 3 ½” Basic White cardstock using Pale Papaya ink. Fussy cut the 4 flower images and adhere them to the Garden green stamped image covering the garden green flowers. 
  5. Use Stampin’ Seal to adhere the Pale Papaya Designer Series Paper to the lower edge of the Pale Papaya cardstock.
  6. Use Stampin’ Seal to adhere the stamped Basic White layer to the upper part of the Pale Papay cardstock.  
  7. Tie ribbon around these layers into a bow, covering the seam of the papers. 
  8. Use Stampin’ Dimensionals to adhere these layers to the Basic White  folded card base. 
  9. Stamp the “oh, hello” sentiment onto the 2 ½” x 1” Basic White cardstock using Garden Green ink pad and die cut with the smallest rectangular die from the Beautiful Shapes Dies.
  10. Attach this to the card using Stampin’ Dimensionals.
  11. Sprinkle 3 In Color Opal Rounds onto your card.
  12. Stamp and decorate the inside of your card and the envelope and send off a fun “Hello” to someone special.

Shopping List

Recommended Stamper’s Toolkit ❤


A Lovely Happy Birthday Greeting Card

Create solid consistent outlines to your patterned and stamped layers with one color cardstock for a stunning birthday card on an embossed background.

Create timeless designs with the Lovely in Linen Suite! Each piece is carefully designed to work with and complement one another, from the rustic floral designs on the paper to the coordinating elegant everyday stamp sentiments.

Measurements

Full list of supplies needed, listed below. A die cutting machine is needed for this card.

Basic White

  • 5 ½” x 8 ½”  scored and folded on the long-side at 4 ¼” 
  • 4 ⅛” x 2”
  • 3 ¼” x 3 ¼” (for stamping and fussy cutting the flowers)

Sahara Sand

  • 4 ⅛” x 5 ⅜”

Evening Evergreen

  • 4 ⅞” x 2 ⅛”
  • 4 ¼” x 2 ⅛” 
  • 4 ⅛” x 1 ⅞”

Lovely in Linen Designer Series Paper:

  • 4 ¾” x 2” Evening Evergreen plaid
  • 4” x 1 ¾” Soft Succulent/white polka dots 


Let’s Create

  1. Affix all stamps to Acrylic Blocks.
  2. Fold the Card Base in half using a Bone Folder to sharpen the crease.
  3. Emboss the 4 ⅛” x 5 ⅜” Sahara Sand Cardstock using the Stripes 3D embossing folder from the Stripes & Splatters 3D Bundle. You’ll need to run it through twice, once on each side of the cardstock, since this is one of the narrow folders.
  4. Using Evening Evergreen ink – ink up just the large flower part of the photopolymer stamp. Because the stamp is clear, it makes it easier to just ink up a part of the stamp. Be sure to clean and dry the ink off of any part of the other flowers/stems. Stamp the stem onto the 4 ⅛” x 2” Basic White piece of cardstock. (refer to the picture above)
  5. Using Sweet Sorbet ink, stamp the large flower and the smaller flower onto the 3 ¼” x 3 ¼” Basic White. Fussy cut these to flowers and adhere them flat to the green stems covering the green flowers.
  6. Adhere this stamped panel to the 4 ¼” x 2 ⅛” Evening Evergreen cardstock.
  7. Adhere the Evening Evergreen plaid Designer Series Paper to the 4 ⅞” x 2 ⅛” Evening Evergreen Cardstock.
  8. Adhere the Soft Succulent Polka Dot Designer Series Paper to the 4 ⅛” x 1 ⅞” Evening Evergreen cardstock.
  9. Adhere the Soft Succulent Designer Series Paper layers to the Embossed Sahara Sand panel about ¾” from the bottom edge.
  10. Adhere the Evening Evergreen plaid layers onto of these layers about ¼” from the right edge.
  11. Tie the ribbon around these layers towards the lower part of the soft succulent with the bow landing towards the right side of the card.
  12. Adhere the stamped panel to the center of the card front. Hint: Put adhesive on the right edge of the stamped panel and dimensionals on the left edge. This will help the panel to sit even on the card.
  13. Adhere the completed card front to the folded Basic White Card Base.
  14. Sprinkle a few Evening Evergreen Opal Rounds from the package of In Color Opal Rounds.
  15. Stamp and decorate the inside of your card and the envelope.
  16. So cute! Now send it to someone special.

Shopping List

Recommended Stamper’s Toolkit ❤


Thinking Happy Thoughts of You On the Farm

Stampin’ Up! Catalogs are full of inspiration. CASE the Catalog when you copy and share everything. This card was inspired by a design on page 34 of the new Jan-April Mini Catalog.

Measurements

Full list of supplies needed, listed below. A die cutting machine is needed for this card.

Mint Macaron Cardstock: 5 ½” h x 8 ½” h scored and folded at 4 ¼”

Kraft Paper:  1” h x 3 ¾” w (4)

2022-2023 Subtles Designer Series Paper

Basic White Cardstock:

  • 5 ¼” h x 4” w
  • Scrap for sentiment and goose

Scrap Cardstock for animals:

  • Evening Evergreen
  • Basic Gray
  • Daffodil Delight
  • Petal Pink
  • Garden Green

Let’s Create

  1. Affix all stamps to Acrylic Blocks.
  2. Fold the Card Base in half using a Bone Folder to sharpen the crease.
  3. Die cut all the animals:
    • Evening Evergreen Cardstock Cows (2)
    • Basic Gray Bunnies (2)
    • Daffodil Delight Goslings (4)
    • Basic White Goose
    • Petal Pink Pigs (3)
    • Garden Green Hills (3)
  4. Use Stampin’ Seal to attach the Mint Macaron DSP to the Card Base.
  5. Use Stampin’ Dimensionals to attach the Kraft Paper strips.
  6. Stamp the sentiment in Evening Evergreen Ink on Basic White Cardstock and die cut with the label die from Succulent Dies.
  7. Use Tear N’ Tape to attach a zig zag of Crinkle Seam Ribbon and then attach the Sentiment with Stampin’ Dimensionals. 
  8. Use Stampin’ Seal or Multipurpose Glue to attach the animals. 
  9. Add some 2021-2023 In Color Opal Rounds
  10. Stamp and decorate the remaining 5 ¼”  hx 4” w Basic White Cardstock and attach to the inside with Stampin’ Seal.
  11. Decorate your envelope.
  12. Great CASE!! ! Who needs this pick-me-up? Put it in the mail today.

Shoping List

This project also uses the On the Farm Bundle [160661]

Recommended Stamper’s Toolkit ❤


Create a Farm Scene From All of Us Card

My sister and her family run a farm in southeastern OH and I couldn’t wait to create with the new On The Farm Bundle and Sale-a-bration Designer Series Paper! So cute!! The On the Farm Bundle is new in the 2023 Jan-April Mini Catalog and the On the Farm Designer Series Paper is available for free with a $50 product order during Sale-a-bration. Both catalogs begin Jan. 5, 2023.

Choose a free Sale-A-Bration product – like this farm themed paper – with every $50 or $100 you spend (before tax and shipping) January 5 – February 28, 2023.

Measurements

Full list of supplies needed, listed below. A die cutting machine is needed for this card.

Daffodil Delight Cardstock; 5 ½” h x 8 ½” w scored and folded on the long-side at 4 ¼”

Basic White Cardstock: 

  • scrap for sentiment label
  • 5 ¼” h x 4” w

On the Farm Designer Series Paper (DSP):

  • Daffodil Delight Striped:5 ¼” h x 4” w
  • Balmy Blue Flower: 5 ¼” h x 4” w
  • Cow, sheep, pigs, and flowers

Let’s Create

  1. Affix all stamps to Acrylic Blocks.
  2. Fold the Card Base in half using a Bone Folder to sharpen the crease.
  3. Attach the Daffodil Delight Striped DSP to the from of the card base with Stampin’ Seal.
  4. Use the Picture This! Die to die cut the rectangles from the Balmy Blue DSP.
  5. Use Paper Snips to fussy cut out the animals and flowers. If you want a black cow with a white face, like mine, use the Basic Black Dark Stampin’ Blend to color the cow.
  6. Stamp the sentiment in Cherry Cobbler ink on the Basic White Cardstock and die cut with the label from the Seasonal Label Dies.
  7. Arrange the Balmy Blue, sentiment, animals, and flowers on the front of the card in a pleasing manner.
  8. Carefully attach the Balmy Blue die cut with Stampin’ Dimensionals.
  9. Attach the Sentiment with Stampin’ Dimensionals.
  10. Attach the animals and flowers with Stampin’ Seal, Mini Glue Dots and/or Stampin’ Seal as needed.
  11. Add some Rustic Metal Dots
  12. Stamp and decorate the remaining 5 ¼” hx 4” w Basic White Cardstock and attach to the inside with Stampin’ Seal.
  13. Decorate your envelope.
  14. So Fun!! ! Now who will you send it to?

Shopping List

This project also uses the On the Farm Bundle [160661] and On the Farm Sale-a-bration Designer Series Paper [160835] available Jan 5, 2023.

Recommended Stamper’s Toolkit ❤