Sweet Birthday Wishes

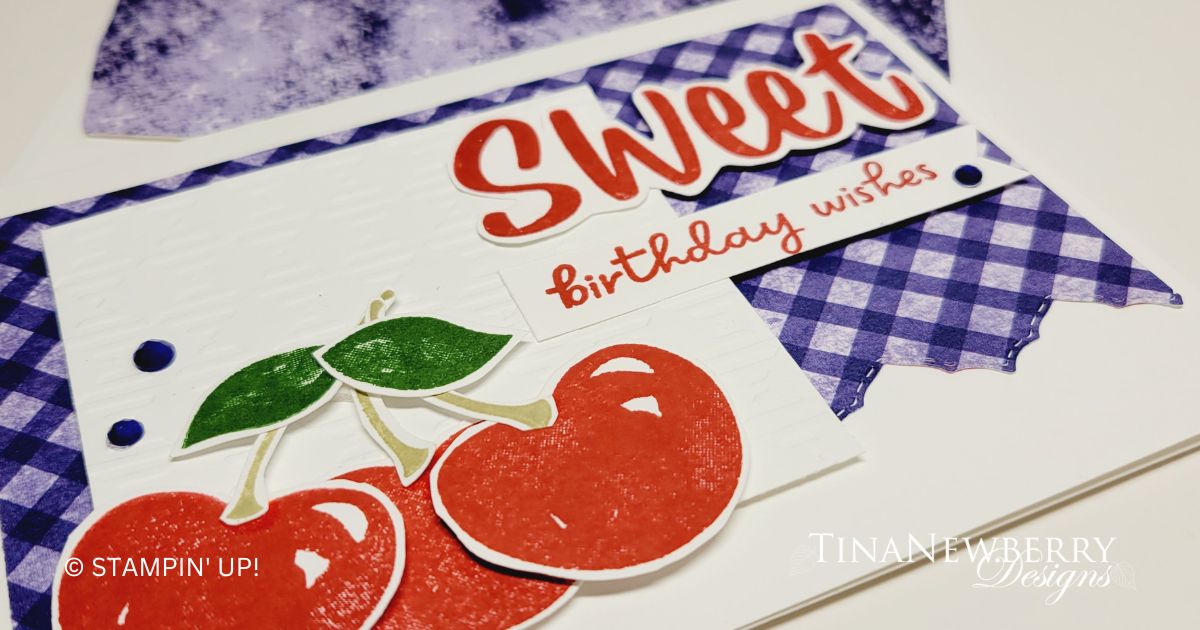
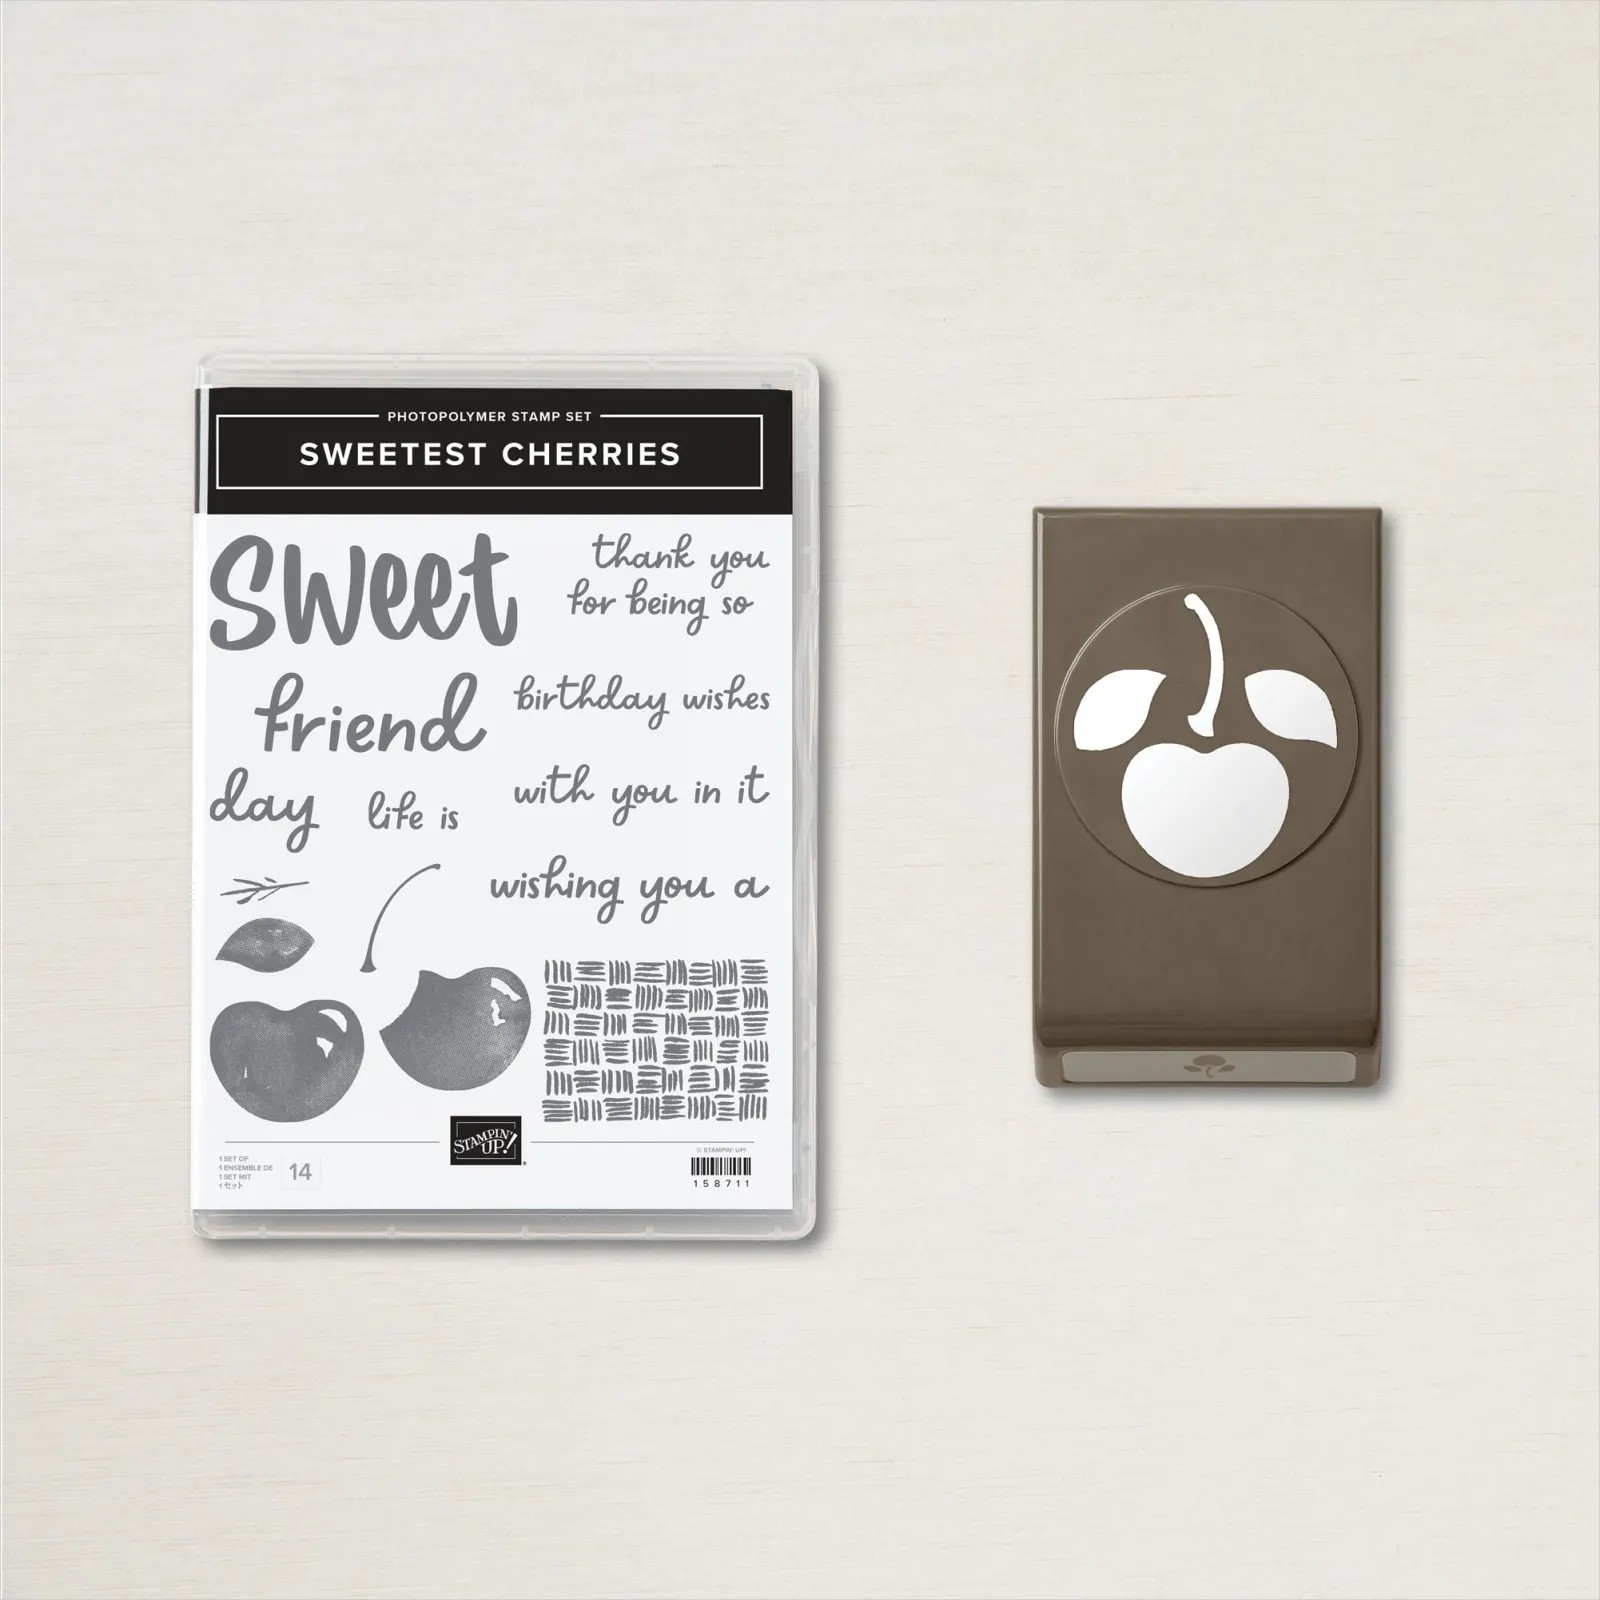
The big SWEET in the Sweetest Cherries Bundle can be combined with the variety of words and phrases to create any number of cards and the cherries are so fun! Design inspired by Peggy Noe.

The Sweetest Cherries Bundle includes the Sweetest Cherries Stamp Set and the Cherries Builder Punch. Fill your cards and scrapbook pages with buckets of cherries. Stamp the cherries, then cut them out quickly and easily with the coordinating punch.

Measurements

Full list of supplies needed, listed below. A die cutting machine is needed for this card.
Basic White Thick Cardstock: 5 1/2″ w x 8 1/2″ h folded to 5 1/2″ w x 4 1/4″ h Card Base
Basic White Cardstock:

  • 3″ h x 3″ w
  • Scrap for tag, cherries and sweet

Tea Boutique Designer Series Paper (DSP): 3 1/2″ h x 5 1/4″ w

Let’s Create

  1. Affix all stamps to Acrylic Blocks.
  2. Fold the Card Base in half using a Bone Folder to sharpen the crease.
  3. Run the DSP through the Stampin’ Cut & Embossing machine with the Basic Borders Dies. Attach to the front of the card with Stampin’ Seal.
  4. Run the 3″ square Basic White Cardstock through the Stampin’ Cut & Embossing machine with the Gingham Embossing Folder and attach with Stampin’ Dimensionals.
  5. On the scrap Basic White Cardstock, stamp the Sweet, sentiment, and Cherries in Real Red ink, the Stems in Crumb Cake and the Leaves in Garden Green.
  6. Use the Cherries Builder Punch to punch the Cherries, Leaves and Stems. Use Mini Glue Dots, Multipurpose Glue and Stampin’ Dimensionals to assemble the Cherries. Attach with Stampin’ Dimensionals and Stampin’ Seal.
  7. Use Paper Snips to trim out the Sweet.
  8. Use your trimmer to cut the Sentiment down to a small rectangle, then use Paper Snips to flag one end.
  9. Attach the Sweet and sentiment with Stampin’ Dimensionals and Stampin’ Seal.
  10. Sprinkle on the Solid Faceted Gems.
  11. Stamp and decorate the inside and attach with Stampin’ Seal.
  12. Decorate your envelope.
  13. So cute! Now send it to someone special.

Shopping List

Recommended Stamper’s Toolkit

Product List
Order online from the convenience of your own home or send me your order and I’ll take care of you. ❤ Either way, please use the host code ANTD9UHS. Order online AND, if your order is $50 or more using host code ANTD9UHS between now and the end of the month you’ll receive a free pack of embellishment as a THANK YOU gift from me. ❤ If your order is over $150, skip the host code, earn Stampin’ Rewards for free stuff yourself and I’ll still send you a free pack of embellishment as a THANK YOU gift from me. ❤

Seascape Sunset Greeting Card

I love this combination of stamp sets, dies, and colors. What a serene setting. So peaceful.

Create incredible layered dioramas with the Layering Diorama Dies! These dies nest to create a 3D effect for unique diorama card fronts. For an easy but intricate looking diorama, use a minimum of 3 diorama layers with tonal cardstock to create depth-of-field. Want to create a safari escape? An underwater world? Or frame a space exploration? The diorama designs are versatile to fit a wide variety of diorama landscapes!

Measurements

Full list of supplies needed, listed below. A die cutting machine is needed for this card.

Card Base Basic White Thick Card Stock 8 ½” x 5 ½”, score at 4 ¼”
Basic White layer 4” x 5 ¼”, Die-Cut with Diorama Die (to use as a masking template)
Basic White layer 4” x 5 ¼”
Vellum Punched Dragonfly

Let’s Create

  1. Affix all stamps to Acrylic Blocks.
  2. Fold the Card Base in half using a Bone Folder to sharpen the crease.
  3. Create the scene
    • Use Diorama layer as a template.
    • Use Blending Brushes and the masking technique to create first the sky, and then the ocean. (I used large yellow stickies, but you could also use our masking paper.
    • Place the diorama mask on the Basic White layer.
    • Place large mask (yellow sticky) to cover the ocean while you create the sky.
    • Create the sky with Daffodil Delight and Calypso Coral ink and Blending Brushes.
    • Lift the sticky and use a new sticky to create a mask to cover the sky.
    • Create the ocean with Pool Party and Bermuda Bay ink and Blending Brushes.)
  4. Stamp the fish, the sentiment, and the plants in Tuxedo black ink.
  5. Stamp the sand in Sahara Sand ink.
  6. Wrap ribbon around layer, centered on the horizon line. Tie a bow. Adhere to card base with Stampin’ Dimensionals.
  7. Punch small dragonfly from vellum and adhere to sky. Place a small gem on the dragonfly.
  8. Stamp and decorate the inside.
  9. Decorate your envelope.
  10. Stunning!! Now send it to someone special.

Shopping List

Recommended Stamper’s Toolkit

Product List
Order online from the convenience of your own home or send me your order and I’ll take care of you. ❤ Either way, please use the host code ANTD9UHS. Order online AND, if your order is $50 or more using host code ANTD9UHS between now and the end of the month you’ll receive a free pack of embellishment as a THANK YOU gift from me. ❤ If your order is over $150, skip the host code, earn Stampin’ Rewards for free stuff yourself and I’ll still send you a free pack of embellishment as a THANK YOU gift from me. ❤

Sunset Card with Diorama Dies

A few die cuts and some amazing paper brings this card together in a jiffy.

Create incredible layered dioramas with the Layering Diorama Dies! These dies nest to create a 3D effect for unique diorama card fronts. For an easy but intricate looking diorama, use a minimum of 3 diorama layers with tonal cardstock to create depth-of-field. Want to create a safari escape? An underwater world? Or frame a space exploration? The diorama designs are versatile to fit a wide variety of diorama landscapes!

Measurements

Full list of supplies needed, listed below. A die cutting machine is needed for this card.

Card Base Pumpkin Pie Cardstock: 8 ½” x 5 ½”, score at 4 ¼”
Pumpkin Pie Cardstock: 4 ¼” x 5 ½”, Die-Cut with DIorama Die
Mango MelodyCardstock: 4 ¼” x 5 ½”, Die-Cut with next smallest DIorama Die
Designer Series Paper (DSP) Layer: 4 ⅛” x 5 ⅜”
Die-Cut Harvest Die in Cajun Craze Cardstock
Punched Dual Oval in coordinating Designer Series Paper
Inside: Basic White Cardstock 4″ h x 5 1/4″ w

Let’s Create

  1. Affix all stamps to Acrylic Blocks.
  2. Fold the Card Base in half using a Bone Folder to sharpen the crease.
  3. Die-Cut Harvest Die in Cajun Craze
  4. Punch Dual Oval in coordinating Designer Series Paper. Stamp sentiment in Cajun Craze.
  5. Assemble Card.
    • Adhere DSP to card base with liquid glue.
    • Adhere Mango Melody layer with liquid glue.
    • Adhere Pumpkin Pie layer with Stampin’ Dimensionals.
    • Adhere sentiment with liquid glue.
    • Adhere Harvest Die with liquid glue on the card base and Stampin’ Dimensionals on the inside.
  6. Sprinkle on the Glossy Dots.
  7. Stamp and decorate the inside and attach with Stampin’ Seal.
  8. Decorate your envelope.
  9. Stunning and so easy! Who needs a little hello? Put it in the mail.

Shopping List

Recommended Stamper’s Toolkit

Product List
Order online from the convenience of your own home or send me your order and I’ll take care of you. ❤ Either way, please use the host code ANTD9UHS. Order online AND, if your order is $50 or more using host code ANTD9UHS between now and the end of the month you’ll receive a free pack of embellishment as a THANK YOU gift from me. ❤ If your order is over $150, skip the host code, earn Stampin’ Rewards for free stuff yourself and I’ll still send you a free pack of embellishment as a THANK YOU gift from me. ❤