Peaceful Christmas Alternative #2

Thank you for your interest in this project. Some projects are exclusive to subscribers who will receive passwords by email.

Are you a subscriber? Awesome! Check your email for the password and enter it here to view this project.

Not yet subscribed?  We’d love for you to join us.  Subscribe to my email list and receive news, information and inspiration by email.

CASE = Copy and Share Everything

Are you shy about CASEing? Seeing what Stampin’ Up! artists copy and share might help you feel a little more at ease and give you the courage to start employing this handy method for jumpstarting your own creativity. We suggest copying the layout, color scheme, or technique, but you can copy anything that makes you feel like pulling out your crafting supplies and starting on a project!

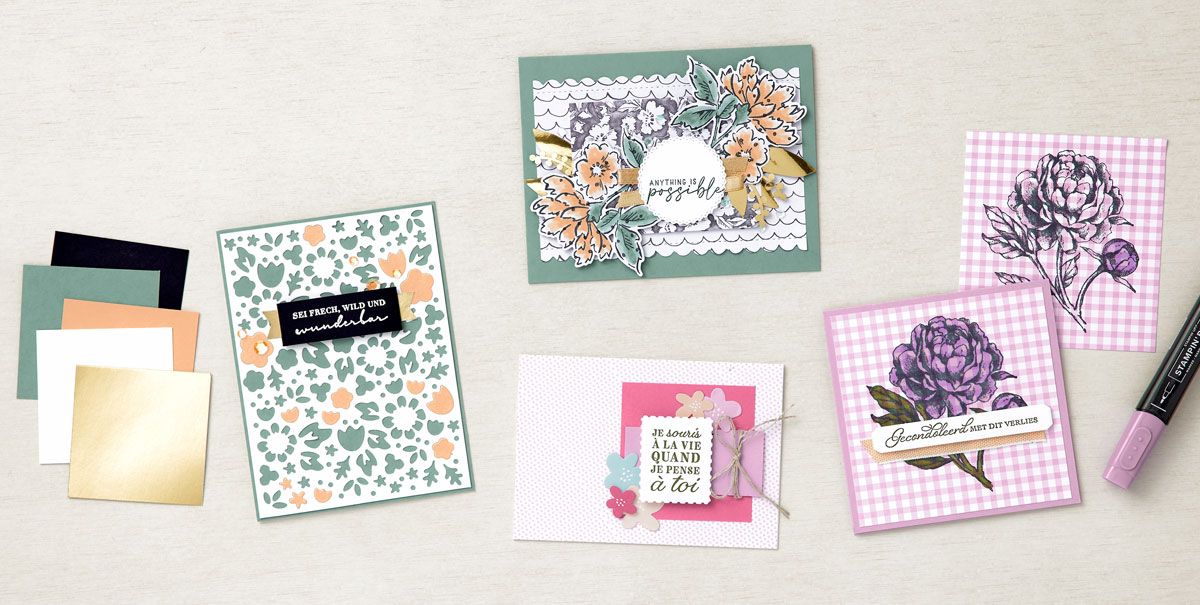
For the Je souris à la vie card, we CASEd the card’s eye-catching layout with its lovely layers and accents. We also feature a great technique that you can add to your papercrafting knowledge base: Use cornstarch or baby powder on the back of stickers when you want to remove the stickiness. This makes it easy to pop them up using Stampin’ Dimensionals. (We love trying new things!)

We CASEd a breathtaking color combo (Basic Black, Basic White, gold, Pale Papaya, and Soft Succulent) to create the Wunderbar card. Isn’t that color combination striking? We also used the new 5-5/16″ x 4″ (13.5 x 10.2 cm) Flower Market Die to make a perfect layer, allowing you to enhance a card front with lattice-like intricacy and detail. As you can see, we added cardstock scraps to the back to pull in extra color and create interest. You’ll love that effect in your cards!

On the Gecondoleerd card, we CASEd stamping and coloring on Designer Series Paper, and we think the Fresh Freesia and Mossy Meadow Stampin’ Blends look lovely together! And our new Pale Papaya & White 1/2″ (1.3 cm) Ribbon adds just the right touch of softness to complete the card.

Show us your best CASE! Upload your projects to the Customer PaperCrafty Time Group. We’d love to see them!

Happy Anniversary

SO much fun! Combine dies, stamps and stunning paper to create this fall festive Double Z-Fold Anniversary card. The Double Z-Fold adds some WOW factor with little effort. This one was made for my parents Anniversary using the beautiful Nature’s Harvest Designer Series Paper, Always in My Heart Stamp set and Meadow Dies.

Measurements

Full list of supplies needed, listed below. A die cutting machine is needed for this card.
LARGE OUTER Z
Card Base Z: Cajun Craze Cardstock 11” w x 4-1/4” h scored along the long side at 5 1/2″ and 8 1/4”. Fold on the score lines
Front Background: Harvest Meadow DSP 4” h x 2 1/2″ w
Middle Background: Harvest Meadow DSP 4” h x 2 1/2″ w
Inside Background: Harvest Meadow DSP 4” h x 5 1/4″ w

SMALL INNER Z
Card Base: Calypso Cardstock 10” w x 3 1/4″ h and score along the long side at 4 1/2″ and 7 1/4” Fold on the score lines
Front Background: Harvest Meadow DSP 3” h x 4 1/4″ w
Middle Background: Harvest Meadow DSP 3” h x 2-1/2” w
Inside Sentiment: White Cardstock 3” h x 2-1/2” w
Front Sentiment: White Cardstock scrap

Let’s Create

Shopping List

Stamper’s Toolkit

You will also need adhesive, acrylic blocks, scissors and other basic PaperCrafting items from the Stamper’s Toolkit

Harvest Cheer

Bring your imagination to life, first when you select the package being delivered and again when you set to coloring the girl. Coloring is an increasingly popular activity known for being relaxing and this stamp set sets you up for a good coloring session in the middle of your papercrafty time. Enjoy!

Measurements

Misty Moonlight Card Base 8 ½” x 5 ½”, scored at 4 ¼”

Basic White

Inside Layer:  5 1/4″ h x 4″ w

Panel Basic White 2 ½” x 4 ¼”

Harvest Meadow Designer Series Paper

Misty Moonlight layer 3 ¾” x 5”

Bumblebee layer 3 ½” x 4 ¾”

Coordinating Scrap 3” x 6 (for envelope)

Cardstock Layer Bumblebee 3 ¾” x 5”

Let’s Create

  1. Adhere all stamps to acrylic blocks.
  2. Stamp top half of girl in Memento Black on Basic White panel
  3. Align and stamp bottom half of girl in Memento Black
  4. Stamp off once, and stamp the ground lightly underneath the girls boots in Memento Black
  5. Use Blends and Color Lifter to color the image:
    1. Boots are done in Basic Black light
    2. Leggings are done in Balmy Blue light on every other stripe
    3. Coat is done in Balmy Blue light, and lightened with the Color Lifter
    4. Gloves are done in Pumpkin Pie dark
    5. Cuffs and scarf are done in Pumpkin Pie light
    6. Flower wrapping is done in Crumb Cake light (using dark for just the shadows)
    7. Bouquet is done in Pumpkin Pie, Bumblebee, Daffodil Delight, Old Olive, CInnamon Cider and Crumb Cake. CREATIVE TIP: Use short pen strokes to achieve a look of long needles. Use a dot motion to achieve a “spray” look
  6. Stamp bottom right corner of inside layer and color.
  7. Adhere the Misty Moonlight DSP on an angle tilted to the left.
  8. Adhere Bumblebee DSP to Bumblebee Cardstock.
  9. Wrap Crumb Cake twine around this layer and tie in a bow.
  10. Then adhere this panel to the card front on an angle tilted to the right.
  11. Adhere colored image to card front with liquid glue.
  12. Adhere decorated inside layer.
  13. Cut a piece of scrap Designer Series Paper to 3” x 6”. Adhere to back flap of envelope and follow around the edge of the envelope with snips to trim the paper into shape.
  14. So cute! Who will you send it to?

Shopping List

Stamper’s Toolkit

You will also need adhesive, acrylic blocks, scissors and other basic PaperCrafting items from the Stamper’s Toolkit