Catching Snowflakes

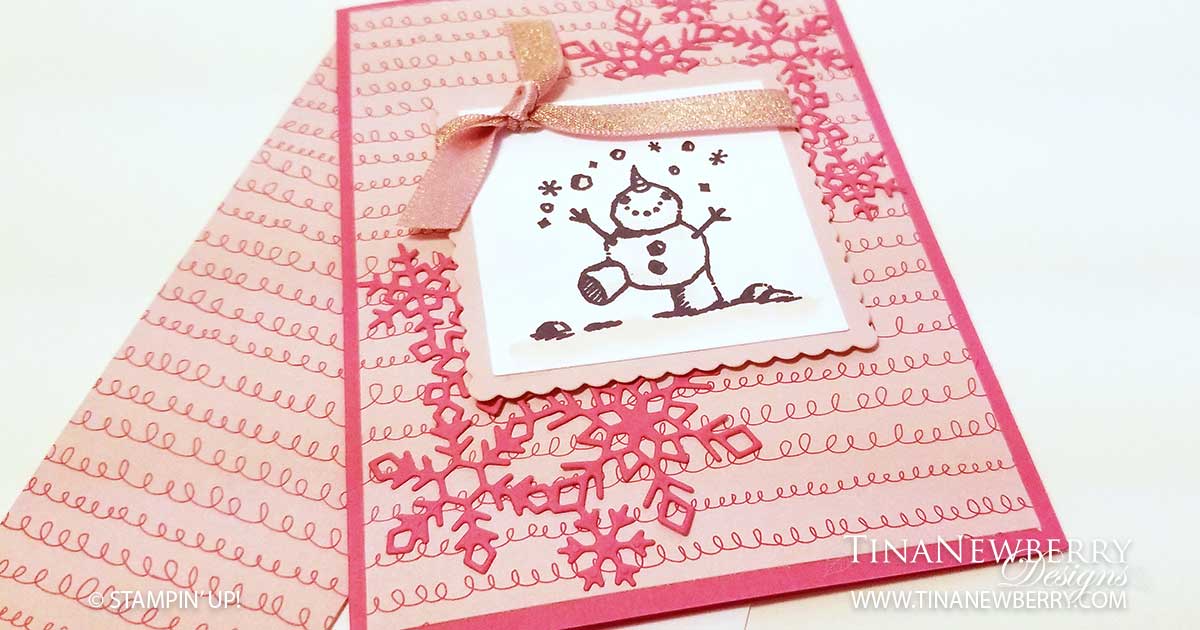
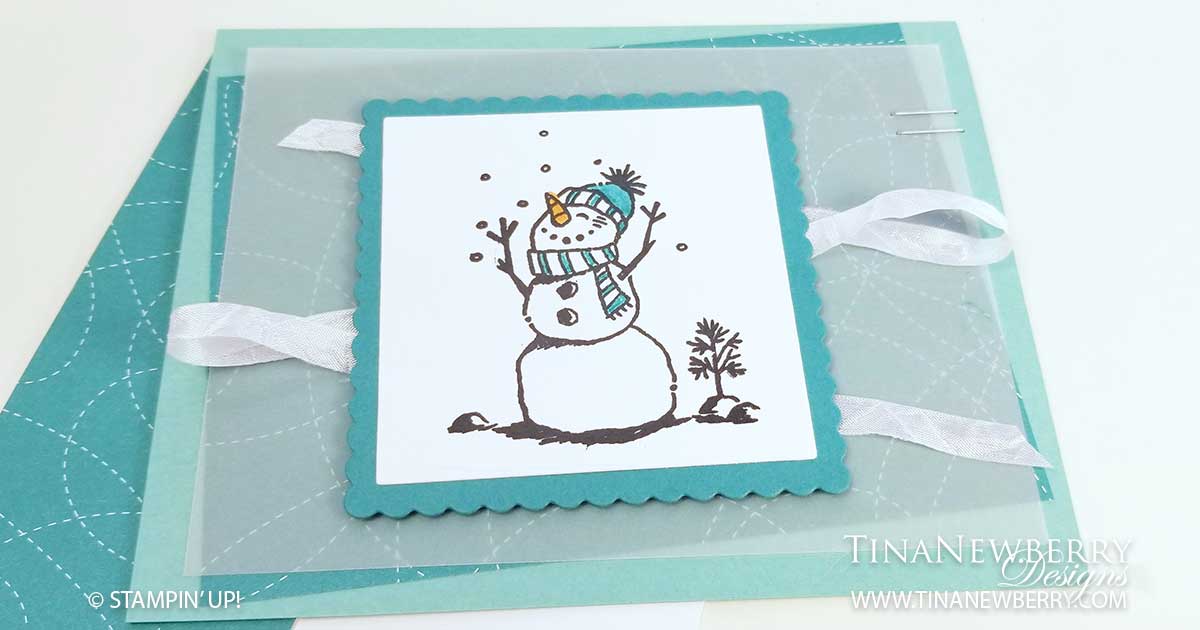
I just love Snowmen and this one just looks like he is so happy catching snowflakes. The playfulness of the Snail Mail Designer Series Paper becomes available tomorrow (eek!) and is just perfect for Mr. Snowman. Vellum adds a softness to the card with the crinkle seam ribbon in the background. I attempted to put a sentiment on the front of this one and decided against it. I like him just as he is.

Full list of supplies needed, listed below. A die cutting machine is needed for this card.
Card Base: Canine Cabana Cardstock 8 1/2 h” x 5 1/2″ w folded to 5 1/2″ h x 4 1/4″ w.
Background: Snail Mail DSP 5″ h x 3 3/4″ w
Vellum Layer: Vellum Cardstock 5″ h x 3 3/4″ w
Sentiment Matte: Bermuda Bay Cardstock trimmed with the Layering Squares Dies to a 3″ square
Sentiment Layer: 
Whisper White Cardstock – Stamp first (see below) then trim with the Layering Squares Dies to a 2 5/8″ square
Inside Layer: Whisper White Cardstock 5 1/4″ h x 4″ w

  1. Affix all stamps to Acrylic Blocks.
  2. Fold the Card Base in half using a Bone Folder to sharpen the crease.
  3. Attach the Background DSP with Stampin’ Seal
  4. Add the Vellum Cardstock with Stampin Seal, being sure to limit the adhesive to where the Sentiment will be.
  5. Add two staples to the right-hand side – for design elements more than to hold the paper on.
  6. Run Stampin’ Seal on top of the Vellum in a Z pattern and place the Crinkle Ribbon along that adhesive.
  7. Stamp the Snowman in Tuxedo Memento Ink on the Sentiment Layer and color with the Bermuda Bay and Pumpkin Pie Stampin’ Blends.
  8. Attach the Sentiment to the Sentiment Matte and attach the Sentiment Matte with Stampin’ Dimensionals.
  9. Decorate the Inside Layer and attach.
  10. Decorate the envelope.
  11. So cute! Now send it to someone special.

Shopping List

This project uses the Snail Mail Designer Series Paper from the Jan-June Mini Catalog, available January 5, 2020

Recommended Stamper’s Toolkit ❤


Snowflake Swirls

When I saw the Snail Mail Designer Series Paper in the Jan-June Mini Catalog, I just knew it was perfect for more cards with the a-dorable Snowman Season Photopolymer Stamp set. This little guy comes to life with the beautiful snowflakes from the Christmas Layers Dies, which really are more winter than Christmas. The Die set comes with 7 snowflake and foliage dies so you can add a pop of snowflake color to any project.

Full list of supplies needed, listed below. A die cutting machine is needed for this card.
Card Base: Melon Mambo Cardstock 8 1/2 h” x 5 1/2″ w folded to 5 1/2″ h x 4 1/4″ w.
Background: Snail Mail DSP 5 1/4″ h x 4″ w
Snowflake Decorations (2): Melon Mambo Trimmed with the Christmas Layers Dies
Sentiment Matte: Blushing Bride Cardstock 2 3/4″ x 2 3/4″ w trimmed with the Layer Squares Dies
Sentiment Layer: 
Stamp first (see instructions below) Whisper White Cardstock 3/8″ h x 2 3/8″ w trimmed with the Layer Squares Dies
Ribbon: 6″ Blushing Bride 3/8″ Metallic Ribbon (avail in the Jan – June Mini Catalog Jan 5th)
Inside Layer: Whisper White Cardstock 5 1/4″ h x 4″ w

  1. Affix all stamps to Acrylic Blocks.
  2. Fold the Card Base in half using a Bone Folder to sharpen the crease.
  3. Attach the Background using Stampin’ Seal.
  4. Making the Snowflake Layer
    1. Attach Adhesive Sheets to the Melon Mambo Cardstock
    2. Die Cut the Snowflakes to make stickers
    3. Poke out the extra pieces from the Snowflake Die Cut, being careful not to remove the backing.
    4. Remove the backing to reveal the adhesive.
    5. Attach to Card.
  5. Stamp the Snowman on Whisper White Cardstock and Die Cut with the Layering Square Die.
  6. Use the Petal Pink Stampin’ Blend to add a little color to the Sentiment.
  7. Attach the Sentiment to the Sentiment Matte.
  8. Wrap Ribbon around Sentiment Matte and tie a knot.
  9. Attach the Sentiment Matte with Stampin’ Dimensionals.
  10. Decorate the Inside Layer and attach.
  11. Decorate the envelope.
  12. So cute! Now send it to someone special.

Shopping List

This project uses the Snail Mail Designer Series Paper and the Blushing Bride 3/8″ Metallic Ribbon. Both will be available starting January 5, 2021 in the January to June Mini Catalog.

Recommended Stamper’s Toolkit ❤


Blow Out the Candles

Thank you for your interest in this project. Some projects are exclusive to subscribers who will receive passwords by email.

Are you a subscriber? Awesome! Check your email for the password and enter it here to view this project.

Not yet subscribed?  We’d love for you to join us.  Subscribe to my email list and receive news, information and inspiration by email.

You’re Fabulous

I’m on a roll making birthday cards these days. Somehow I am in short supply. I just love this sentiment from the FREE Approaching Perfection Sale-a-bration Stamp Set. For this pretty card I dug out the Peony Dies to make another beautiful 3-D flower for the focal point and then prettied up all around it with the Oh So Ombre Designer Series Paper, also FREE from the Sale-a-bration Catalog. The Lovely Labels Pick A Punch makes it quick and easy to make beautiful matted labels. Look closely, this card uses only Stamps, Ink and Paper for some #simplestamping.

Full list of supplies needed, listed below. A die cutting machine is needed for this card.
Card Base: Blackberry Bliss Cardstock 8 1/2 h” x 5 1/2″ w folded to 5 1/2″ h x 4 1/4″ w.
Background: Oh So Ombre DSP 5 1/4″ h x 4″ w
Decorative Layer Matte: Whisper White Cardstock 4″ h x 2 1/2″ w
Decorative Layer: Oh So Ombre DSP 3 7/8″ h x 2 3/8″ w
Sentiment Matte: Blackberry Bliss Cardstock 1″ h x 3 1/2″ w trimmed with the Lovely Labels Pick A Punch
Sentiment Layer: 
Whisper White Cardstock 3/4″ h x 2 3/4″ w trimmed with the Lovely Labels Pick A Punch
Inside Layer: Whisper White Cardstock 5 1/4″ h x 4″ w

  1. Affix all stamps to Acrylic Blocks.
  2. Fold the Card Base in half using a Bone Folder to sharpen the crease.
  3. Attach the Background Layer using Stampin’ Seal.
  4. Attach the Decorative Layer to the Decorative Layer Matte using Stampin’ Seal. Then attach to the Background using Stampin’ Dimensionals.
  5. Make the Peony
    1. Crinkle a piece of Whisper White Cardstock and then die cut the Peony.
    2. Die cut the leaves from Pear Pizzaz and the Pistil from Daffodil Delight.
    3. Assemble the Peony and secure with Mini Glue Dots.
    4. Attach the Pistil with a Mini Glue Dot.
    5. Assemble the Leaves and attach with Mini Glue Dots.
  6. Attach the Peony to the Decorative Layer with a Stampin’ Dimensional or a Mini Glue Dot.
  7. Stamp the Sentiment in Blackberry Bliss ink on Sentiment Layer and trim ends with the Lovely Labels Pick A Punch
  8. Attach Sentiment to the Sentiment Matte and add to card with Stampin Dimensionals
  9. Decorate the Inside Layer and attach.
  10. Decorate the envelope.
  11. Pretty! Put it in the mail!

Shopping List

This project uses new products available January 5, 2021: Oh So Ombre Designer Series Paper [155225] and Approaching Perfection Stamp Set [155282]

Recommended Stamper’s Toolkit ❤


Happy Birthday!

SNEAK PEAK: This quick and easy masculine birthday card uses two FREE products from the upcoming Sale-a-bration Catalog and one from the new January – June Mini Catalog. From January 5th – February 28th in addition to the FREE gift you get from me, you’ll pick FREE product from the Sale-a-bration catalog for every $50 increment purchased. I’ve used the Approaching Perfection Stamp Set and the Oh So Ombre Designer Series Paper on this pretty card. From the January – June Catalog, I’ve used the Painted Texture Embossing Folder. You’re going to love these products! And the best part, this card takes a SIP, using only Stamps, Ink and Paper for some #simplestamping.

Full list of supplies needed, listed below. A die cutting machine is needed for this card.
Card Base: Basic Black Cardstock 8 1/2 h” x 5 1/2″ w folded to 5 1/2″ h x 4 1/4″ w.
Background: Oh So Ombre DSP 5 1/4″ h x 4″ w with the Painted Texture Embossing Folder.
Decorative Layer Matte: Granny Apple Green Cardstock 5 1/4″ h x 1 3/4″ w.
Decorative Layer: Oh So Ombre DSP 5 1/4″ h x 1 1/2″ w.
Sentiment Matte:
Granny Apple Green with the Tasteful Labels Dies.
Sentiment Layer: Whisper White Cardstock with the Tasteful Labels Dies.
Inside Layer: Whisper White Cardstock 5 1/4″ h x 4″ w.

  1. Affix all stamps to Acrylic Blocks.
  2. Fold the Card Base in half using a Bone Folder to sharpen the crease.
  3. Run the Background through the Stampin’ Cut & Emboss Machine with the Painted Texture Embossing Folder and attach to the Card Base with Stampin’ Seal.
  4. Use Stampin’ Seal to attach the Decorative Layer to the Decorative Matte and then attach to the Background.
  5. Die cut the Sentiment Matte and the Sentiment Layer.
  6. Stamp the Sentiment on the Sentiment Layer with Tuxedo Black Memento Ink and attach to the Sentiment Matte with Stampin’ Seal.
  7. Add the Sentiment Matte with Stampin’ Dimensionals.
  8. Decorate the Inside Layer and attach.
  9. Decorate the envelope.
  10. That was easy! Who will you send it to?

Shopping List

Recommended Stamper’s Toolkit ❤