Hello Spring

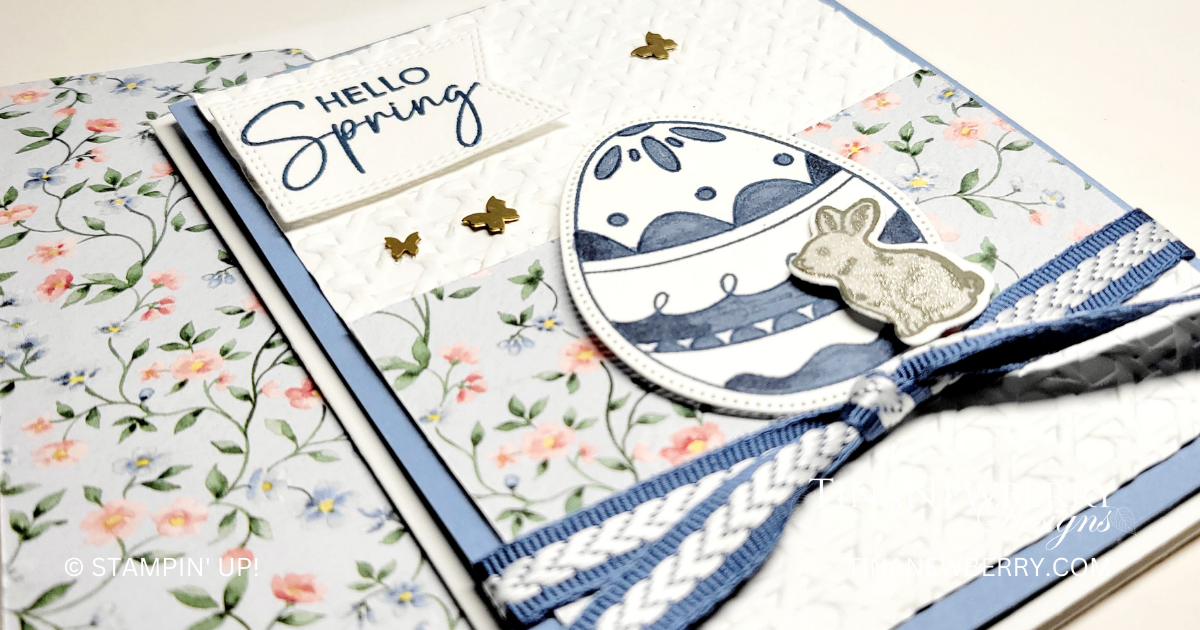
Thank you to everyone who helped me with the color selection for this card at Stamp-Along Saturday. It was a tough choice between a Misty Moonlight, Boho Blue, or Flirty Flamingo egg. I just love the Flight & Airy Sale-a-bration paper behind the egg. Give your bunny some shimmer with the Clear Wink of Stella.

Stamp, then cut out Easter eggs and bunnies for cards and gift tags in minutes with the Excellent Eggs bundle. Combine stamp images and dies to create colorful and dimensional accents to welcome Easter and the arrival of spring!

Measurements

Full list of supplies needed, listed below. A die cutting machine is needed for this card.

Basic White Thick Cardstock: 

  • 5 ½” h x 8 ½” w scored and folded at 4 ¼” w
  • Scrap for egg and bunny

Basic White Cardstock:

  • 5 ¼” h x 4” w
  • 5” h x 3 ¾” w
  • Scrap for sentiment

Boho Blue: 5 ¼” h x 4” w

Flight & Airy Designer Series Paper (DSP): 2” h x 3 ¾” w


Let’s Create

  1. Affix all stamps to Acrylic Blocks.
  2. Fold the Card Base in half using a Bone Folder to sharpen the crease.
  3. Run one of the 5 ¼” h x 4” w Basic White panels through the Stampin’ Cut & Emboss Machine with the Cane Weave Embossing Folder and attach to the Boho Blue panel with Stampin’ Seal.
  4. Attach the DSP to the Cane Weave embossed panel with Tear N’ Tape (hold better on embossed surfaces).
  5. Wrap Inner Braid ribbon around the Boho Blue panel and tie a knot. 
  6. Attach the Boho Blue panel with Stampin’ Dimensionals. 
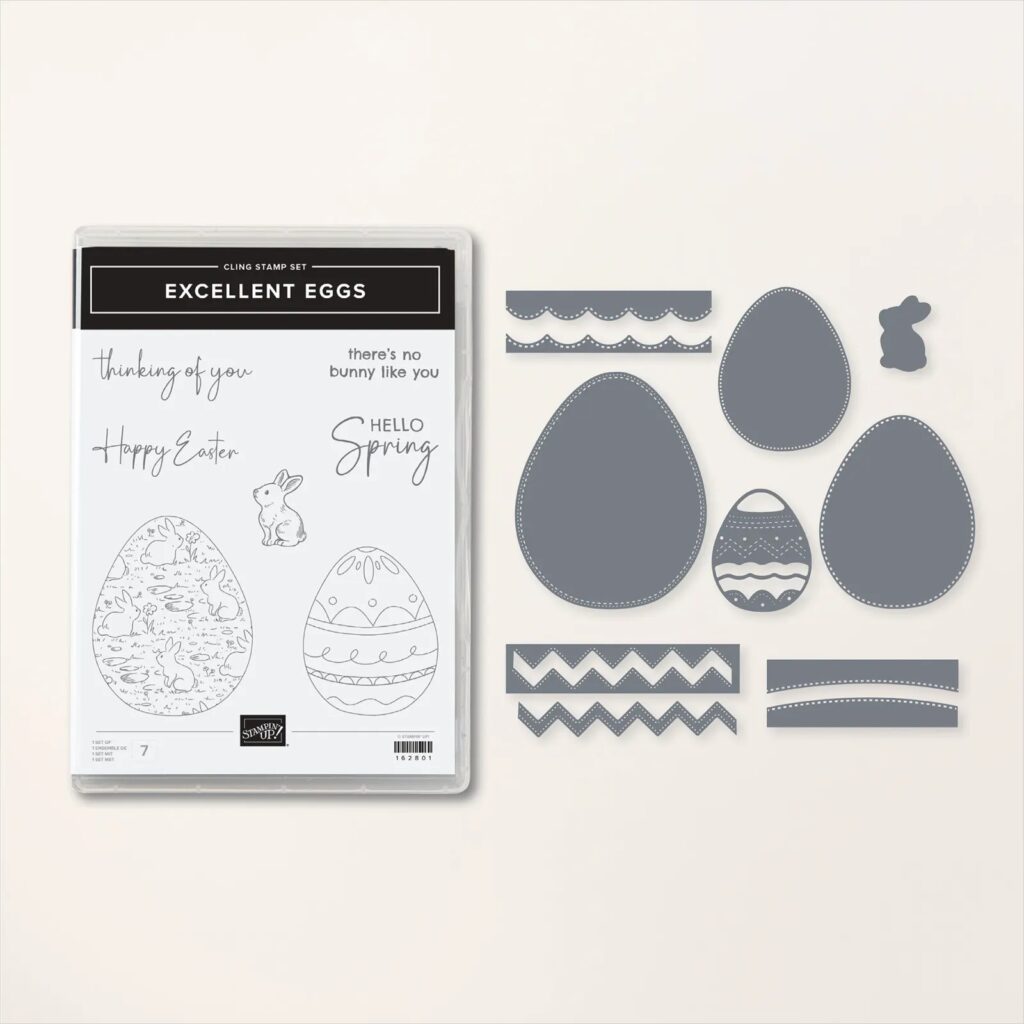
  7. Stamp the bunny and Egg in Memento ink on the Basic White Thick cardstock, then die cut.
  8. Use Stampin’ Blends to color the Egg and Bunny. I used Misty Moonlight and Light Crumb Cake. Use Clear Wink of Stella to add some shimmer to the Bunny. Attach the Egg and Bunny with Stampin’ Dimensionals.
  9. On a piece of Basic White cardstock, stamp the sentiment in Misty Moonlight ink, then Die Cut. Attach with Stampin’ Dimensionals. 
  10. Sprinkle on some Brushed Brass Butterflies.
  11. Stamp and decorate the remaining 5 ¼” w x 4” h for inside
  12. Decorate your envelope. 
  13. So sweet! ! Who needs some happy mail?

Shopping List

Recommended Stamper’s Toolkit ❤


Happy Easter

Use Stampin’ Blends alcohol markers to color this card in your favorite color combo.

Stamp, then cut out Easter eggs and bunnies for cards and gift tags in minutes with the Excellent Eggs bundle. Combine stamp images and dies to create colorful and dimensional accents to welcome Easter and the arrival of spring!

Measurements

Full list of supplies needed, listed below. A die cutting machine is needed for this card.

Basic White Thick Cardstock: 

  • 5 ½” h x 8 ½” w scored and folded at 4 ¼” w
  • Scrap for egg and springs

Basic White Cardstock:

5 ¼” h x 4” w (2)

Scrap for sentiment

Vellum Cardstock: Scrap for sprigs

Brights Designer Series Paper: Granny Apple Green scrap for envelope

Let’s Create

  1. Affix all stamps to Acrylic Blocks.
  2. Fold the Card Base in half using a Bone Folder to sharpen the crease.
  3. Attach one of the 5 ¼” h x 4” w Basic White panels to the front with Stampin’ Dimensionals.
  4. On Basic White Thick cardstock scrap, stamp the Egg with Bunnies in Memento Ink. Use the pen tip end of Stampin’ Blends to color in the bunny scene. I used Tahitian Tide Dark and Light, Lemon Lime Twist Dark and Light, and Flirty Flamingo Light.
  5. Die cut the Egg
  6. Die cut the Sentiment Tag, Sentiment Tag Ring and two spring from Basic White cardstock and two sprigs from Vellum Cardstock.
  7. On the Basic White Sprig, use Stampin’ Blends to color the stems and “berry” leaves. I used Granny Apple Green and Azure Afternoon Light and Dark.
  8. On the Basic White Sentiment Tag, attach the tag ring around the hole,  stamp the Sentiment in Azure Afternoon in and thread ribbon through the hole. Attach to Card Based with Stampin’ Dimensionals.
  9. Arrange the springs and the egg on above the Sentiment Tag. Attach springs with Mini Glue Dots and the Egg with Stampin’ Dimensionals.
  10. Sprinkle on some 2022–2024 In Color Pearls
  11. Stamp and decorate the remaining 5 ¼” w x 4” h for inside
  12. Decorate your envelope with a piece of Granny Apple Green from the Brights DSP pack.  
  13. Adorbs! ! Who will you send it to?

Shopping List

Recommended Stamper’s Toolkit ❤


Step It Up: Bee Mine

Need fun ideas for your project? Try making these cards using the Bee My Valentine Bundle. Keep your card simple with the Beginner design or “step it up” by making the Avid card!

BEGINNER

To make this card, we stamped the flower images using Fresh Freesia and Granny Apple Green. Then we stamped the bee body image on Lemon Lolly Cardstock and the wings and antennae on Basic White Cardstock. We punched out all the bee parts using the Bee Builder Punch and adhered them together using Multipurpose Liquid Glue. We adhered the bee to the card front using Stampin’ Dimensionals and finished the card with our sentiment.

CASUAL

To step up this card, we created a card base made of Just Kiddin’ Designer Series Paper. We added an extra panel of Basic White Cardstock, where we stamped a few more flowers and adhered extra flower pieces that we stamped and fussy cut. We finished the card with a few Lemon Lolly Adhesive-Backed Solid Gems.

AVID

We stepped up this card by stamping a few more flowers to the card base using Petal Pink ink. We also used black Stampin’ Emboss Powder to add some shine and dimension to our bee. We stamped the bee wings on Vellum Cardstock and finished the card with a sentiment that we heat embossed with white Stampin’ Emboss Powder onto Basic Black Cardstock.

Shopping List

Recommended Stamper’s Toolkit ❤


Perennial Lavender Calendar

Create a stunning stand-up calendar display with paper and embellishments from the Perennial Lavender Suite.

Measurements

Full list of supplies needed, listed below. A die cutting machine is needed for this card.

Gorgeous Grape Cardstock Base: 4 ½”x 5 3/4”
Highland Heather Cardstock: 3 ¼” x 2 ½”
Gorgeous Grape Cardstock: 3 ¾” x 2 ¼”
Basic White Cardstock: 3″ x 2 1/4″
Perennial Lavender Designer Series Paper (DSP): 4” x 5 1/4”
Taylored Expressions Calendar
Calendar stand from Calendar-Case.com
OPTIONALLY CREATE: Printed list of birthdays for each month, or other decoration (eg, You could either list birthdays on a printed page, or you can decorate a layer as shown here)


Let’s Create

  1. Affix all stamps to Acrylic Blocks.
  2. Fold the Card Base in half using a Bone Folder to sharpen the crease.
  3. Adhere DSP to front of Card Base with Stampin’ Seal.
  4. Adhere Taylored Expressions calendar (one month or whole year) to the 3 ¾” x 2 ¼” Gorgeous Grape layer and attach with Stampin’ Seal.
  5. On the 3″ x 2 1/4″ Basic White cardstock, stamp the flowers in Orchid Oasis and stems in Lost Lagoon ink. Stamp the sentiment in Orchid Oasis. Attach to the 3 ¼” x 2 ½” Highland Heather Layer with Stampin’ Seal.
  6. Adhere the stamped layer with Stampin’ Dimensionals.
  7. Add a Paper Butterfly Accent in the upper corner.
  8. Add some Purple Fine Shimmer Gems.
  9. Open plastic case and stand it upright in an easel shape. Add your decorated page and enjoy :).  These are great to give as gifts also!
  10. You can either make a new page for each month of the year, or you could make one main page for the entire year.

Shopping List

Recommended Stamper’s Toolkit ❤


May You Feel Sheltered in the Love That Surrounds You

Remember that Postage Stamp punch we had awhile ago? So fun right? Well… did you see all of the “postage stamp” dies in the Perennial Postage Bundle?! Loads more fun. I have a feeling these dies will be around for awhile.

Create all-occasion greetings with the Perennial Postage stamp and die bundle. The stamp set offers multiple sentiments, ranging from love and support to thanks and Mother’s Day wishes. The dies give you a wide range of options for creating die-cut postage stamps to use as card backgrounds or accent pieces.

Measurements

Full list of supplies needed, listed below. A die cutting machine is needed for this card.

Crumb Cake Card Base: 4 ¼” x 11”, score at 5 1/2”

Perennial Lavender Designer Series Paper (DSP):

  • 4” x 5 ¼”
  • scrap for 2 ¾” x 2” die cut

Vellum Cardstock: scrap for 2 ¾” x 2” die cut

Basic White scrap for 2 ¾” x 2” die cut


Let’s Create

  1. Affix all stamps to Acrylic Blocks.
  2. Fold the Card Base in half using a Bone Folder to sharpen the crease.
  3. Die-Cut
    • 2 ¾” x 2” size Perennial Postage Dies in Vellum
    • 2 ¾” x 2” size Perennial Postage Dies in Designer Series Paper
    • 1 ¾” square size Perennial Postage Dies in Basic White
  4. Adhere Designer Series Paper to front of card with Stampin’ Seal.
  5. Stamp sentiment in Orchid Oasis on Basic White die cut.
  6. Arrange layers in a pleasing manner and adhere. NOTE: Only put adhesive on the back of the vellum in places that are not visible (ie covered by other layers).
  7. Wrap ribbon around the card front, near the fold and tie a bow in the upper left corner.
  8. Sprinkle on the Purple Shimmer gems.
  9. Stamp and decorate the inside and attach with Stampin’ Seal.
  10. Decorate your envelope.
  11. Pretty! Now send it to someone special.

Shopping List

Recommended Stamper’s Toolkit ❤