Gate Fold Thank You Card

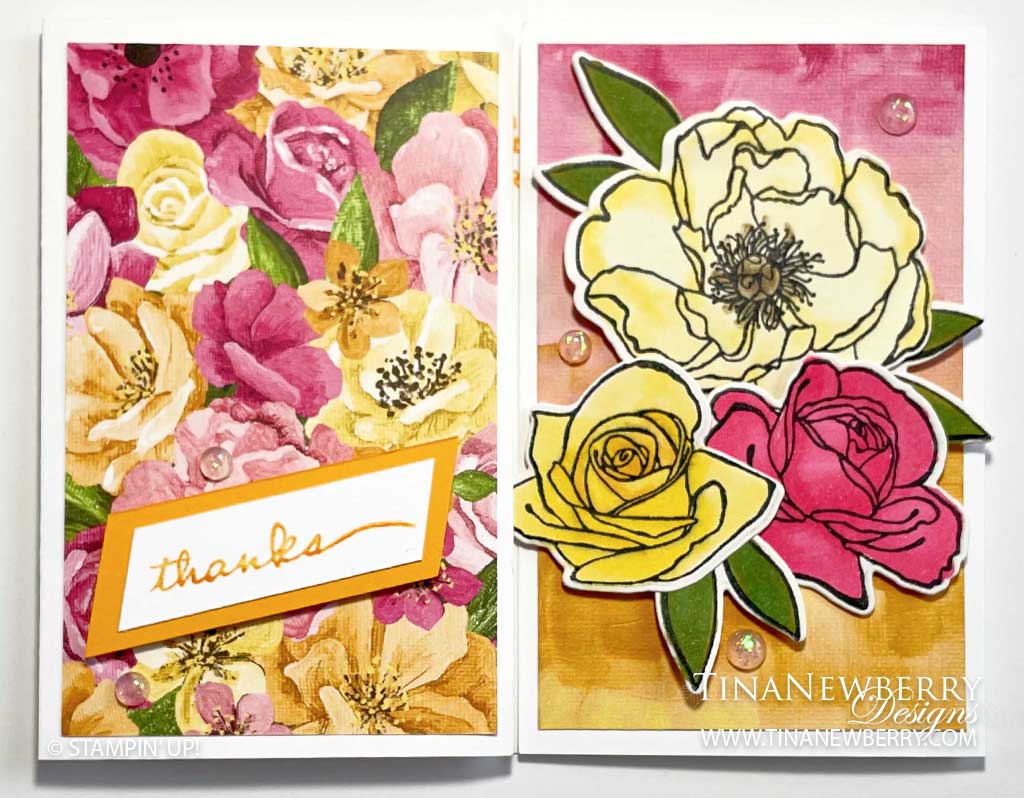
Show how thankful you are with a stunning gate fold Thanks card in bright yellows and pinks using the Hues of Happiness Suite. Make a statement when you stamp the flowers, color in your favorite colors and die cut them out.

Create all-occasion paper crafts with beautiful floral designs by pairing Happiness Abounds stamps and dies.
Pick and choose your favorite items from the Hues of Happiness Suite.

Measurements

Full list of supplies listed below. A die cutting machine is needed for this project.

Basic White Thick Cardstock: 4 ¼” h x 11” w folded to 4 1/4″ h x 5 1/2″ w for Card Base

Basic White Cardstock:

  • Scrap: ½” h x 2 ½” w
  • 5 1/4″ h x 4″ w

Mango Melody Cardstock Scrap: ¾” h x 3” w

Shimmery White Cardstock: Scraps

Hues of Happiness Designer Series Paper (DSP): 4″ h x 2 ½”w – 2 complementary prints

Let’s Create

  1. Affix all stamps to acrylic blocks.
  2. Score the Basic White Thick card base at 2 ¾” and 8 ¼”. Fold at score lines and sharpen the score line with a Bone Folder to create the gate fold.
  3. Stamp the 3 rose images, and 3 sets of leaf clusters with Memento Tuxedo Black Stamp Pad onto Shimmery White card stock. Set this aside to dry.
  4. Adhere the 2 layers of Hues of Happiness DSP onto the card front flaps.
  5. Use the Mango Melody Stampin’ Pad to stamp the “thanks” sentiment onto the Basic White scrap. Use scissors to cut diagonal slants on each end.
  6. Take the Mango Melody card stock scrap and trim it to frame around the “thanks” layer. Attach to the “thanks” layer with Stampin’ Seal.
  7. Die cut the stamped roses and leaves with a die cutting machine.
  8. Now color:
    1. Use the Light So Saffron Stampin’ Blends to color the largest rose. Use the Light Daffodil Delight Stampin’ Blends to fill in with shading. 
    2. Color the center of this rose with the Light Crumb Cake Stampin’ Blends. 
    3. Color the mid-size rose with the Light Flirty Flamingo Stampin’ Blends and use the Dark Flirty Flamingo Stampin’ Blends to add shadow depth.
    4. Color the tightest rose bloom with the Light Daffodil Delight Stampin’ Blends and the Dark Daffodil Delight Stampin’ Blends to shade the deeper crevices.
    5. On the die cut leaves use the Light Old Olive Stampin’ Blends and Light Shaded Spruce Stampin’ Blends to create a blended color to complement the leaves in the Hues of Happiness DSP. 
  9. Use Stampin’ Dimensionals to adhere the roses and leaves as a cluster on the right side flap.
  10. Use Stampin’ Dimensionals to adhere the sentiment onto the left side flap.
  11. Stamp and decorate the remaining Basic White cardstock and adhere to the inside with Stampin’ Seal.
  12. Embellish the card front with Opal Rounds.
  13. Now let’s decorate the envelope! Cut a 1” x 4 ⅜” strip of Hues of Happiness DSP. Adhere this layer onto the front of the envelope with Stampin’ Seal.
  14. So Pretty! Who do you need to thank today?
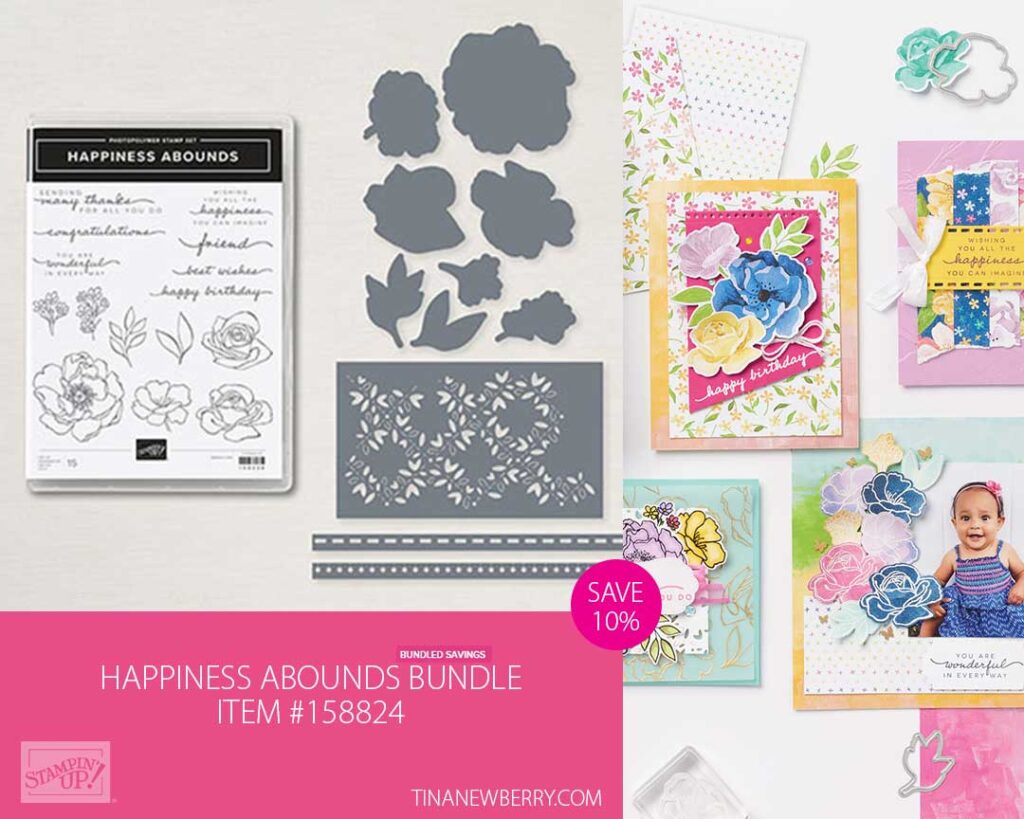
Shopping List

Recommended Stamper’s Toolkit

Stamper’s Toolkit

You will also need adhesive, acrylic blocks, scissors and other basic PaperCrafting items from the Stamper’s Toolkit

Coloring a Happy Birthday Card

Coloring is so relaxing and you can choose your favorite color palette. Use this layout to make a whole bouquet of cards in any colors you like.

The Cottage Rose Bundle includes the Cottage Rose Stamp Set and the Cottage Flowers Dies.
Save 10% when you buy the Stamp Set and Die Set together
in the Cottage Rose Bundle

Measurements

Full list of supplies needed, listed below. A die cutting machine is needed for this card.
Very Vanilla Thick Cardstock:

  • 8 ½” x 5 ½” (scored at 4 ¼”) for card base
  • ~5 ½” x 4 ¼” scrap for Stamping and die cutting flowers

Evening Evergreen Cardstock: 5 ⅜” x 4 ⅛”

Petal Pink Cardstock:

  • 5 ¼” w  x 4” h
  • 3”w x ½” h (for stamping the sentiment)

Abigail Rose Designer Series Paper (DSP) – lined print:  5 ⅛” x 3 ⅞”

Very Vanilla Cardstock:

  • 5 ¼” w  x 4” h


Let’s Create

  1. Affix all stamps to Acrylic Blocks.
  2. Fold the Card Base in half using a Bone Folder to sharpen the crease.
  3. Using Black Memento Ink, stamp the large floral image and the smaller flower and 1 set of the leaves on the scrap Very Vanilla Thick Cardstock .  Color these images using Stampin’ Blends.  I used Petal Pink, Soft Succulent and Daffodil Delight.  Using the Cottage Flowers Dies, die cut these images.
  4. Using Black Memento Ink Pad, stamp the leaves repeatedly on a 5” length of the Natural Finish ⅞” Ribbon. 
  5. Stamp the sentiment on the ½” strip of Petal Pink with Memento Black Ink Pad and cut the left edge at an angle.
  6. Use Stampin’ Seal to adhere
    1. the Evening Evergreen to your Very Vanilla folded card base.
    2. the Petal Pink layer to your card
    3. then the Abigail Rose DSP panel to the Petal Pink layer.
  7. Cut the left edge of the Ribbon at an angle and use Tear & Tape to attach to the lower edge of the card leaving about ⅝” at the bottom of the DSP showing and even with the left edge of the Petal Pink panel.
  8. Use Stampin’ Dimensionals to adhere
    1. the large floral die cut image towards the lower left of the card. 
    2. the smaller flower to the upper right of the card. 
  9. Use Stampin’ Seal to tape flat the die cut leaves slipping them under the smaller flower.
  10. Adhere the Sentiment using Stampin’ Dimensionals.
  11. Embellish with 3 Rustic Metallic Adhesive backed dots.
  12. Stamp and decorate the inside and attach with Stampin’ Seal.
  13. Decorate your envelope.
  14. Lovely! Who will you send this birthday wish to?

Shopping List

Recommended Stamper’s Toolkit ❤


Color A Heartfelt Best Wishes Card

Send beautiful Best Wishes and get your coloring fix with the stunning roses in the Cottage Rose bundle. This card uses a rich color palette of very vanilla, old olive and rich razzleberry, but you can change it up to suit your tastes. Color coordination is made easy with the Stampin’ Up! Color Families – Regals, Brights, Subtles or Neutral. You pick!

The Cottage Rose Bundle includes the Cottage Rose Stamp Set and the Cottage Flowers Dies.
Cottage Rose Bundle
Save 10% when you buy the stamp set and dies as a bundle.

Measurements

Full list of supplies needed, listed below. A die cutting machine is needed for this card.

Very Vanilla Thick Cardstock:

  • 11” h x 4 ¼” w (score at 5 ½”) for Card Base
  • ~5 ½” x 3 ½” scrap for stamping and die cutting flowers

Basic Black Cardstock:

  • 5 ¼” h x 4” w
  • 4 ¼” h x 2 ¼” w

Very Vanilla:

  • 5” h x 3 ¾” w
  • 4 ¼” h x 2 ⅛” w
  • 3″ w x 1 ¼” h scrap for sentiment
  • 5 ¼” h x 4” w for inside

Let’s Create

  1. Affix all stamps to Acrylic Blocks.
  2. Fold the Card Base in half using a Bone Folder to sharpen the crease.
  3. Using Sahara Sand Ink Pad and stamps from the Cottage Rose Stamp set, randomly create a background on the 5 ¼” x 4” Very Vanilla panel.
  4. Flag the bottom edge of the 4 ¼” x 2 ⅛” Very Vanilla.  An easy way to do this is to find the center (just over 1”) and make a slit about ¾” up.  Cut from each bottom corner up to the slit. This will give you even tails on your flag.  Emboss this piece using the Fern 3D Embossing Folder.  Adhere to the Basic Black 4 ¼” x 2 ¼” layer with the top edges even.  Flag the bottom of the Basic Black panel.
  5. Stamp the large floral image, the smaller flower and 2 sets of leaves onto the Very Vanilla Thick Cardstock 5 ½” x 3 ½” scrap using Black Memento Ink Pad.  Color these images using Stampin’ Blends.  I used Rich Razzleberry, Old Olive and Daffodil Delight. Then die cut these images using the Cottage Flower Dies.
  6. Using Black Memento Ink Pad, stamp the sentiment and die cut using the smallest rectangle in the Deckled Rectangles Die Set.  
  7. Use Stampin’ Seal to adhere:
    1. the 5 ¼” h x 4” w Basic Black Layer to your folded Very Vanilla card base
    2. your stamped Very Vanilla background layer. 
    3. the “flag” layers toward the left side of your card lining up the top edge with the Very Vanilla background layer.
  8. Use Stampin’ Dimensionals to adhere:
    1. your flowers using Stampin’ Dimensionals, placing leaves to fill in where you like.
    2. the sentiment being careful not to use Dimensionals where the sentiment overlaps the flag layers. Instead use a little Multipurpose Glue in that area.
  9. Embellish with 3 Iridescent Rhinestone Basic Jewels.
  10. Stamp and decorate the inside and attach with Stampin’ Seal.
  11. Decorate your envelope.
  12. So pretty! Who will you send it to?

Shopping List

Recommended Stamper’s Toolkit ❤