This is Why I Shouldn’t Stamp on the Card

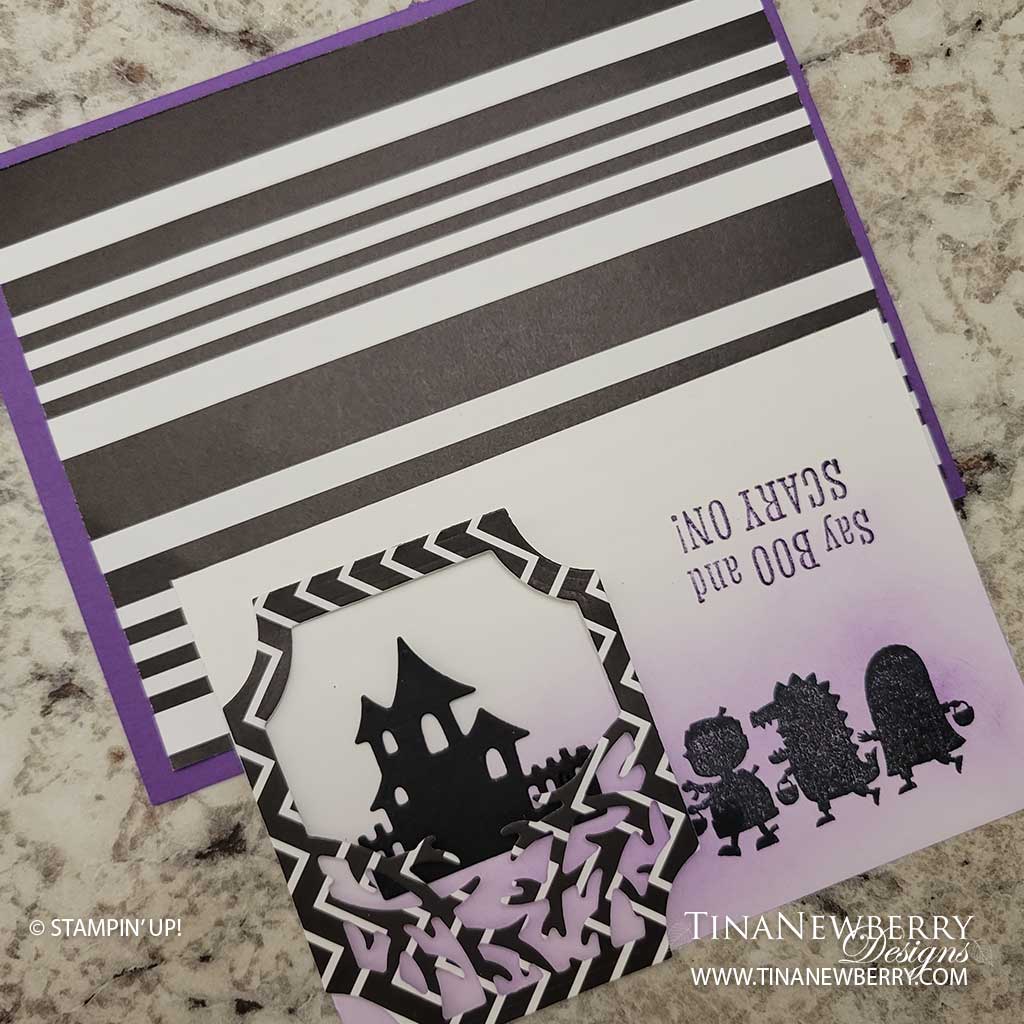
What’s wrong with this picture? Yup, you got it. I stamped my sentiment upside down and crooked! Ugh. This is exactly why I seldom stamp my sentiment on the card. Even if I stamp it right-side up, I am most likely going to stamp it crooked, so I usually stamp on scrap paper and either die cut or go with an easy rectangle. Most of the time, it takes two or three tries to get those sentiments right. I made a quick fix for this one though and created a cute little tag with a pop of color behind it and now you wouldn’t even know I made the mistake… except now you’re looking. LOL.

Measurements

Full list of supplies needed, listed below. A die cutting machine is needed for this card.
Gorgeous Grape Cardstock: 8 1/2″ h x 5 1/2″ w scored and folded on the long-side at 4 1/4″ for the Card Base.

Basic White Cardstock:

  • 3 1/4″ h x 4 3/4″ w
  • scrap for tag
  • 4″ h x 5 1/4″ w

Basic Black Cardstock: scrap for haunted house and bats.

Parakeet Party Cardstock: 1/2″ h x 2 1/4″ w

Black & White Designs Designer Series Paper (DSP):

  • 4″ h x 5 1/4″ w
  • Scrap for spooky frame

Let’s Create

  1. Affix all stamps to Acrylic Blocks.
  2. Fold the Card Base in half using a Bone Folder to sharpen the crease.
  3. Attach the 4″ h x 5 1/4″ w DSP to the Card Base with Stampin’ Seal.
  4. Lift some color off the Gorgeous Grape ink pad with an acrylic block. Then use a Blending Brush to pick up some ink from the blog and in a circular motion, apply some color to the bottom half of the 3 1/4″ h x 4 3/4″ w Basic White Cardstock.
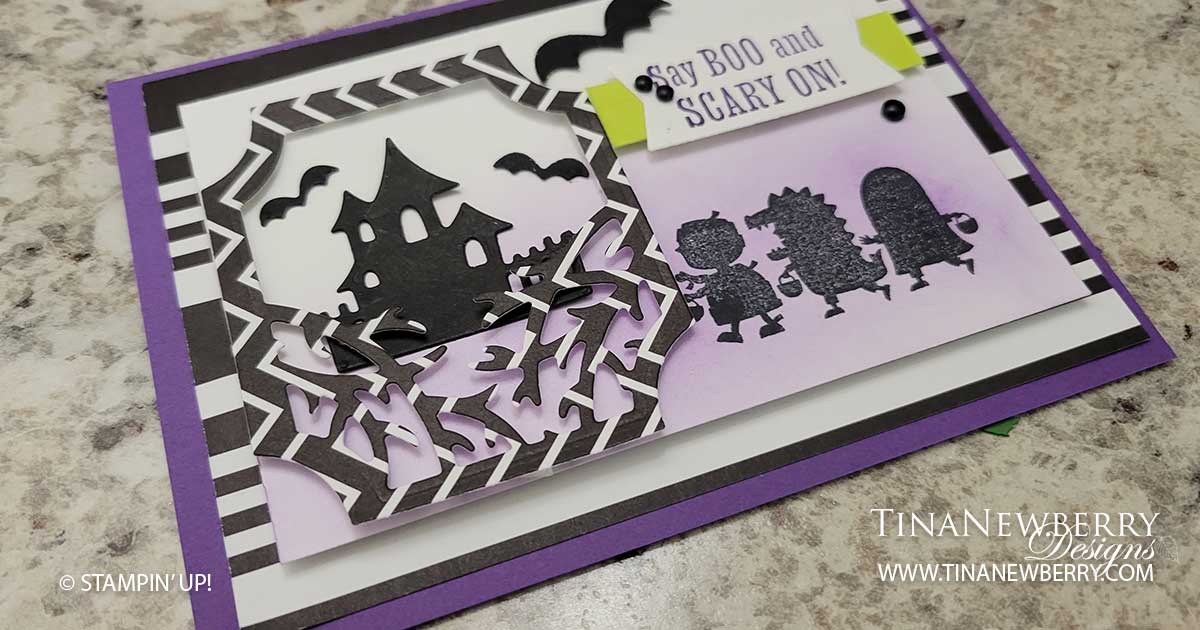
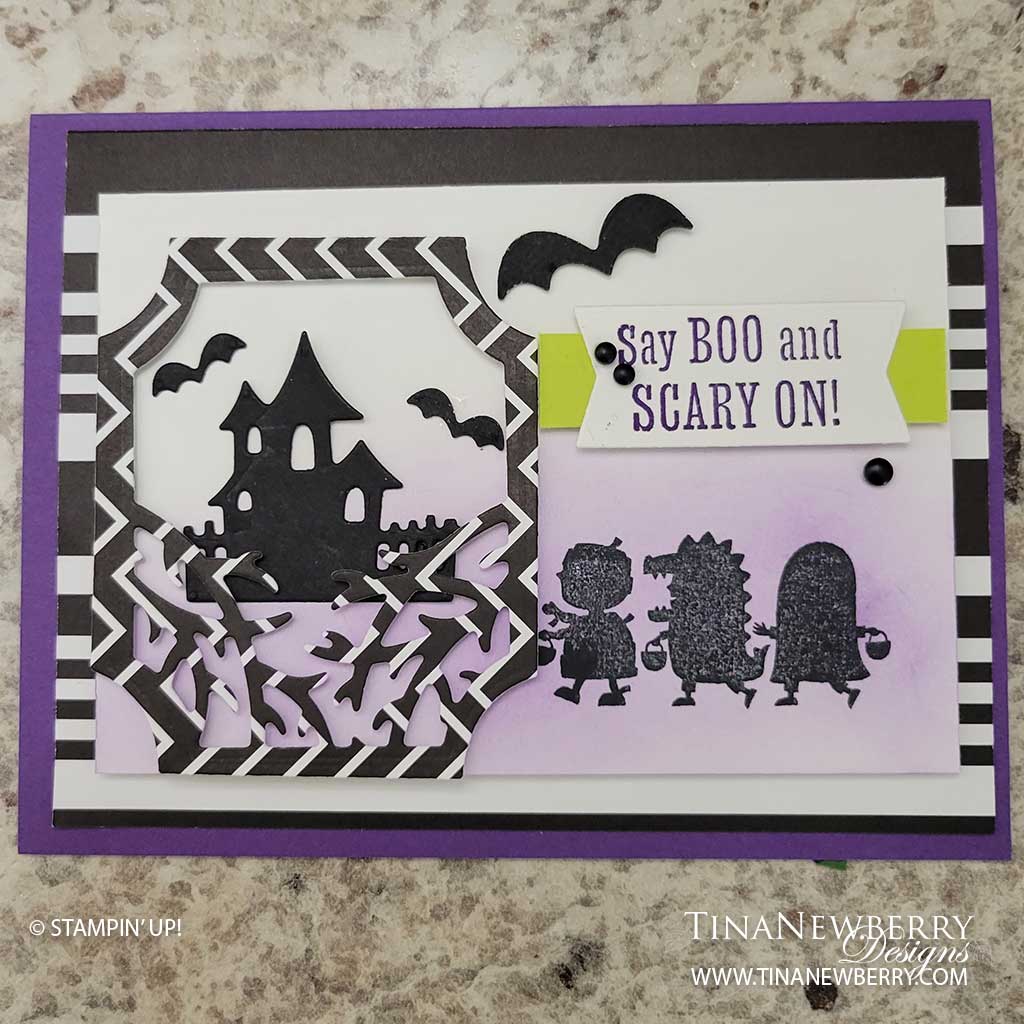
  5. In the lower right corner stamp the three trick or treaters in Tuxedo Black ink.
  6. On scrap white cardstock, stamp the Sentiment in Gorgeous Grape ink.
  7. Die cut:
    1. The basic white sentiment frame.
    2. The spooky frame with the DSP.
    3. The bats and haunted house in Basic Black.
  8. Arrange the house, frame, and sentiment on the Card Base.
  9. First attach the spooky frame with Stampin Dimensionals. Then add some Stampin’ Seal to the back of the house and attach in inside the spooky frame.
  10. Next use Stampin’ Seal to attach the Parakeet Party strip to the back of the Sentiment Tag with Stampin’ Seal and attach both layers to the card with Stampin’ Dimensionals.
  11. Use Multipurpose glue to add some bats.
  12. Sprinkle on the black Classic Matte Dots.
  13. Stamp and decorate the inside and attach with Stampin’ Seal.
  14. Decorate your envelope.
  15. So cute! Now send it to someone special.

Shopping List

Recommended Stamper’s Toolkit ❤


White Letters Pop on a Dark Tag

Create a tag that pops with white text on any dark cardstock. I’ll show you how.

Measurements

Full list of supplies needed, listed below. A die cutting machine is needed for this card.
Balmy Blue Cardstock 5 1/2″ h x 8 1/2″ w folded to 5 1/2″ h x 4 1/4″ w

Basic White Thick Cardstock: scraps for apple, leaves and flowers

Parakeet Party Cardstock: scrap for flower centers

Basic White Cardstock:

  • 5 1/4″ h x 4″ w
  • 4 3/4″ h x 3 1/4″ w

Basic Black Cardstock: scrap for sentiment tag

Let’s Create

  1. Affix all stamps to Acrylic Blocks.
  2. Fold the Card Base in half using a Bone Folder to sharpen the crease.
  3. Run the Card Base through the Stampin’ Cut & Emboss machine with the scalloped die from the Apple Dies to create the scalloped edge. Attach the small scalloped piece to the inside edge of the Card Base.
  4. Run the 4 1/2″ h x 3″ w Basic White Cardstock through the Stampin’ Cut & Emboss Machine with the Stitched Rectangle and then again with the Timeworn Typ Embossing Folder. Attach to Card Base with Stampin’ Seal.
  5. On the Basic White Thick Cardstock, stamp the apple and leaves in Sahara Sand ink. Then color with Stampin’ Blends:
    1. Apple: Real Red, Daffodil Delight, and a bit of Cherry Cobbler
    2. Apple Stem: Soft Suede
    3. Leaves: Old Olive
  6. Die cut the apple, leaves, the branch, two large flowers and one small flower from Basic White Thick and three flower centers from Parakeet Party Cardstock scraps.
  7. Use Stampin’ Blends to add some color to the:
    1. Flower Tips- Flirty Flamingo
    2. Branch- Crumb Cake
    3. Flower Centers- Black
  8. To create the tag:
    1. Remove static from the Basic Black Cardstock by rubbing the surface with an Embossing Buddy
    2. Stamp the sentiment in Versamark Ink
    3. Sprinkle with White Embossing Powder
    4. In slow deliberate circles, carefully heat the black cardstock with a Heat Tool to melt the embossing powder. Be careful not to burn your fingers, overheat your work surface or scorch your sentiment. You will see the embossing powder melt as it turns from a chalky dull color to a bright white.
    5. Run the sentiment through the Stampin’ Cut & Emboss Machine with the tag from the Apple Dies.
  9. Arrange the apple, flowers, branch, leaves and sentiment tag on the card front.
    1. Use Fine Tip Glue to attach the Parakeet Party flower centers to the flowers.
    2. Use Stampin’ Seal to attach the apple, branch and leaves.
    3. Use Mini Glue Dots to attach the flowers.
    4. Use Stampin’ Dimensionals to attach the Sentiment Tag.
  10. Tie a bow with Linen Thread and attach with a Mini Glue Dot.
  11. Sprinkle on the Fine Sparkle Adhesive Backed gems.
  12. Stamp and decorate the 5 1/4″ h x 4″ w Basic White Cardstock for the inside and attach with Stampin’ Seal.
  13. Decorate your envelope.
  14. So sweet! Now send it to someone special.

Shopping List

Recommended Stamper’s Toolkit ❤


Make a Torn Strip Peekaboo Card

Yvonne Spikmans, of the Stampin’ Up! 2022 Artisan Design Team was one of the many talented designers who inspired me to get the Apple Harvest Bundle with her original design of this card. She’s way more talented than I am, but I sure had fun trying out this torn strip peekaboo card.

Measurements

Full list of supplies needed, listed below. A die cutting machine is needed for this card.
Basic White Thick Cardstock:

  • 5 1/2″ w x 8 1/2″ h folded to 5 1/2″ w x 4 1/4″ h for the Card Base.
  • Scrap for apples and flowers

Basic White Cardstock:

  • 3 1/2″ h x 4 1/2″ w
  • 3/4″ h x 3 1/2″w

So Saffron Cardstock: scraps for center of flowers.

2022-2023 6″ x 6″ Brights Designer Series Paper (DSP):

  • 3 1/2″ h x 5″ w Poppy Parade Pattern 1
  • 3 1/4″ h x 3 1/2″ w Poppy Parade Pattern 2

Let’s Create

  1. Affix all stamps to Acrylic Blocks.
  2. Fold the Card Base in half using a Bone Folder to sharpen the crease.
  3. Protect your work surface and use Tuxedo Black ink to stamp the apples randomly along the edges of the card base front.
  4. Carefully create two small tears about 2″ apart in the short edge of the 3 1/2″ h x 4 1/2″ w Basic White Cardstock. Then slowly work the two tears until they are each about 3″ long. Next flatten the torn flap and carefully roll it back on itself and secure with a Mini Glue Dot.
  5. Use Stampin’ Seal to attach the DSP pattern 2 onto the left edge of DSP pattern 1 with Stampin’ Seal.
  6. Use Stampin’ Dimensionals to attach the torn Basic White panel to the left edge of the DSP layer. Pattern 2 should show through the torn area and Pattern 1 should show on the right edge.
  7. Use Stampin’ Dimensionals to attach the DSP and torn panel to the front of the Card Base.
  8. Stamp sentiment in Poppy Parade ink on the 3/4″ h x 3 1/2″w Basic White Cardstock layer and trim the ends with the Lovely Labels Pick A Punch. Attach to the torn layer with Stampin’ Dimensionals.
  9. Use Tuxedo Black ink to stamp the whole apple on Basic White Thick scrap. Then use Poppy Parade, Granny Apple Green and Light Soft Suede to color the apple. Die cut out and attach to the card with Stampin’ Dimensionals.
  10. Die cut three flowers from Basic White Thick scrap and three flower centers from So Saffron scrap cardstock.
  11. Use dark Petal Pink Stampin’ Blend to color the center of the flowers and then use Multipurpose Liquid Glue to attach the So Saffron flower centers. Attach using Mini Glue Dots.
  12. Tie a bow with Sweet Sorbet twine and attach with a Mini Glue Dot.
  13. Sprinkle on the Solid Faceted Gems
  14. Stamp and decorate the inside.
  15. Decorate your envelope.
  16. Squeal! Now send it to someone special.

Shopping List


Recommended Stamper’s Toolkit ❤


Wishing You an Adventurous Journey

Stampin’ Up! Artisan Design Team member, Yvonne Spikman, was so clever to use the boater from the kayak stamp with the rowboat from the Adventurous Journey stamp set and diorama die cuts for the water! I used her general design with a bit of creative liberty to make this card design my own. Sometimes the most relaxing card making comes from re-creating something beautiful someone else made. CASE=Copy and Share Everything.

Adventurous Journey
Don’t make crafting an “oar-deal”—discover new designs and ideas with the Adventurous Journey Stamp Set! Celebrate birthdays, new beginnings, and more with the adventurers in your life.

Measurements

Full list of supplies needed, listed below. A die cutting machine is needed for this card.
Basic White Thick Cardstock:

  • 11″ h x 4 1/4″ w folded to 5 1/2″ h x 4 1/4″ w
  • scrap for boat, boater w/ oars

Basic White Cardstock: scrap for sentiment tags

2022-2023 Brights Designer Series Paper (DSP): scrap for diorama die cuts

Let’s Create

  1. Affix all stamps to Acrylic Blocks.
  2. Fold the Card Base in half using a Bone Folder to sharpen the crease.
  3. Die cut two pieces of Pacific Point DSP with large Diorama Dies.
  4. Stamp the boat and kayak on Basic White Scrap in Soft Suede ink. Color the row boat with Light and Dark Soft Suede. Color the boater and oars from the kayak image with Light and Dark each of Soft Suede, Crumb Cake and Parakeet Party.
  5. Use Paper Snips to carefully cut out the boater and the row boat.
  6. Use a Stampin’ Dimensional to attach the boater to the row boat.
  7. Arrange the Pacific Point die cuts on the front of the card base. Use a pencil to lightly mark where two spots on the Card Base where you have room to add ripples.
  8. Remove the die cuts and stamp ripples in Night of Navy ink on the card base and a few on the die cuts.
  9. Attach Pacific Point die cuts with Stampin’ Dimensionals.
  10. Attach the row boat with Stampin’ Dimensionals
  11. On Basic White scrap, stamp the sentiment in Night of Navy Ink. Then carefully cut out into strips and attach with Stampin’ Dimensionals.
  12. Sprinkle on the Fine Sparkle Adhesive Backed Gems.
  13. Stamp and decorate the inside.
  14. Decorate your envelope.
  15. Awesome! Now send it to someone special.

Shopping List

Recommended Stamper’s Toolkit ❤