Quick & Easy Thinking of You Card

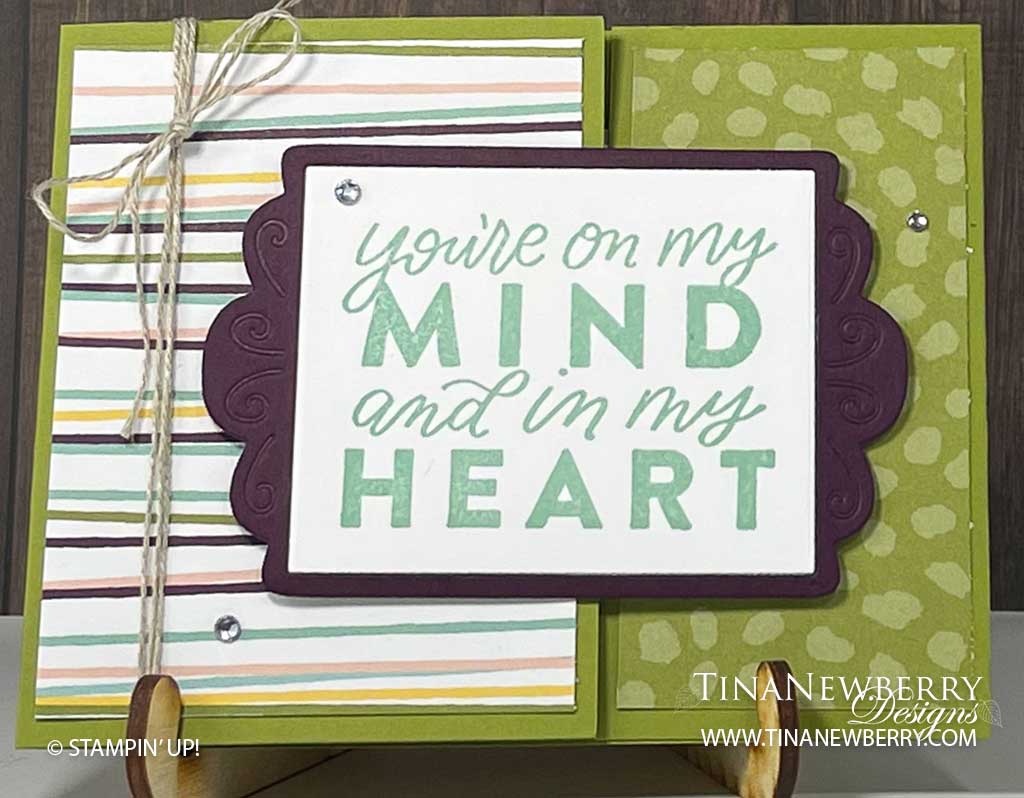
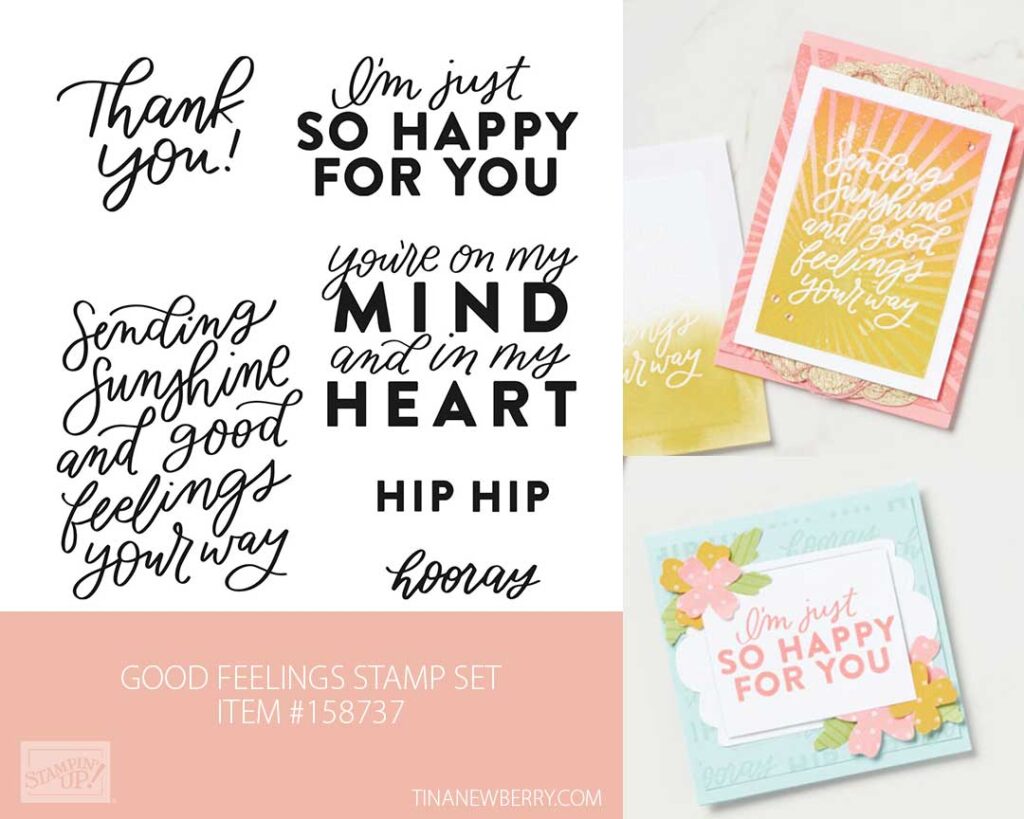
You’re On My Mind and In My Heart in these playful fonts makes for a creative Thinking of You card with a simple fun-fold and lots of room to write your well-wishes.

Shop the Good Feelings Stamp Set

Measurements

Full list of supplies needed, listed below. A die cutting machine is needed for this card.

POCKET CARD BASE
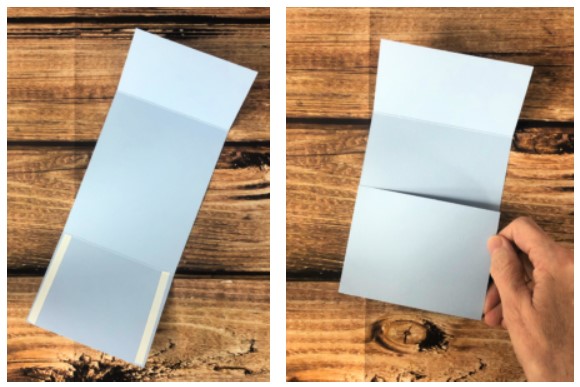
Old Olive Cardstock: 4 ¼” x 11”, score at 3 ¼” and 8 ¾” for Card Base
Design a Daydream Designer Series Paper (DSP):

  • 4″ h x 3″ w for larger left flap
  • 4″ h x 2″ w for right flap

SENTIMENT LABEL (attaches to left flap of Card Base)
Blackberry Bliss Cardstock: scrap die-cut frame from Fabulous Frames dies
Basic White Cardstock: 2 ⅝” h x 3 ⅛” w (for adhering behind frame)
INSIDE POCKET CARD
Pool Party Cardstock: 4 1/2″ w x 3″ h
Basic White Cardstock: 4 1/4″ w x 2 3/4″ h
Design a Daydream DSP: ½” h x 4” w


Let’s Create

  1. Affix all stamps to Acrylic Blocks.
  2. Fold the Old Olive Card Base on the score lines using a Bone Folder to sharpen the crease.
  3. Turn the shorter flap into a pocket, using Tear & Tape along the edges.
  4. Hold the Card Base so the pocket is on the right, attach the two largest pieces of Designer Series Paper to the larger flap and pocket with Stampin’ Seal.
  5. Wrap Linen Thread around the largest flap and secure with a bow.
  6. Die cut the Blackberry Bliss Cardstock scrap with the Fabulous Frames Dies.
  7. Stamp the Sentiment on the 2 ⅝” h x 3 ⅛” w Basic White Cardstock in Pool Party Ink. Adhere to back of the Blackberry Bliss Frame.
  8. Adhere the framed sentiment to the largest flap on the front with Stampin’ Dimensionals.
  9. Use Stampin’ Seal to attach the 4 1/4″ w x 2 3/4″ h Basic White Cardstock to the 4 1/2″ w x 3″ h Pool Party Cardstock and attach the ½” h x 4” w to the Basic White layer. This is the inside card.
  10. Wrap Linen Thread around several times and secure with a bow.
  11. Sprinkle on the Rhinestone Basic gems.
  12. Decorate your envelope.
  13. So cute! Now send it to someone special.

Shopping List

Recommended Stamper’s Toolkit ❤


Bold & Pretty Thank You Greeting Card

Show your gratitude and appreciation with a big Thank You on a fancy fold pull out card.

Measurements

Full list of supplies needed, listed below. A die cutting machine is needed for this card.

POCKET CARD BASE

Daffodil Delight Cardsctock Card Base 4 ¼” w x 11” h, scored on the long-side at 3 ¼” and 8 ¾”

Design a Daydream Host 12″x12″ Designer Series Paper for bottom flap  4″ w x 3″ h

Design a Daydream Host 12″x12″ Designer Series Paper for top flap  4″ w x 2″ h

SENTIMENT LABEL (attaches to top flap of Card Base)

Blackberry Bliss Cardsctock die-cut  frame from Fabulous Frames dies

Basic White Cardsctock layer at 2 ⅝” w x 3 ⅛” h (for adhering behind frame)

INSIDE POCKET CARD

Daffodil Delight Cardsctock for pocket card  4 1/2″h x 3″ w

Basic White Cardsctock for pocket card  4 1/4″ h x 2 3/4″ w

Blackberry Bliss Cardstock scrap to die-cut corners from Fabulous Frames dies

Let’s Create

  1. Affix all stamps to Acrylic Blocks.
  2. Fold the Card Base at score lines using a Bone Folder to sharpen the crease.
  3. Fold the bottom flap up (the longer one) of the Card Base, and create a pocket using Tear-n-Tape on the edges
  4. Attach Design a Daydream layers to front flaps with Stampin’ Seal.
  5. Use Stampin’ Cut & Emboss to die-cut label from Blackberry Bliss Cardstock.
  6. Stamp sentiment on Basic White Cardstock in Blackberry Bliss ink and adhere to the Blackberry Bliss Fabulous Frame with Stampin’ Seal.
  7. Adhere this layer carefully to the top flap only using Stampin’ Seal.
  8. Use a Mini Glue Dot to add a Crinkle White bow
  9. Sprinkle on the rhinestones.
  10. For the inside, die cut corners in Blackberry Bliss Cardstock from the Fabulouse Frames Dies.
  11. Adhere 4 1/4″ h x 2 3/4″ w Basic White panel to the 4 1/2″h x 3″ w Daffodil Delight Cardstock with Stampin’ Seal and attach Blackberry Bliss Corners.
  12. Wrap Crinkle Seam Ribbon around and tie a bow.
  13. Insert into pocket
  14. Decorate your envelope.
  15. How fun! Now send it to someone special.

SHopping List

Recommended Stamper’s Toolkit ❤


I’ll Never Forget Your Kindness Cheery Elephant Greeting Card

Thank you for your interest in this project. Some projects are exclusive to subscribers who will receive passwords by email.

Are you a subscriber? Awesome! Check your email for the password and enter it here to view this project.

Not yet subscribed?  We’d love for you to join us.  Subscribe to my email list and receive news, information and inspiration by email.

Send Words of Encouragement

For this simple elegant card, the design die in the Happiness Abounds Bundle brings interest when used on vellum over a dark background.

Measurements

Full list of supplies needed, listed below. A die cutting machine is needed for this card.

Night of Navy Cardstock 5 ½” h  x  8 ½” w folded to 5 ½” h x 4 ¼” w

Hues of Happiness Designer Series Paper (DSP): 

  • 5 1/4″  h x 1” w
  • 1″  h x 4” w

Vellum Cardstock: 5 ¼” h x 4” w

Basic White Cardstock:

  • scrap 1” h x 3” w
  • 4” h x 5 ¼”  h


Let’s Create

  1. Affix all stamps to Acrylic Blocks.
  2. Fold the Card Base in half using a Bone Folder to sharpen the crease.
  3. Die cut the Vellum with the large die in your Stampin’ Cut & Emboss machine. 
  4. Adhere 2 large Navy Solid Faceted Gems onto the right-side outer corners of the 5 ¼” h x 4” w Vellum layer, place Mini Glue Dots onto the backside of the Vellum behind the 2 gems.  Add Stampin’ Seal behind the left-side very close to the edge and attach the Vellum layer to the Card Base.
  5. Adhere the 5 1/4″  h x 1” w Hues of Happiness DSP layer onto the card front on top of the Vellum layer positioned to the far left of the card.
  6. Stamp the sentiment with Night of Navy Stampin’ Pad onto the 1” h x 3” w Basic White card stock scrap.
  7. Punch each end of the Basic White sentiment strip with the Lovely Labels Pick A Punch.
  8. Wrap several loops of the Linen thread and twist into a figure-8 adhere onto the back of the sentiment label with Tear & Tape or Mini Glue Dots.
  9. Use Dimensionals to adhere the sentiment onto the card front.
  10. Embellish the sentiment with 3 Navy Solid Faceted Gems.
  11. Stamp and decorate the 4” h x 5 ¼” h Basic White cardstock and attach the 1″  h x 4” w Hues of Happiness DSP for the inside and attach with Stampin’ Seal.
  12. Decorate your envelope.
  13. So sweet! Who will you send it to?

Shopping List

Recommended Stamper’s Toolkit ❤


Gate Fold Thank You Card

Show how thankful you are with a stunning gate fold Thanks card in bright yellows and pinks using the Hues of Happiness Suite. Make a statement when you stamp the flowers, color in your favorite colors and die cut them out.

Create all-occasion paper crafts with beautiful floral designs by pairing Happiness Abounds stamps and dies.
Pick and choose your favorite items from the Hues of Happiness Suite.

Measurements

Full list of supplies listed below. A die cutting machine is needed for this project.

Basic White Thick Cardstock: 4 ¼” h x 11” w folded to 4 1/4″ h x 5 1/2″ w for Card Base

Basic White Cardstock:

  • Scrap: ½” h x 2 ½” w
  • 5 1/4″ h x 4″ w

Mango Melody Cardstock Scrap: ¾” h x 3” w

Shimmery White Cardstock: Scraps

Hues of Happiness Designer Series Paper (DSP): 4″ h x 2 ½”w – 2 complementary prints

Let’s Create

  1. Affix all stamps to acrylic blocks.
  2. Score the Basic White Thick card base at 2 ¾” and 8 ¼”. Fold at score lines and sharpen the score line with a Bone Folder to create the gate fold.
  3. Stamp the 3 rose images, and 3 sets of leaf clusters with Memento Tuxedo Black Stamp Pad onto Shimmery White card stock. Set this aside to dry.
  4. Adhere the 2 layers of Hues of Happiness DSP onto the card front flaps.
  5. Use the Mango Melody Stampin’ Pad to stamp the “thanks” sentiment onto the Basic White scrap. Use scissors to cut diagonal slants on each end.
  6. Take the Mango Melody card stock scrap and trim it to frame around the “thanks” layer. Attach to the “thanks” layer with Stampin’ Seal.
  7. Die cut the stamped roses and leaves with a die cutting machine.
  8. Now color:
    1. Use the Light So Saffron Stampin’ Blends to color the largest rose. Use the Light Daffodil Delight Stampin’ Blends to fill in with shading. 
    2. Color the center of this rose with the Light Crumb Cake Stampin’ Blends. 
    3. Color the mid-size rose with the Light Flirty Flamingo Stampin’ Blends and use the Dark Flirty Flamingo Stampin’ Blends to add shadow depth.
    4. Color the tightest rose bloom with the Light Daffodil Delight Stampin’ Blends and the Dark Daffodil Delight Stampin’ Blends to shade the deeper crevices.
    5. On the die cut leaves use the Light Old Olive Stampin’ Blends and Light Shaded Spruce Stampin’ Blends to create a blended color to complement the leaves in the Hues of Happiness DSP. 
  9. Use Stampin’ Dimensionals to adhere the roses and leaves as a cluster on the right side flap.
  10. Use Stampin’ Dimensionals to adhere the sentiment onto the left side flap.
  11. Stamp and decorate the remaining Basic White cardstock and adhere to the inside with Stampin’ Seal.
  12. Embellish the card front with Opal Rounds.
  13. Now let’s decorate the envelope! Cut a 1” x 4 ⅜” strip of Hues of Happiness DSP. Adhere this layer onto the front of the envelope with Stampin’ Seal.
  14. So Pretty! Who do you need to thank today?

Shopping List

Recommended Stamper’s Toolkit

Stamper’s Toolkit

You will also need adhesive, acrylic blocks, scissors and other basic PaperCrafting items from the Stamper’s Toolkit