Hang In There

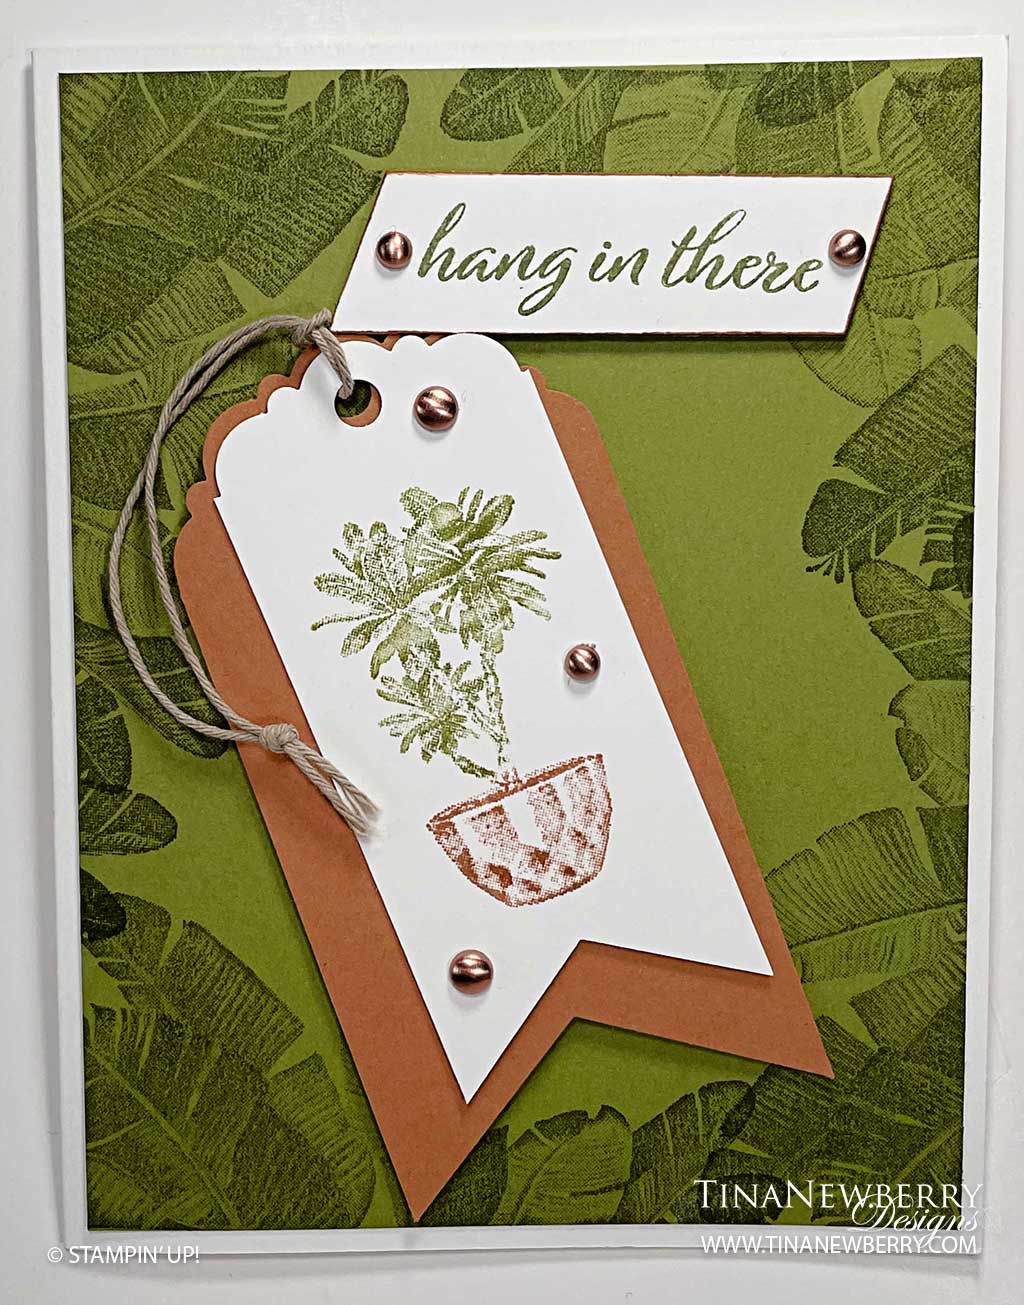
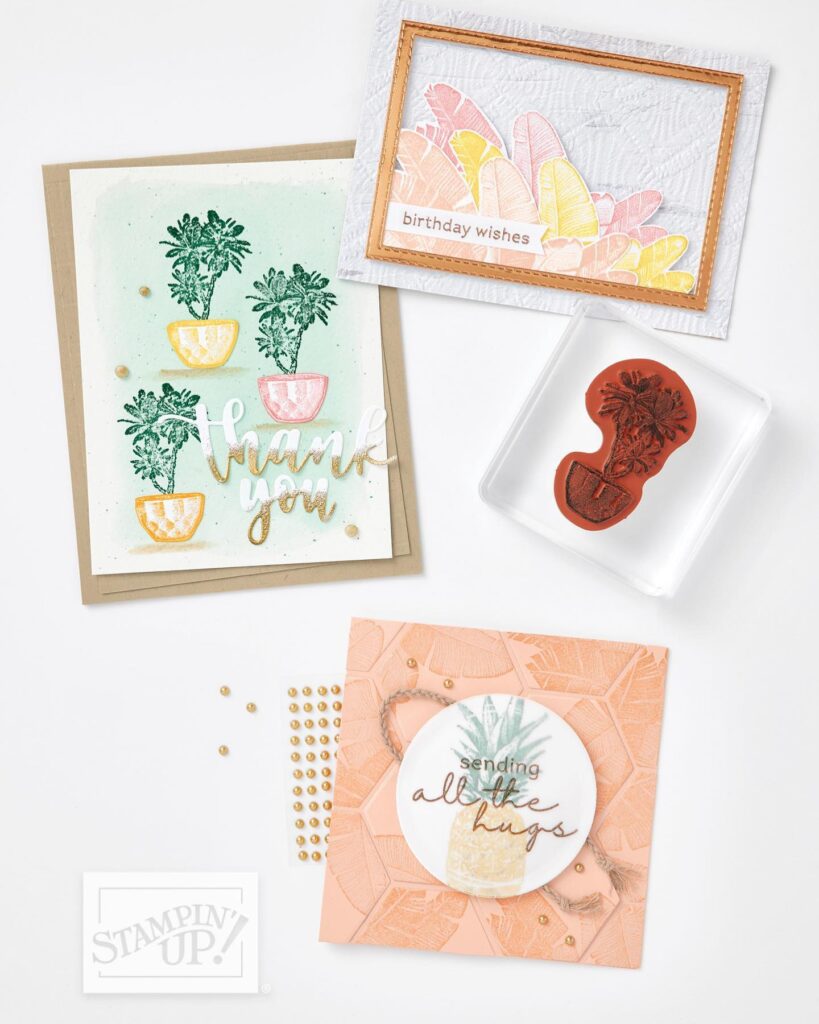
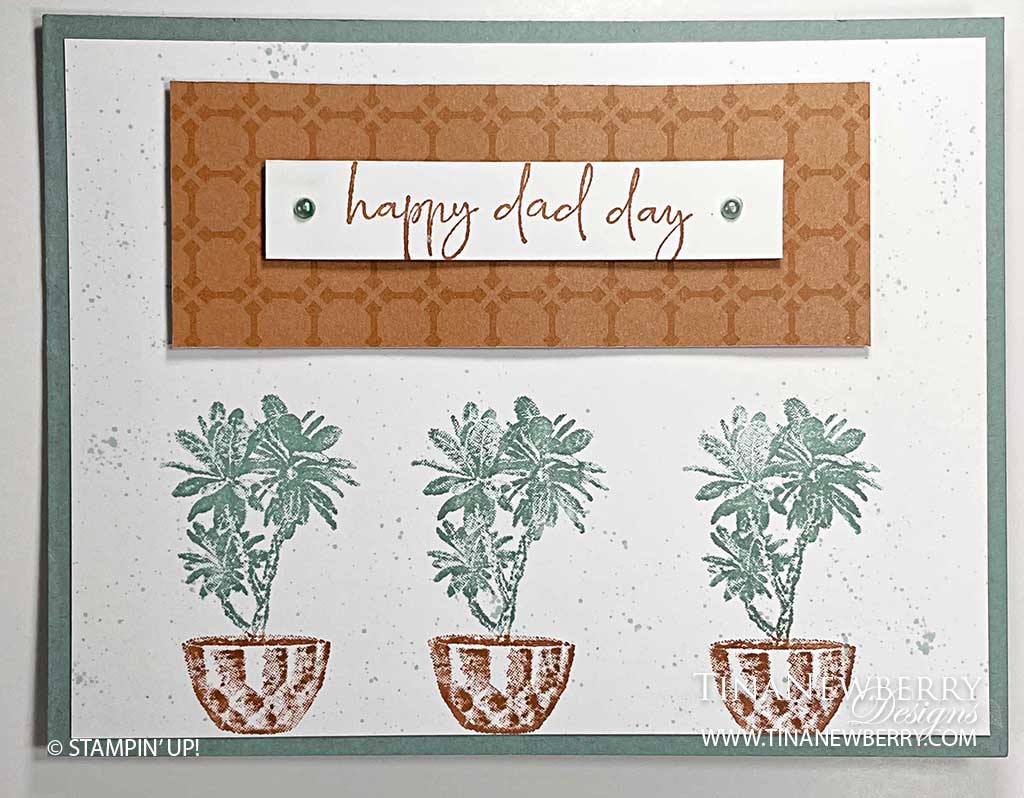
The color combinations for this design are endless! For this one, the Old Olive and Cinnamon Cider combination of this card combines with the Island Vibes stamps set are perfect to support the boys or girls in your life.

Measurements

Full list of supplies needed, listed below. A die cutting machine is needed for this card.

Card Base: Thick Basic White Cardstock 5 ½” h  x  8 ½” w folded to 5 ½” h x 4 ½” w

Background: Old Olive Cardstock  5 ¼” h x 4” w

Back Tag Layer: Cinnamon Cider Cardstock 4 ½”  h x 2” w

Front Tag Layer: Basic White Cardstock 4” h x 1 ½” w

Sentiment Layer: Basic White Cardstock scrap ¾” h x 3” w

Inside Layer: Basic Whie Cardstock 5 ¼” h x 4” w

Let’s Create

  1. Affix all stamps to Acrylic Blocks.
  2. Fold the Card Base in half using a Bone Folder to sharpen the crease.
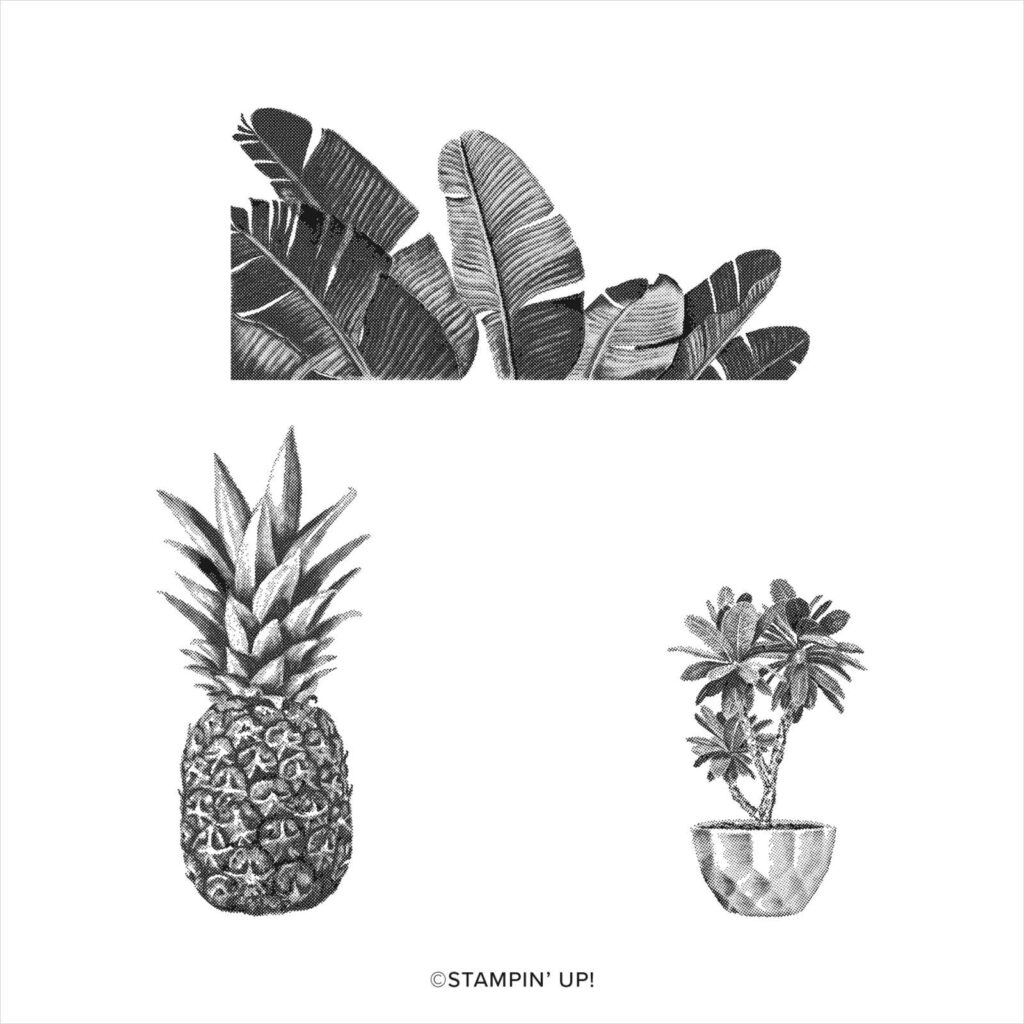
  3. Stamp the palm fronds image with Old Olive Stampin’ Pad around the perimeter of the Old Olive Cardstock layer. 
  4. Adhere the stamped Old Olive Cardstock layer onto the front of the Thick Basic White card base.
  5. Punch the tops of the Cinnamon Cider Cardstock 4 ½”  h x 2” w and Basic White card stock 4” h x 1 ½” w with the Delightful Tag Topper.
  6. Place the pot side of the stamp image into the Cinnamon Cider Stampin’ Pad and the plant part of the image into the Old Olive Stampin’ Pad. Stamp onto the center of the Basic White Cardstock tag.
  7. Stamp the sentiment with Old Olive Stampin’ Pad onto the ¾” h x 3” w Basic White Cardstock scrap. Trim each end with a slant cut but leave space for placing embellishments at each end.
  8. Lightly tap the edges of the sentiment layer into the Cinnamon Cider Stampin’ Pad to lightly ink each side.
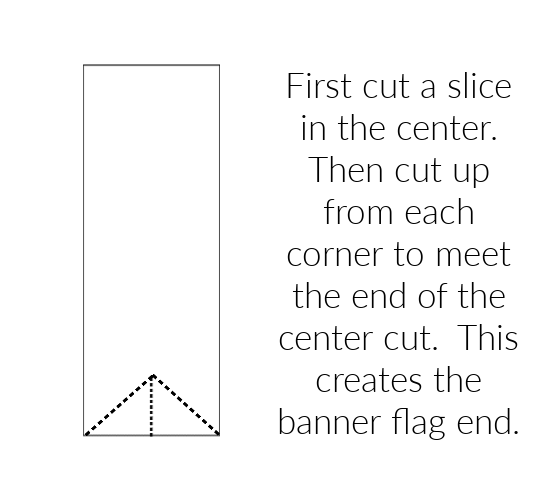
  9. Now cut a banner tag bottom onto the Cinnamon Cider tag and the Basic White tag, see the diagram image. 
  10. Cut a 15” length of the Linen Thread. Fold it in half and push the fold from the front to the back of the tags ribbon holes to connect the tags.
  11. Thread the ends up through the loop and pull it snug.  Tie the ends into a knot and trim the ends.
  12. Use Dimensionals to adhere the layered tags diagonally onto the card front. 
  13. Use Dimensionals to adhere the sentiment strip onto the card front.
  14. Embellish the sentiment and tag with the Brushed Metallic Adhesive Backed Dots.
  15. If you like, you can stamp the palm leaves onto the top left corner of the envelope.
  16. Stamp and decorate the inside and attach with Stampin’ Seal.
  17. So cute! Now send it to someone special.

Shopping List

Stamper’s Toolkit

You will also need adhesive, acrylic blocks, scissors and other basic PaperCrafting items from the Stamper’s Toolkit

Happy Dad Day

Father’s Day will be here before we know it. Get a jump on your cards with the Island Vibes Sale-a-bration Stamp Set. Free with your $50 product order now thru February 28th. Learn more about Sale-a-bration.

Measurements

Full list of supplies needed, listed below. A die cutting machine is needed for this card.

Card Base: Garden Green Cardstock 4 ¼” h  x  11” w folded to 4 1/4″ h x 5 1/2″ w

Background: Basic White card stock  4″ h x 5 1/4″ w

Front Layer: Cinnamon Cider print from the In Color 2020–2022 6″ X 6″ (15.2 X 15.2 CM) Designer Series Paper 1 ½” h x 4” w

Sentiment Layer: Basic White Cardstock scrap ½” h x 3” w

Inside Layer: Basic White Cardstock 4″ h x 5 1/4″ w

Let’s Create

  1. Affix all stamps to Acrylic Blocks.
  2. Fold the Card Base in half using a Bone Folder to sharpen the crease.
  3. Place the pot side of the stamp image into the Cinnamon Cider Stampin’ Pad and the plant part of the image into the Soft Succulent Stampin’ Pad. Stamp onto the center  lower edge of the Basic White card stock  4″ h x 5 1/4″ w. Repeat and stamp the image to the left and then right of the first image. 
  4. Use the dark Soft Succulent Stampin’ Blends marker to tap along the edge of a clear block to splatter ink onto this layer of Basic White 4″ h x 5 1/4″ w card stock. 
  5. Adhere this stamped Basic White layer onto the Soft Succulent card base. 
  6. Adhere the 1 ½” h x 4” w Cinnamon Cider print from the In Color 2020–2022 6″ X 6″ Designer Series Paper across the card front.
  7. Stamp the sentiment with Soft Succulent Stampin’ Pad onto the Basic White Cardstock scrap ½” h x 3” w.  Adhere this sentiment layer with Dimensionals onto the Cinnamon Cider DSP layer. 
  8. Color 2 pearls with the Soft Succulent Stampin’ Blends marker.  Allow to dry and then place them at either end of the sentiment label. 
  9. If you like, decorate the envelope with a layer of the Cinnamon Cider print from the In Color 2020–2022 6″ X 6″ Designer Series Paper.
  10. Stamp and decorate the inside and attach with Stampin’ Seal.
  11. Perfect! Now you are ready for Dad Day!

Shopping List

Stamper’s Toolkit

You will also need adhesive, acrylic blocks, scissors and other basic PaperCrafting items from the Stamper’s Toolkit

Happiness is Being with You

The deer from the ’21 Jul-Dec Mini Catalog returns cute as ever and he brough some more adorable friends with him. Send friendly cheer when you create your own forest scene with the Friends of the Forest stamp set and your preferred coloring technique.

Measurements

Full list of supplies needed, listed below. A die cutting machine is needed for this card.

Card Base – Basic White

  • 8 ½” x 5 ½” (score at 4 ¼”)
  • 3 ¾” x 2 ¾”
  • 2 ¼” x ⅝”
  • 3 ½” x 2 ½” (for stamping and punching deer/fussy cutting tree stump & rabbit)

Crumb Cake 5” x 3 ⅝”
Garden Green 5 ¼” x 1 ½”
Heart & Home DSP (Garden Green) 3 ⅝” x 2 ⅝”
Heart & Home DSP (Wood Grain) 1 ¼” x 1 ¼”

Let’s Create

  • Cut Basic White Card Base 8 ½” x 5 ½” and score at 4 ¼”.
  • Using the Brick & Mortar 3 D Embossing Folder, emboss the Crumb Cake panel.
  • Using the Stripes Embossing Folder from the Stripes and Splatters 3 D Folder emboss the Garden Green with the stripes going the length of the card stock.
  • Flag one end of the woodgrain DSP square. Using a blending brush, brush some color onto this piece with Crumb Cake ink.
  • Using Black Memento ink, stamp the sentiment onto the Basic White strip and flag the left end.
  • Stamp the deer, rabbit and the tree stump only the 3 ½” x 2 ½” Basic White.  Color these images using the Stampin’ Blends.  The colors used in the photo above are – Crumb Cake light & dark, and petal pink dark. Punch the Deer using the Deer Builder Punch. And fussy cut the tree stump and the rabbit.
  • Card Assembly – Adhere the brick embossed Crumb Cake panel to the folded Basic White card base.  Adhere the embossed strip Garden Green cardstock to the left side of the card.  
  • Adhere the DSP to the coordinating Basic White matte.  Using two 10” pieces of linen thread, wrap them together around the DSP panel and tie into a bow with the bow towards the left side. 
  • Adhere the DSP panel to your card centering it top to bottom.  Slip the flagged piece of wood grain DSP under this piece toward the left side. (as shown in the photo)
  • Adhere the punched deer to the left side of the DSP panel and the flagged sentiment to the upper right of the same panel.
  • Adhere the tree stump using a Stampin’ Dimensional to the lower right corner of the embossed Crumb Cake and adhere the bunny to the top of the stump with a Stampin’ Dimensional.

Shopping List

Stamper’s Toolkit

You will also need adhesive, acrylic blocks, scissors and other basic PaperCrafting items from the Stamper’s Toolkit

My Foxy Friend

Send cards of cheer to your friends with the whimsical Forest Friends stamp set. You set the scene with your color choices and style. I just love the little bird in the tree on this fun card!

Measurements

Full list of supplies needed, listed below. A die cutting machine is needed for this card.

Basic White Thick Cardstock

  • 8 ½” x 5 ½” (score at 4 ¼”) for the Card Base

Basic White Cardstock

  • 5” x 4” for cutting stitched rectangle
  • 2” x 2” for stamping and cutting fox and bird

Calypso Coral Cardstock: 5 ⅜” x 4 ⅛” for the Background
Pansy Petals Designer Series Paper: 5 ⅜” x 2”
So Saffron Cardstock

  • 5 ⅜” x ¼”
  • 3 ⅝” x 4”

Let’s Create

  1. Affix all stamps to Acrylic Blocks.
  2. Fold the Basic White Thick Card Base in half using a Bone Folder to sharpen the crease.
  3. Cut the 5” x 4” Basic White cardstock using the Stitched Rectangle Die (Use the die that measures approximately 4 ⅞” x 3 ½” – the 2nd largest one)
  4. Using memento black ink, stamp the row of mushrooms/small daisy across the bottom of the stitched rectangle 3 times. I started with the one in the center and then one on each side of that.
  5. With Memento Black ink, stamp the tree so the lines of the trunk are just above the flower in the center. (you will use a black marker to bring these lines lower in another step)
  6. Making your rectangle a little shorter: Take the same stitched rectangle die and line it up so the top of the die will cut your stamped rectangle just above the tree. You can line this up pretty easily if you place it upside down on your cutting plate. Place the top cutting plate so it just covers the top edge of the die. This is the only part you want to cut. By placing the cutting plate only over the top edge, you’ll cut off the excess paper and the rest of the rectangle will not be affected by this second pass through the die cutting machine.
  7. Stamp the fox and the small bird on the 2” x 2” piece of Basic White using Black Memento ink.
  8. Using a Basic Black Stampin’ Write Marker, extend the tree trunk down to the grass line. Color in the images using Stampin’ Blends as shown in the photo. Colors used in the sample are Granny Apple Green light, Crumb Cake light Poppy Parade light, Daffodil delight light, Balmy Blue light and dark, Cajun Craze light and dark.
  9. Fussy cut both the fox and the bird.
  10. Attach the stamped rectangle to the 3 ⅝” x 4” So Saffron. You may need to adjust the size of this piece depending on how you cut your rectangle.
  11. Attach the fox and the bird onto your stamped and colored panel using Stampin’ Dimensionals.
  12. Adhere the narrow So Saffron strip to the right of the DSP on leaving just a narrow edge showing. Then adhere this to the Calypso Coral background panel and then to the folded card base.
  13. Stamp the sentiment using Black Memento ink to lower right on the Calypso Coral panel.
  14. Adhere the layered stamped stitched rectangle panel to the card using Stampin’ Dimensionals.
  15. Using the dark Calypso Coral Blend, color 2 of the Polished Dots. Place them in the upper right of the stitched rectangle.
  16. Stamp and decorate the inside and attach.
  17. Decorate your envelope.
  18. So cute! Now send it to someone special.

Shopping List

Stamper’s Toolkit

You will also need adhesive, acrylic blocks, scissors and other basic PaperCrafting items from the Stamper’s Toolkit