BONUS PROJECTS: Flowering Tulips Bundle

Build sentimental bouquets with the Flowering Tulips Bundle! Use the variety of budding tulips stamps from the Flowering Tulips Stamp Set to create your perfect bouquet to send to someone special, then use your favorite coloring technique to make it shine! Pair the modern sentiments included with your budding tulips for all-occasion card-making projects. The Tulips Dies are a must have for any floral enthusiast. Not only can you create layered tulip fields, but you can also create three types of layered tulip blossoms, perfect for creating your own tulip bouquet! Simply die cut the coordinating dies with contrasting cardstock colors, and then fold the pieces together to make beautiful tulip blossoms. These dies are sized perfectly for the front of a card. Scroll down for the shopping list and assembly video.

START OF SOMETHING NEW CARD
5-1/2″ x 4-1/4″ (14 x 10.8 cm)

  1. Before you start stamping, cut the following:
    • 5-1/2″ x 8-1/2″ (14 x 21.6 cm) Old Olive Cardstock
    • 3″ x 5″ (7.6 x 12.7 cm) Basic White Cardstock
    • 1-3/4″ x 2-3/8″ (4.4 x 6 cm) Basic White Cardstock
    • 2″ x 4″ (5.1 x 10.2 cm) Basic White Cardstock
    • 6-1/2″ (16.5 cm) piece from White 3/4″ (1.9 cm) Frayed Ribbon
  1. Fold the Old Olive 5-1/2″ x 8-1/2″ (14 x 21.6 cm) Cardstock in half to create the
    card base.
  2. On the Basic White 3″ x 5″ (7.6 x 12.7 cm) Cardstock
    • Stamp the tulip stems in Old Olive ink so they crisscross (you’ll use these
    stems as your guide for stamping the head of your flowers, so place
    them accordingly).
    • Stamp the tulips in Flirty Flamingo ink on the upper right and bottom left
    areas, then stamp the tulip centers in Pale Papaya Classic ink
    • Stamp the remaining tulips in Pale Papaya ink on the upper left and bottom
    right areas.
    • Stamp the leaves in Old Olive ink.
  3. Stamp two leaves in Old Olive ink and a tulip in Pale Papaya ink on the
    Basic White 2″ x 4″ (5.1 x 10.2 cm) Cardstock. Die cut the images and adhere to
    the center of the Basic White 3″ x 5″ (7.6 x 12.7 cm) Cardstock.
  4. Adhere the Basic White 3″ x 5″ (7.6 x 12.7 cm) Cardstock to the folded
    Old Olive card base using Stampin’ Dimensionals®.
  5. Fold the White 3/4″ (1.9 cm) Frayed Ribbon over the Basic White piece, then
    adhere using Stampin’ Dimensionals.
  6. Stamp the sentiment in Pale Papaya ink on the Basic White 1-3/4″ x 2-3/8″
    (4.4 x 6 cm) Cardstock. Cut a V shape at the bottom, then adhere using
    Stampin’ Dimensionals.

LOVE YOU SO MUCH CARD
4-1/4″ x 5-1/2″ (10.8 x 14 cm)

  1. Before you start stamping, cut the following pieces:
    • 5-1/2″ x 8-1/2″ (14 x 21.6 cm) Pale Papaya Cardstock
    • 2-1/2″ x 4-1/4″ (6.4 x 10.8 cm) Basic White Cardstock
    • 7/8″ x 2-1/2″ (2.2 x 6.4 cm) Basic White Cardstock
    • 3-1/2″ x 4-1/2″ (8.9 x 11.4 cm) Old Olive Cardstock
    • 3″ x 3″ (7.6 x 7.6 cm) Pale Papaya Cardstock
    • 3″ (7.6 cm) White 3/4″ (1.9 cm) Frayed Ribbon
  2. Fold the Pale Papaya 5-1/2″ x 8-1/2″ (14 x 21.6 cm) Cardstock in half to create
    the card base.
  3. Stamp the x image in Flirty Flamingo ink on the front of the card base at top
    right and bottom left.
  4. Stamp the tulip leaves and stems in Old Olive ink on the 3-1/2″ x 4-1/2″
    (8.9 x 11.4 cm) Old Olive Cardstock. Die cut using the Tulips Dies and
    Stampin’ Cut & Emboss Machine.
  5. Die cut two tulips from the Pale Papaya 3″ x 3″ (7.6 x 7.6 cm) Cardstock.
    Stamp the petal image in Pale Papaya ink on the back. Fold so the stamped
    petal is visible.
  6. Adhere the leaves, stems and tulips to the Basic White (7/8″ x 2-1/2″;
    2.2 x 6.4 cm) Cardstock.
  7. Adhere the White 3/4″ (1.9 cm) Frayed Ribbon over the tulips.
  8. Stamp the sentiment in Flirty Flamingo ink on the Basic White 7/8″ x 2-1/2″
    (2.2 x 6.4 cm) Cardstock. Adhere over ribbon using Stampin’ Dimensionals.
  9. Use Stampin’ Dimensionals to adhere the assembled Basic White
    2-1/2″ x 4-1/4″ (6.4 x 10.8 cm) Cardstock to the center of the card base.

Shopping List

Assembly Video: Floering Tulips Bonus Projects

Vibrant Flowering Tulips Thinking of You

Create a pretty vibrant Thinking of You greeting card in a jiffy using the Simply Marbelous Free Sale-a-bration paper and the Flowering Fields Designer Series Paper.

Save 10% on the Flowering Tulips Bundle

Measurements

Full list of supplies needed, listed below. A die cutting machine is needed for this card.

Highland Heather Cardstock: 8 ½” x 5 ½”, Score at 4 ¼” for Card Base

Basic White:

  • 4” x 5 ¼” for Inside Layer
  • 4” x 5 ¼”
  • Scrap for cloud die-cuts from Windmill Fields dies

Flowering Fields Designer Series Paper: 3 ¾” x 3” field

Simply Marbelous Sale-a-bration Designer Series Paper: 3 ¾” x 2” sky

Crumb Cake Cardstock: scraps – fence die-cuts from Windmill Fields dies

Let’s Create

  1. Affix all stamps to Acrylic Blocks.
  2. Fold the Card Base in half using a Bone Folder to sharpen the crease
  3. Die-cut fences from Crumb Cake scraps from Windmill Fields dies
  4. Die-cut clouds from Basic White scraps from Windmill Fields dies
  5. Assemble card by adhering Basic White layer and the Flowering Fields and Simply Marbelous DSP layers with Stampin’ Seal. 
  6. Stamp sentiment in upper left corner of Simply Marbelous DSP in Blackberry Bliss.
  7. Adhere fences with small dots of Multipurpose liquid glue.
  8. Adhere clouds with Multipurpose liquid glue.
  9. Sprinkle on the Brass Butterflies..
  10. Stamp and decorate the inside and attach with Stampin’ Seal.
  11. Decorate your envelope.
  12. It’s Lovely! Now send it to someone special.

Shopping List

Recommended Stamper’s Toolkit

Product List
Order online from the convenience of your own home or send me your order and I’ll take care of you. ❤ Either way, please use the host code ANTD9UHS. Order online AND, if your order is $50 or more using host code ANTD9UHS between now and the end of the month you’ll receive a free pack of embellishment as a THANK YOU gift from me. ❤ If your order is over $150, skip the host code, earn Stampin’ Rewards for free stuff yourself and I’ll still send you a free pack of embellishment as a THANK YOU gift from me. ❤

Sweet Thank You Card with Flowering Tulips

Make a sweet Thank You card in just minutes with the Flowering Fields Suite Collection. The paper and Designer Series Paper and circle sentiment set the scene for this sweet greeting card.

Save 10% on the Flowering Tulips Bundle

Measurements

Full list of supplies needed, listed below. A die cutting machine is needed for this card.

Pool Party 8 ½” w x 5 ½” h, score at 4 ¼” w for Card Base

Basic White:

  • 4” w x 5 ¼” h for inside
  • 4” w x 5 ¼” h
  • 3” w x 2 ½” h Basic White Scrap 
  • 1 ¾” Circle from Basic White Scrap

Flowering Fields Designer Series Paper:

  • 3 ¾” w x 3” h
  • 3 ¾” w x 6” h tulips

Let’s Create

  1. Affix all stamps to Acrylic Blocks.
  2. Fold the Pool Party Card Base in half at the score line using a Bone Folder to sharpen the crease.
  3. Cut Designer Series Paper to 6” x 3-¾”, making sure your tulips are facing the right way. Tear at the top around the 2” mark. Adhere 3 ¾” w x 3” h sky pattern to the top of 4” x 5 ¼” Basic White Layer, and the tulip pattern to the bottom. Tear additional off the top as desired to reveal more of the sky. 
  4. Wrap a length of 12” of Pool Party Sheer ribbon around this panel, leaving enough length to tie a bow. Adhere this panel to the card front with Stampin’ Dimensionals. 
  5. Die Cut Stitched So Sweetly Label from the 3” w x 2 ½” h Basic White Scrap.
  6. Stamp sentiment on circle label in Pool Party ink. Adhere circle to Stitched So Sweetly label with Stampin’ Dimensionals.
  7. Attach sentiment panel to card front with Stampin’ Dimensionals.
  8. Tie a fluffy bow to the left of the sentiment. 
  9. Place the butterflies in the sky, and one fluttering amongst the flowers.
  10. Stamp and decorate the inside and attach with Stampin’ Seal.
  11. Decorate your envelope.
  12. So sweet! Put it in the mail to brighten someone’s day.

Shopping List

Recommended Stamper’s Toolkit

Product List
Order online from the convenience of your own home or send me your order and I’ll take care of you. ❤ Either way, please use the host code ANTD9UHS. Order online AND, if your order is $50 or more using host code ANTD9UHS between now and the end of the month you’ll receive a free pack of embellishment as a THANK YOU gift from me. ❤ If your order is over $150, skip the host code, earn Stampin’ Rewards for free stuff yourself and I’ll still send you a free pack of embellishment as a THANK YOU gift from me. ❤

Step It Up: Gumball Greetings

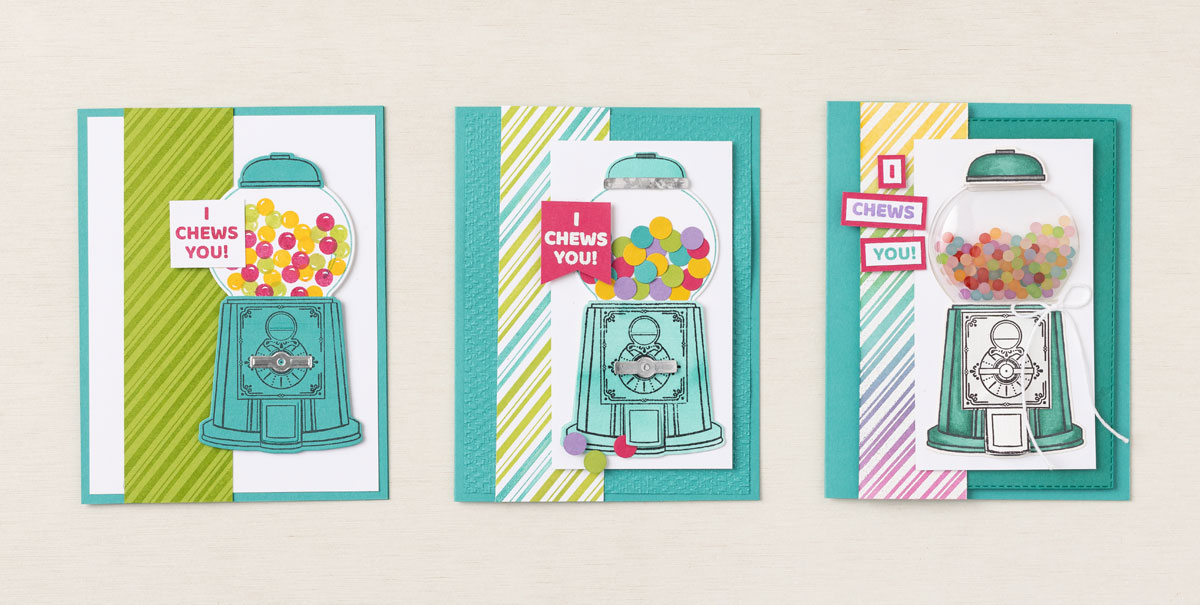
Whether you want to keep it simple or go the extra mile, let someone know you “chews” them with one of these fabulous cards!  (Products referenced are linked below).

CASUAL

We started by layering Basic White onto Bermuda Bay cardstock. We stamped and die cut the cute gumball machine from the Gumball Greeting Bundle, then stamped out a stripe pattern in Granny Apple Green. Finally, we stamped out a few gumballs in Granny Apple Green, Mango Melody, and Melon Mambo and then added an adorable sentiment.

AVID

First, we used the Tasteful Textile embossing folder to add texture to this card. Next, we colored Watercolor Paper with Bermuda Bay ink and then stamped and die cut the gumball machine. We used Silver Simply Elegant 12″ X 12″ (30.5 X 30.5 cm) Specialty Designer Series Paper to add some decoration to the machine, and die cut a few gumballs. We finished by stamping Bermuda Bay and Granny Apple Green stripes onto Basic White cardstock.

ARTFULLY AVID

For this card we blended Bermuda Bay, Mango Melody, and Melon Mambo ink together with blending brushes, then stamped out the stripe pattern using VersaMark ink. We filled the shaker dome with Frosted Beads Assortment and added some white Baker’s Twine to finish it all off. It turned out so sweet!

Show us how you step up your cards! Upload your projects to the Customer PaperCrafty Time Group.

Shopping List