A Little Hello Quick & Easy Card

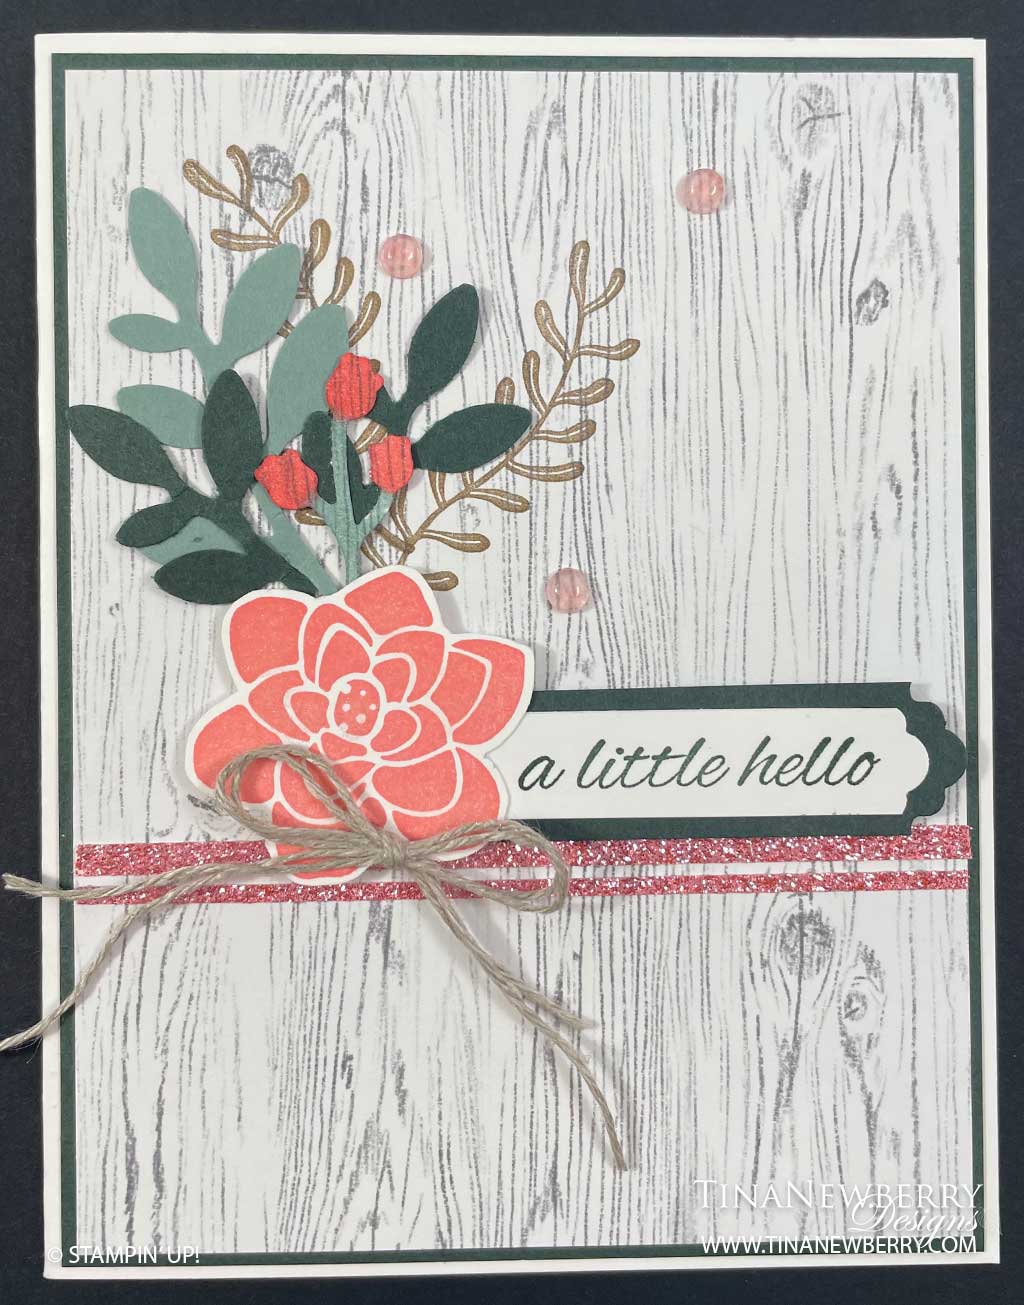
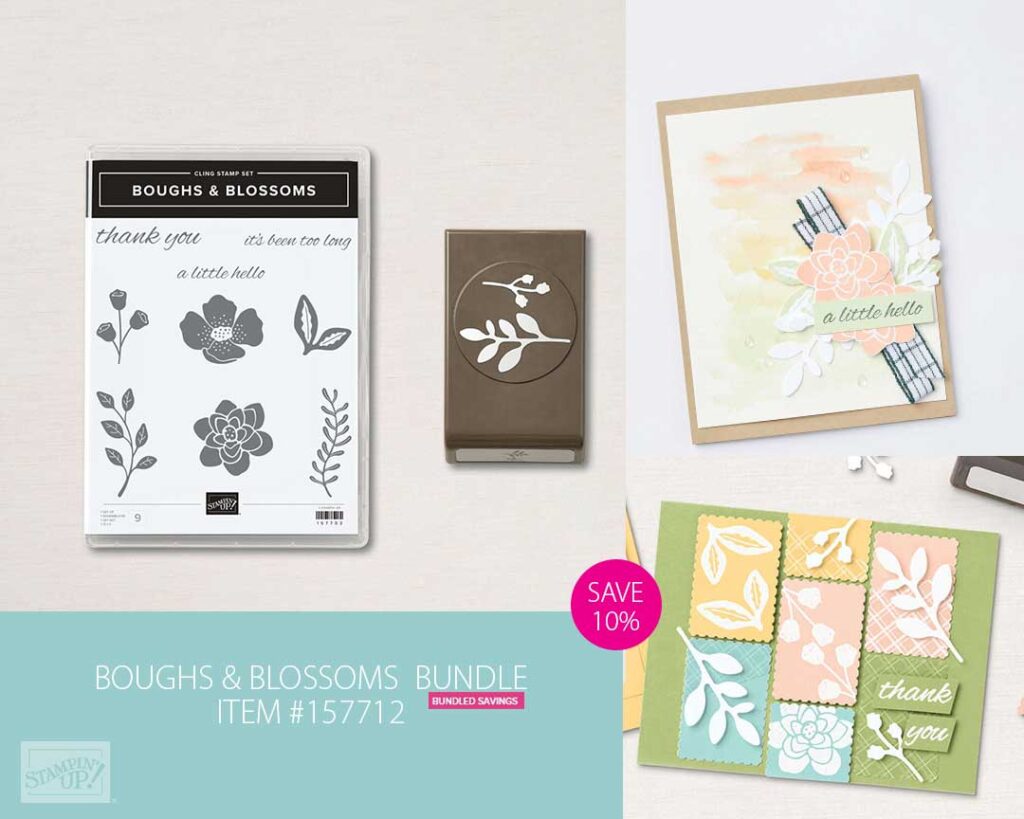
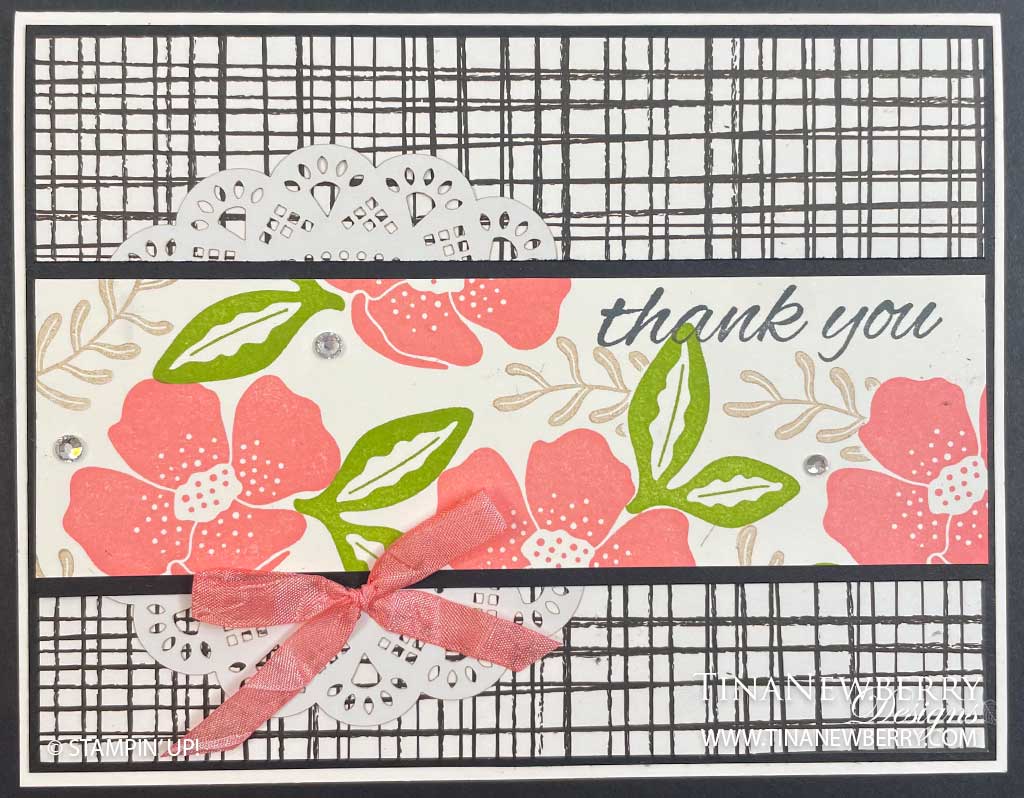
You can quickly and easily make a pretty focal image on the front of your card with the Boughs & Blossoms Punch Bundle. Read on for details.

Boughs & Blossoms Punch Bundle
Save 10% when you buy the Boughs & Blossoms Bundle

Measurements

Full list of supplies needed, listed below.

Basic White Thick: 8 ½” x 5 ½” (score at 4 ¼”) for Card Base

Basic White

  • 2 ¾” x ½
  • scrap 2” x 2” for stamping and cutting flower
  • 5 ¼” x 4” for the inside

Evening Evergreen

  • 5 ⅜” x 4 ⅛”
  • 2 ¾” x ¾”
  • 1 ¼” strip for punching leaves

Heart & Home Designer Series Paper:

  • 5 ¼” x 4”
  • Scrap of the woodgrain DSP for punch bud.

Soft Succulent: 1 ¼” strip for punching leaves

Supple Shimmer Paper (Pink): Two 4” slivers on about ⅛” and the other slightly skinnier.

Let’s Create

  1. Affix all stamps to Acrylic Blocks.
  2. Fold the Card Base in half using a Bone Folder to sharpen the crease.
  3. Using Evening Evergreen ink, stamp the sentiment on the 2 ¾” x ½” Basic White.  Using the Lovely Labels Pick A Punch, punch the right end of both the Basic White and the Evening Evergreen matte for this piece. Use Stampin’ Seal to tape these layers together.
  4. Using the Bough Punch, punch a bud stem out of the woodgrain DSP.  Color this using Dark Flirty Flaming Stampin’ Blend for the buds and Light Soft Succulent Stampin’ Blend for the stems.
  5. Using Flirty Flamingo Ink, stamp the flower onto the 2” square Basic White.  Use Paper Snips to fussy cut the flower.
  6. Brush a little Wink Of Stella onto both the fussy cut flower and the punched buds.
  7. Using the Bough Punch, punch two sets of leaves out of Evening Evergreen Cardstock and one set out of Soft Succulent Cardstock.
  8. Using Crumb Cake Ink, stamp the sprig two times onto the 5 ¼” x 4” Heart & Home Designer Series Paper towards the upper left corner.
  9.  Now you’re ready to assemble your card…. Use Stampin’ Seal to adhere the 5 ¼” x 4” Heart & Home Designer Series Paper to the 5 ⅜” x 4 ⅛” Evening Evergreen matte layer. And then adhere these layers to your folded Basic White Thick card base.
  10. Using Stampin’ Dimensionals, adhere the hand cut flower toward the left side of the card just covering the end of the crumb cake stamped sprig. 
  11. Use Stampin Seal to adhere the punched leaves to the card arranging them in such a way the stems disappear under the raised flower.  Adhere the punched and colored buds on top of the punched leaves.
  12. Using Stampin’ Dimensionals, adhere the sentiment to the right of the flower. Arranging it so the left edge is behind the flower.  You may need to trim a bit off from the left edge if it’s too long.
  13. Adhere the narrow Pink Shimmer strips just below the flower and the sentiment leaving a narrow space in between the two strips. 
  14. Tie a double bow from Linen Thread and using a Mini Glue Dot, adhere this to the card just below the flower. 
  15. Scatter 3 polished dots on the card to complete.
  16. Stamp and decorate the 5 ¼” x 4” Basic White for the inside and attach with Stampin’ Seal.
  17. Decorate your envelope.
  18. Lovely! Now it’s ready to send off to brighten someone’s day!.

Shopping List

Recommended Stamper’s Toolkit

Product List
Order online from the convenience of your own home or send me your order and I’ll take care of you. ❤ Either way, please use the host code ANTD9UHS. Order online AND, if your order is $50 or more using host code ANTD9UHS between now and the end of the month you’ll receive a free pack of embellishment as a THANK YOU gift from me. ❤ If your order is over $150, skip the host code, earn Stampin’ Rewards for free stuff yourself and I’ll still send you a free pack of embellishment as a THANK YOU gift from me. ❤

A Sweet Elegant Stamped Greeting Card

How can you create such a pretty simple card using 5 colors?! Color coordination, patterns, shapes and textures make you card come together easily.

Boughs & Blossoms Bundle – Save 10% when you buy the bundle

Measurements

Full list of supplies needed, listed below. A die cutting machine is needed for this card.
Basic Gray  Cardstock:

  • 8 ½” x 5 ½” (score at 4 ¼”) for Card Base
  • 4 ⅛ x 1 ¼”

Heart & Home Designer Series Paper: 5 ⅜” x 4 ⅛”

Fresh Freesia: 4 ¼” x 3” (for cutting scalloped rectangle)

Smoky Slate: 3 ¾” x 2 ⅝”

Basic White:

  • 3 ⅝” x 2 ½”
  • 5/14″ h x 4″ w for inside

Let’s Create

  1. Affix all stamps to Acrylic Blocks.
  2. Fold the Card Base in half using a Bone Folder to sharpen the crease.
  3. Using the Tasteful Textile Embossing Folder, emboss the 4 ⅛” x 1 ¼” piece of Basic Gray.
  4. Using the 2nd to the largest scalloped rectangle from the Stitched So Sweetly Dies, cut the piece of Fresh Freesia cardstock.
  5. With Fresh Freesia Ink, stamp the flowers 3 times on the Basic White 3 ⅝” x 2 ½” panel.  Then using Pear Pizzazz ink stamp the larger leaves, using Soft Seafoam stamp the smaller sprig.  With Smoky Slate, stamp the small buds. 
  6. Use Stampin’ Seal to attach the embossed Basic Gray to the wood grain DSP about one third from the bottom.  
  7. Wrap a piece of Fresh Freesia Open Weave Ribbon around the center of the Basic Gray Embossed Piece taping the ends on the back with Tear & Tape. Attach these layers to your Basic Gray folded card front with Stampin’ Seal. 
  8. Use Stampin’ Seal to tape the stamped Basic White panel to the Smoky Slate piece of cardstock, and then to the die cut Fresh Freesia cardstock. 
  9. Using Stampin’ Dimensionals adhere the stamped layers to the card, slightly toward the right side and centered in top to bottom.
  10. Tie a bow using the Fresh Freesia Open Weave Ribbon and adhere to the card with a Mini Glue Dot. 
  11. Sprinkle a few small Basic Rhinestone Jewels.
  12. Stamp and decorate the inside and attach with Stampin’ Seal.
  13. Decorate your envelope.
  14. So cute! Now send it to someone special.

Shopping List

Recommended Stamper’s Toolkit

Product List
Order online from the convenience of your own home or send me your order and I’ll take care of you. ❤ Either way, please use the host code ANTD9UHS. Order online AND, if your order is $50 or more using host code ANTD9UHS between now and the end of the month you’ll receive a free pack of embellishment as a THANK YOU gift from me. ❤ If your order is over $150, skip the host code, earn Stampin’ Rewards for free stuff yourself and I’ll still send you a free pack of embellishment as a THANK YOU gift from me. ❤

Boughs & Blossoms Thank You

Show your gratitude with a lovely Thank You card from the Boughs & Blossoms bundle by Stampin’ Up! The bold images in Flirty Flamingo, Granny Apple Green and Crumb Cake add spring cheer to your sincere message.

Boughs & Blossoms – Save 10% when you buy the bundle.

Measurements

Full list of supplies needed, listed below.

Basic White Cardstock:   8 ½” x 5 ½” scored on the long side at 4 ¼” for Card Base

Basic Black Cardstock:

  • 5 ⅜” x 4 ⅛”
  • 4” x 1 ⅞”

Pattern Party Designer Series Paper: 5 ¼” x 4”

Basic White Cardstock:

  • 4” x 1 ¾”
  • 5 ¼” x 4”

Let’s Create

  1. Affix all stamps to Acrylic Blocks.
  2. Fold the Card Base in half using a Bone Folder to sharpen the crease.
  3. Using Tuxedo Black Memento ink, stamp the sentiment in the upper right corner of the Basic White 4” x 1 ¾” cardstock. 
  4. Using Flirty Flamingo Ink, stamp 3 or 4 flowers randomly on Basic White 4” x 1 ¾” cardstock. 
  5. Using Granny Apple Green, stamp the leaves near the flowers, and using Crumb Cake ink, randomly stamp the sprig. Filling in some of the white spaces.  I did cut a mask for the flowers and used that in a couple of places to give the appearance that the sprig was behind the flower.
  6. Use Stampin’ Seal to adhere this stamped panel to the Basic Black 4” x 1 ⅞” panel.
  7. Use Stampin’ Seal to adhere the Pattern Party Designer Series Paper to the 5 ⅜” x 4 ⅛” Basic Black panel, and then to the folded card front.
  8. Use Stampin’ Seal to adhere the doily towards the left side of the card.
  9. Use Stampin’ Seal to the stamped panel to the card so it is centered up and down in the doily. 
  10. Using a Dark Flirty Flamingo Stampin’ Blend, color a length of the white crinkle ribbon and tie into a bow. With a Mini Glue Dot adhere the bow to the lower edge of the stamped cardstock, centering in the doily.
  11. Sprinkle 3 small Iridescent Rhinestone Basic Jewels on the cardfront.
  12. Stamp and decorate the 5 ¼” x 4” Basic White for the inside and attach with Stampin’ Seal.
  13. Decorate your envelope.
  14. So cute! Now send it to someone special.

Shopping List

Recommended Stamper’s Toolkit

Product List
Order online from the convenience of your own home or send me your order and I’ll take care of you. ❤ Either way, please use the host code ANTD9UHS. Order online AND, if your order is $50 or more using host code ANTD9UHS between now and the end of the month you’ll receive a free pack of embellishment as a THANK YOU gift from me. ❤ If your order is over $150, skip the host code, earn Stampin’ Rewards for free stuff yourself and I’ll still send you a free pack of embellishment as a THANK YOU gift from me. ❤

BONUS PROJECTS: Hello Ladybug Bundle

Keep your crafting spot-on with the trendy Hello Ladybug Bundle! This bundle includes the Hello Ladybug Stamp Set and Ladybug Builder Punch. Create adorable cards, cute tags, fun gift wrapping, and sweet scrapbook pages for loved ones (big and small) with these perfectly coordinated products. Mix and match ladybugs, leaves, daisies, forget-me-not blossoms, and friendly sentiments for unique designs every time. You can also try out the Two-Step Stampin’® technique with the stamp set, then use the punch to punch out your ladybug designs for that extra wow factor!

LADYBUG WISHES
4-1/4” x 5-1/2” (10.8 x 14 cm)

  1. Prepare the following paper sizes before you start stamping:
    • 8-1/2” x 5-1/2” (21.6 x 14 cm) from Soft Succulent Cardstock
    • 3-1/2” x 5” (8.9 x 12.
    7 cm) from Soft Succulent Cardstock
    • T
    wo pieces measuring 2” x 3” (5.1 x 7.6 cm) from Basic White Cardstock
    • 1-1/4” x 1-1/4” (3.2 x 3.2 cm) from Old Olive Cardstock
  2. Fold the 8-1/2” x 5-1/2” (21.6 x 14 cm) Soft Succulent piece in half and score at 4-1/4” (10.8 cm) to create the card base.
  3. On the 3-1/2” x 5” (8.9 x 12.7 cm) Soft Succulent piece, randomly stamp the small flowers from the Hello Ladybug Stamp Set in Soft Succulent ink.
  4. Stamp the sentiment in Jet Black StazOn ink onto the 1-1/4” x 1-1/4” (3.2 x 3.2 cm) Old Olive piece.
  5. Stamp one ladybug body in Polished Pink ink and one set of wings in Blushing Bride ink onto a 2” x 3” (5.1 x 7.6 cm) Basic White piece. Then stamp the dots onto the wings in Polished Pink ink. Punch out the images using the Ladybug Builder Punch, then use adhesive to assemble.
  6. Adhere the 3-1/2” x 5” (8.9 x 12.7 cm) Soft Succulent piece to the center of the card base. Then adhere the remaining 2” x 3” (5.1 x 7.6 cm) Basic White piece on top of the stamped card front.
  7. Center the ladybug piece onto the Basic White piece and adhere using Stampin’ Dimensionals®. Then use another Stampin’ Dimensional to attach the sentiment
    (it should slightly overlap the ladybug).
  8. Add beautiful embellishments by gluing Loose Flower Flourishes to the card front.
Products Used

LADYBUG FRIENDS
5-1/2” x 4-1/4” (14 x 10.8 cm)

  1. Get ready to make this dazzling card by prepping the following paper pieces:
    • 5-1/2” x 8-1/2” (14 x 21.6 cm) from Blushing Bride Cardstock
    • 3/8
    ” x 2” (1 x 5.1 cm) from Blushing Bride Cardstock
    • 3
    ” x 4” (7.6 x 10.2 cm) from Basic White Cardstock
    • 5-1/2” x 4-1/4” (14 x 10
    .8 cm) from Basic White Cardstock
  2. On the 3” x 4” (7.6 x 10.2 cm) Basic White piece, stamp the large daisy image from the Hello Ladybug Stamp Set in a random pattern with Polished Pink ink. Then stamp the flower centers using Pale Papaya ink.
  3. On the 5-1/2” x 4-1/4” (14 x 10.8 cm) Basic White piece, stamp one ladybug body in Pale Papaya ink and another ladybug body in Soft Succulent ink. Then, stamp two sets of wings in Old Olive ink. Punch out stamped images using the Ladybug Builder Punch. Use adhesive to assemble each ladybug.
  4. Stamp the sentiment in Polished Pink ink onto the 3/8” x 2” (1 x 5.1 cm) Blushing Bride piece. Trim the top right edge at an angle using scissors.
  5. Create the card base by folding the 5-1/2” x 8-1/2” (14 x 21.6 cm) Blushing Bride piece in half, then adhere the 3” x 4” (7.6 x 10.2 cm) Basic White piece to the lower right side of the card base.
  6. Adhere ladybugs and the sentiment to the card front using Stampin’ Dimensionals, then glue Loose Flower Flourishes for a fabulous final touch!
Products Usesd