Cup of Tea Get Well Card

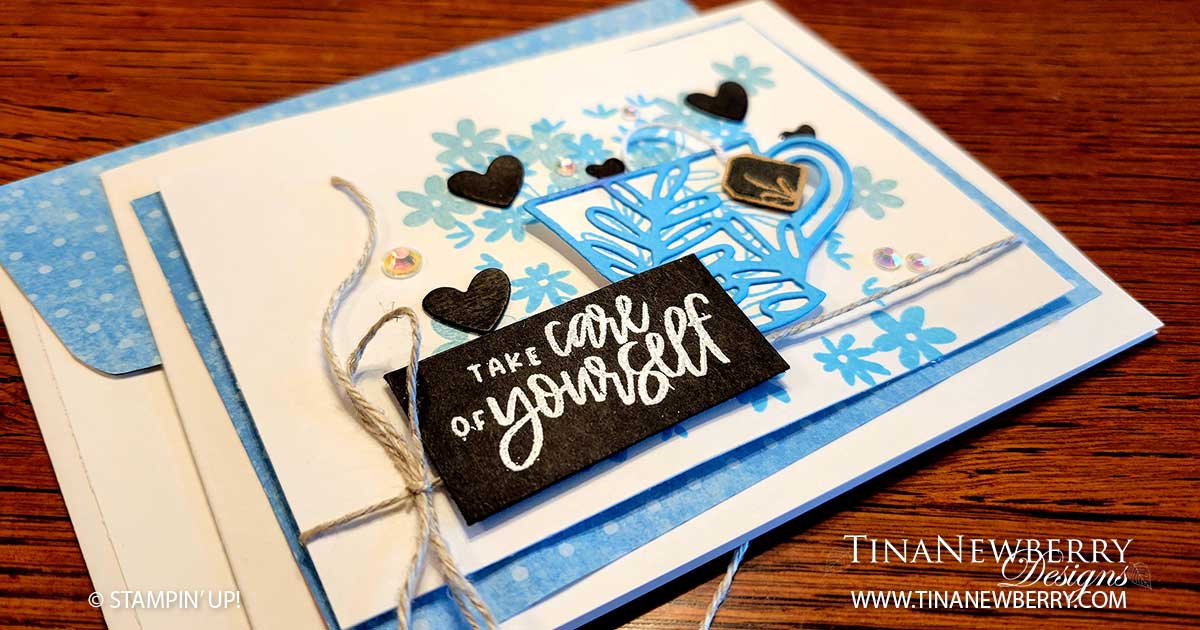
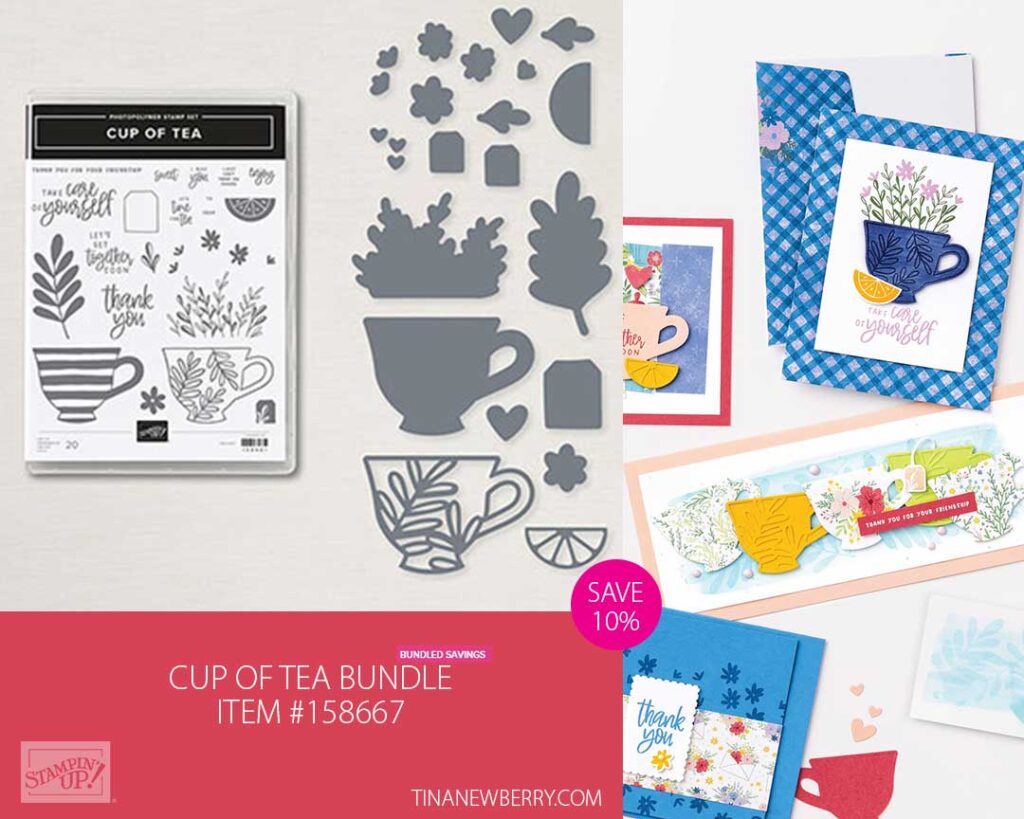
Such an endearing greeting card with polka dots, hearts, flowers and a dainty tea cup! I had seen a similar color palette on Pinterest and couldn’t wait to create it in a get well card with the pretty Cup of Tea Bundle.

Cup of Tea Bundle – Save 10% when you buy the bundle

Measurements

Full list of supplies needed, listed below. A die cutting machine is needed for this card.
Basic White Thick Cardstock: 4 1/4″ h x 11″ w for card base

Basic White Cardstock:

  • 3 1/2″ h x 4 3/4″ w for front
  • 4″ h x 5 1/4″ w for inside (optional)
  • 2″ h x 2 1/2″ w scrap for tea cup

Basic Black Cardstock:

  • 1″ h x 2″ h for sentiment
  • scrap for hearts

Tahitian Tide Cardstock: 2″ h x 2 1/2″ w scrap for tea cup outline

Kraft Paper: scrap for tea tag

Tea Boutique Designer Series Paper (DSP): 3 3/4″ h x 5″ w

Let’s Create

  1. Affix all stamps to Acrylic Blocks.
  2. Fold the Card Base in half using a Bone Folder to sharpen the crease.
  3. Attach the Tea Boutique DSP at an angle with Stampin’ Seal.
  4. Stamp the multi-flower image with Tahitian Tide ink and then add some large flowers in Balmy Blue Ink.
  5. Stamp the floral tea cup image on 2″ h x 2 1/2″ w Basic White Cardstock scrap and die cut.
  6. Attache Adhesive Sheets to the back of the Tahitian Tide scrap cardstock and die cut tea cup outline. Peel off backing and adhere to cup.
  7. Stamp the floral tea bag tag on Kraft Paper with Tuxedo Black Memento Ink and die cut. Use Mini Glue Dots to attach a bit of Basic White Bakers Twine to the tag and cup.
  8. Attach Tea Cup with Stampin Dimensionals.
  9. Die Cut some hearts from Basic Black Cardstock scraps and attach with Multupurpose Liquid Glue.
  10. Stamp the sentiment in Versamark in on 1″ h x 2″ h Basic Black Cardstock and heat emboss with Basic White embossing powder.
  11. Wrap a strand of Linen Thread around the stamped Basic White Cardstock and tie a bow to the left.
  12. Attach the sentiment with Stampin’ Dimensionals.
  13. Sprinkle on the gems.
  14. Stamp and decorate the inside and attach with Stampin’ Seal.
  15. Decorate your envelope.
  16. So cute! Send these get well wishes to someone who is feeling blue.

Shopping List

Recommended Stamper’s Toolkit

Product List
Order online from the convenience of your own home or send me your order and I’ll take care of you. ❤ Either way, please use the host code ANTD9UHS. Order online AND, if your order is $50 or more using host code ANTD9UHS between now and the end of the month you’ll receive a free pack of embellishment as a THANK YOU gift from me. ❤ If your order is over $150, skip the host code, earn Stampin’ Rewards for free stuff yourself and I’ll still send you a free pack of embellishment as a THANK YOU gift from me. ❤

Tea Boutique Thank You

As a tea drinker, I was thrilled to see the Tea Boutique Suite in the new Annual Catalog. So cute! Although I don’t drink my tea out of a pretty porcelain tea cup, preferring an insulated mug to keep it hot, I find them quite pretty. After playing with the Cup of Tea Bundle I am excited about the possibilities of these products. And since I’m a klutz, creating with paper is a lot less daunting than a dainty, breakable cup. LOL

Cup of Tea Bundle – Save 10% when you buy the bundle

Measurements

Full list of supplies needed, listed below. A die cutting machine is needed for this card.
Bright White Thick Cardstock: 5 1/2″ h x 8 1/2″ w , scored and folded on the long-side at 4 1/4″ for card base.

Basic White Cardstock:

  • 1 1/2″ square scrap for sentiment
  • 4″ h x 3″ w for die cut
  • 5 1/4″ h x 4″ w for inside

Crushed Curry Cardstock: 1 3/4″ square scrap

Tea Boutique Designer Series Paper (DSP):

  • 5 1/2″ x 4 1/4″ for die cut
  • scraps for flowers

Let’s Create

  1. Affix all stamps to Acrylic Blocks.
  2. Fold the Card Base in half using a Bone Folder to sharpen the crease.
  3. Die cut the 5 1/2″ x 4 1/4″ Tea Boutique DSP with the largest Scalloped Contours Die, then attach to the Card Base with Stampin’ Seal.
  4. Stamp the striped tea cup on the 4″ h x 3″ w Basic White with Orchid Oasis Stamp Pad and then die cut with the Scalloped Contrours Die.
  5. Die cut about 20 flowers – large and small – in coordinating Tea Boutique DSP and use Mini Glue Dots to adhere to the cup layer and then attach to the card with Stampin Dimensionals.
  6. Stamp the Thank You sentiment stamp pad Orchid Oasis and die cut with Layering Circles Dies.
  7. Die cut a scalloped circle in Crushed Curry from the Layering Circles Dies.
  8. Attach the Thank You sentiment to the Crushed Curry scalloped circle and then attach both the card with Stampin’ Dimensionals. In the lower right of the circle, you may need to stack the dimensionals to keep the circles level becuase the tea cup die is already raised with dimensionals.
  9. Add a few small flowers to the sentiment with Mini Glue Dots.
  10. Add Basic Pearls to the center of each large flower.
  11. Tie a bow with Orchid Oasis Metallic Ribbon and attach with a Mini Glue Dot.
  12. Stamp and decorate the inside and attach with Stampin’ Seal.
  13. Decorate your envelope.
  14. So cute! Send your thanks today.

Shopping List

Recommended Stamper’s Toolkit

Product List
Order online from the convenience of your own home or send me your order and I’ll take care of you. ❤ Either way, please use the host code ANTD9UHS. Order online AND, if your order is $50 or more using host code ANTD9UHS between now and the end of the month you’ll receive a free pack of embellishment as a THANK YOU gift from me. ❤ If your order is over $150, skip the host code, earn Stampin’ Rewards for free stuff yourself and I’ll still send you a free pack of embellishment as a THANK YOU gift from me. ❤

Happiness Grows Within Quick & Easy Greeting Card

My parents have an arbor in their front yard in New Hampshire where a beautiful purple wisteria grows. The vines grow all around the arbor and have even shot across the lawn! Logan and I call it the Harry Potter vine. I’ve only seen it in bloom once or twice, but it sure is beautiful. When the Wisteria Wishes Stamp Set came out in the new Stampin’ Up! Annual Catalog, I knew I was in for hours and hours of fun creating with this pretty bundle. Create a cute quick & easy card in just minutes with the Wisteria Wishes Stamp Set and add a bit of pop with the Parakeet Party Plaid paper from the 2022-2024 In-Color Designer Series Paper Pack. Then use this layout over an over again with your other favorite stamp sets and patterned paper.

Wisteria Wishes – Save 10% when you buy the bundle

Measurements

Full list of supplies needed, listed below.
Gorgeous Grape Cardstock: 4 1/2″ h x 11″ w scored and folded on the long-side at 5 1/2″

Highland Heather Cardstock: 3 3/8″ h x 4 3/8″ w

2022-2024 Designer Series Paper (DSP): 4″ h x 5 1/4″ w

Basic White Cardstock:

  • 3 1/4″ w x 4 1/4″ h
  • 4″ h x 5 1/4″ w

Let’s Create

  1. Affix all stamps to Acrylic Blocks.
  2. Fold the Card Base in half using a Bone Folder to sharpen the crease.
  3. On the 3 1/4″ w x 4 1/4″ h Basic White Cardstock, stamp
    1. the sentiment in the lower right corner with Parakeet Party ink
    2. the wisteria flowers all around in Highland Heather
    3. the wisteria detail blossoms in gorgeous grape on top of every flower
  4. Use Stampin Seal’ to attach the stamped panel to the 3 3/8″ h x 4 3/8″ w Highland Heather panel.
  5. Double up 12″ of Crinkle Seam Binding, wrap around the stamped panel and tie a bow. Trim the ends as needed.
  6. Attach the Parakeet Party plaid piece to the folded Gorgeous Grape Card Base with Stampin’ Seal.
  7. Attach the stamped panel to the Parakeet Party with Stampin’ Dimensionals.
  8. Sprinkle on the Highland Heather pearls.
  9. Stamp and decorate the inside and attach with Stampin’ Seal.
  10. Decorate your envelope.
  11. Such a sweet card! Who will you send it to?
Product List

Recommended Stamper’s Toolkit

Product List
Order online from the convenience of your own home or send me your order and I’ll take care of you. ❤ Either way, please use the host code ANTD9UHS. Order online AND, if your order is $50 or more using host code ANTD9UHS between now and the end of the month you’ll receive a free pack of embellishment as a THANK YOU gift from me. ❤ If your order is over $150, skip the host code, earn Stampin’ Rewards for free stuff yourself and I’ll still send you a free pack of embellishment as a THANK YOU gift from me. ❤

Faith is About Trusting

Create an endearing card of encouragement with the new Wisteria Wishes Bundle by Stampin’ Up! Using a blending brush with the new Sweet Sorbet In-Color stamp pad, you can give your wisteria blossoms a gradient look just like Pink Japanese Wisteria blossoms! I’ll show you how.

Wisteria Wishes- Save 10% when you buy the bundle

Measurements

Full list of supplies needed, listed below. A die cutting machine is needed for this card.
Sweet Sorbet Cardstock: 5 1/2″ h x 8 1/2″ w scored and folded on the long side at 4 1/4″

Basic White Cardstock:

  • 5 1/2″ h x 4 1/4″ w for die cut
  • scrap for branch and flowers
  • 5 1/2″ h x 4/14″ w for inside

Design a Daydream 12″x12″ Host Designer Series Paper (DSP): 4 1/4″ h x 3″ w

Let’s Create

  1. Affix all stamps to Acrylic Blocks.
  2. Fold the Card Base in half using a Bone Folder to sharpen the crease.
  3. Die cut one 5 1/2″ h x 4 1/4″ w Bssic White Cardstock piece with the larges Color & Contours die.
  4. Stamp the Sentiment on the lower corner of the DSP with Sweet Sorbet ink.
  5. Attach the DSP to the die cut Basic White with Stampin’ Seal.
  6. Wrap the Sweet Sorbet Metallic Woven Ribbon around both layers and tie a bow just above the sentiment.
  7. Stamp the Branch in Garden Green ink and Die Cut.
  8. Use a blending brrush to apply Sweet Sorbet ink to a scrap piece of Basic White Cardstock taking care to blend from top to bottom so the top is darker than the bottom. Apply Sweet Sorbet ink to the blossom accent stamp and stamp on scrap paper before stamping on the Sweet Sorbet blended scrap. Clean the blossom accent stamp and then stamp again in Versamark ink, offsetting the Sweet Sorbet impression you made first. Sprinkle with white embossing powder and heat set. Then die cut with the wisteria blossom die.
  9. Attach the Wisteria Blossom to the Branch with Multipurpose glue. When set, attach to the DSP with Stampin’ Dimensionals.
  10. Attach the die cut Basic White layer with Stampin’ Dimensionals.
  11. Stamp and decorate the remaining 5 1/2″ h x 4 1/4″ w Bssic White Cardstock piece for the inside and attach with Stampin’ Seal.
  12. Decorate your envelope.
  13. Pretty! Now send it to someone special.

Shopping List


Recommended Stamper’s Toolkit

Product List
Order online from the convenience of your own home or send me your order and I’ll take care of you. ❤ Either way, please use the host code ANTD9UHS. Order online AND, if your order is $50 or more using host code ANTD9UHS between now and the end of the month you’ll receive a free pack of embellishment as a THANK YOU gift from me. ❤ If your order is over $150, skip the host code, earn Stampin’ Rewards for free stuff yourself and I’ll still send you a free pack of embellishment as a THANK YOU gift from me. ❤