Creative Challenge: Non-Traditional Colors

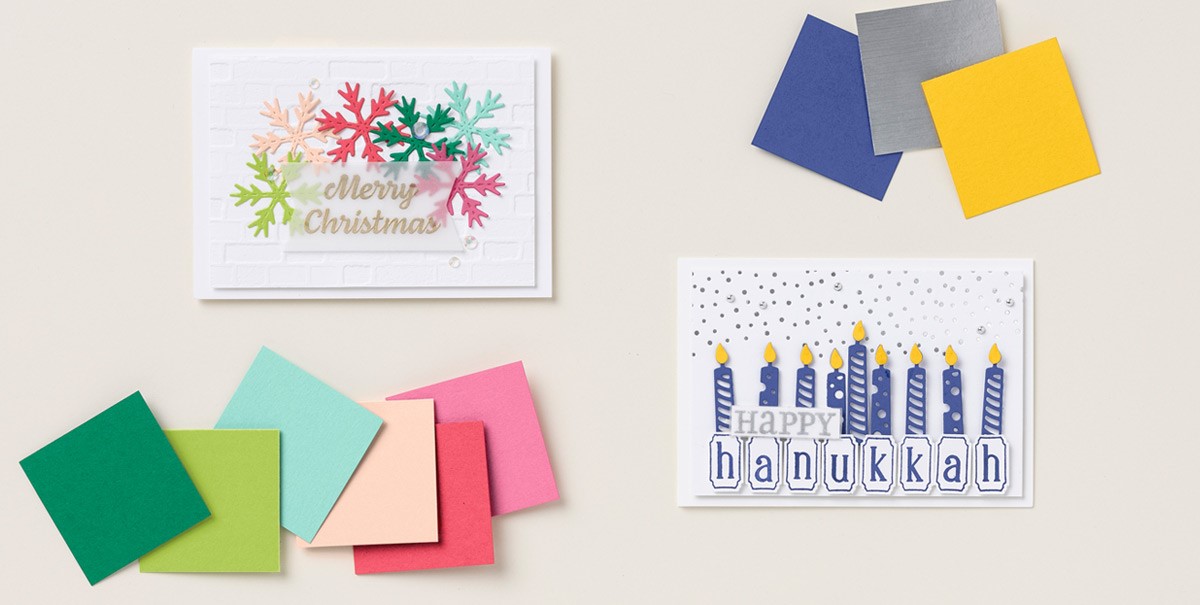
Every month, we like to issue a new creative challenge to keep your minds sharp and your creative juices flowing. Since it’s so close to Christmas, we’ve decided to go with a festively inspired challenge: make a Christmas card using anything except traditional Christmas colors. Take a look at what we came up with!

For our Merry Christmas card, we started with a white card base and layered on a white panel embossed with the Brick & Mortar 3D Embossing Folder. Then we die cut a few snowflakes in Coastal Cabana, Granny Apple Green, Petal Pink, Polished Pink, Shaded Spruce, and Sweet Sorbet. We adhered a sentiment and finished the card with some Iridescent Rhinestone Basic Jewels, which added a touch of sparkle that we love at Christmas without competing with the colorful snowflakes.

For our Happy Hanukkah card, we chose a Basic White panel and die cut some “stars” into it. We backed that paper with Silver Foil, and then die cut a few candles in Starry Sky, adding some Crushed Curry flames. We made sure to arrange the candles with one slightly taller than the others, imitating the look of a menorah. We finished the card with a few Festive Pearls and a sentiment that we made with the Alphabest Stamp Set.

We loved this challenge because it really helped us think outside the box. What will you come up with this month? Don’t forget to share your creative projects on social media and remember to use #CreativeChallengeSU so everyone can see!

Shopping List

Quick & Easy Christmas Note Card #2

Bring the gold and glimmer for this quick and easy note card – these second of three note card projects this week.

Brightest Glow Bundle by Stampin' Up!
Pair the peek-through dies with shimmery paper and one of 12 sentiments in the Brightest Glow Bundle to create mesmerizing Christmas cards for everyone on your list! The stamps are sized to fit inside the dies for greetings that really shine.

Measurements

Full list of supplies needed, listed below. A die cutting machine is needed for this card.
Very Vanilla Note Card

Lights Aglow Designer Series Paper (DSP): 5″ h x 3″ w

Gold Foil 5” h x ½” w

Very Vanilla Cardstock: scrap 3” h x 3” w

Let’s Create

  1. Affix all stamps to Acrylic Blocks.
  2. Fold the Card Base in half using a Bone Folder to sharpen the crease.
  3. Adhere the Gold Foil layer along the left edge of the card front.
  4. Adhere the Lights Aglow Specialty DSP.
  5. Stamp the sentiment with Soft Sueded Stampin’ Pad onto the scrap of Very Vanilla cardstock. 
  6. Use the Handmade Tag to punch around the sentiment.
  7. Ink a sponge dauber by tapping it onto the surface of a Soft Suede Stampin’ Pad.  Gently brush all around the edges of the sentiment tag. 
  8. Use adhesive tape to adhere two loops of Gold Shimmer Ribbon onto the back of the sentiment tag. 
  9. Use Dimensionals to adhere the sentiment tag onto the card front.
  10. Embellish with gold Festive Pearls. 
  11. Decorate your envelope.
  12. Glimmery! Put it in the mail and make someone’s day.

Shopping List

Recommended Stamper’s Toolkit

Product List
Order online from the convenience of your own home or send me your order and I’ll take care of you. ❤ Either way, please use the host code ANTD9UHS. Order online AND, if your order is $50 or more using host code ANTD9UHS between now and the end of the month you’ll receive a free pack of embellishment as a THANK YOU gift from me. ❤ If your order is over $150, skip the host code, earn Stampin’ Rewards for free stuff yourself and I’ll still send you a free pack of embellishment as a THANK YOU gift from me. ❤

Quick & Easy Christmas Note Card #1

Who says cards need to be complicated? Take a S.I.P. with this heartfelt card using stamps, ink & paper for #simplestamping.

Brightest Glow Bundle by Stampin' Up!
Pair the peek-through dies with shimmery paper and one of 12 sentiments in the Brightest Glow Bundle to create mesmerizing Christmas cards for everyone on your list! The stamps are sized to fit inside the dies for greetings that really shine.

Measurements

Full list of supplies needed, listed below. A die cutting machine is needed for this card.
Very Vanilla Note Card

Lights Aglow Designer Series Paper (DSP): 3″ h x 4 3/4″ w

Very Vanilla Cardstock: scrap 2″ h x 4″ w

Let’s Create

  1. Affix all stamps to Acrylic Blocks.
  2. Fold the Card Base in half using a Bone Folder to sharpen the crease.
  3. Cut two 5” lengths of the Gold Shimmer Ribbon. Use Tear & Tape to adhere an end of each on the back side of the Lights Aglow DSP layer, about ½” down from the top edge. 
  4. Adhere this Lights Aglow DSP layer onto the card front using Stampin’ Seal+. 
  5. Wrap the loose ends of Gold Shimmer Ribbon around to the front and tie a double knot.
  6. Stamp the sentiment with Cherry Cobbler Stampin’ Pad onto the Very Vanilla cardstock scrap.
  7. Use the decorative label die to die cut around the sentiment with the Stampin’ Cut and Emboss Machine.
  8. Adhere the sentiment label onto the lower right corner of the card front with Stampin’ Dimensionals.
  9. Embellish with 3 gold Festive pearls around the sentiment.
  10. Cut a layer of the Lights Aglow DPS 3 ⅝”h x ⅝”w and adhere to the left edge of the envelope.
  11. So pretty! Jot a quick note and send this to someone you love.

Shopping List

Recommended Stamper’s Toolkit

Product List
Order online from the convenience of your own home or send me your order and I’ll take care of you. ❤ Either way, please use the host code ANTD9UHS. Order online AND, if your order is $50 or more using host code ANTD9UHS between now and the end of the month you’ll receive a free pack of embellishment as a THANK YOU gift from me. ❤ If your order is over $150, skip the host code, earn Stampin’ Rewards for free stuff yourself and I’ll still send you a free pack of embellishment as a THANK YOU gift from me. ❤

Accordion Tent Fold Choo Choo Santa Card

Thank you for your interest in this project. Some projects are exclusive to subscribers who will receive passwords by email.

Are you a subscriber? Awesome! Check your email for the password and enter it here to view this project.

Not yet subscribed?  We’d love for you to join us.  Subscribe to my email list and receive news, information and inspiration by email.