Sometimes There are No Words

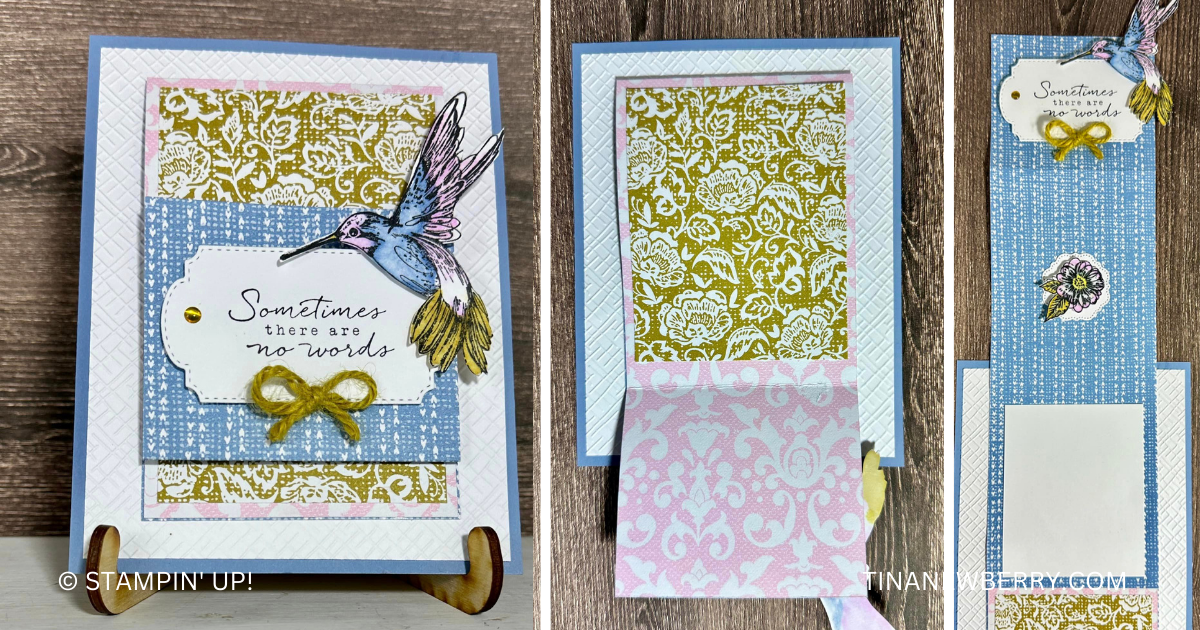
Oh! I just love the hummingbird in the Thoughtful Expressions bundle and my friend Lela custom colored this one to match the beautiful Poetic Expressions Designer Series paper she used on this fun fold card. Time to show off your DSP!

Create your own handmade cards full of love and support with the elegant Thoughtful Expressions bundle. Stamp, then custom-color a hummingbird and flowers and top it all off with a die-cut frame featuring a sweet sentiment.

Measurements

Full list of supplies needed, listed below. A die cutting machine is needed for this card.

Card Base Boho Blue Cardstock 5 ½” x 4 ¼”
Layer 1 Basic White Cardstock 4” x 5 ¼”, embossed with Basics 3D Embossing Folder (crosshatch pattern)
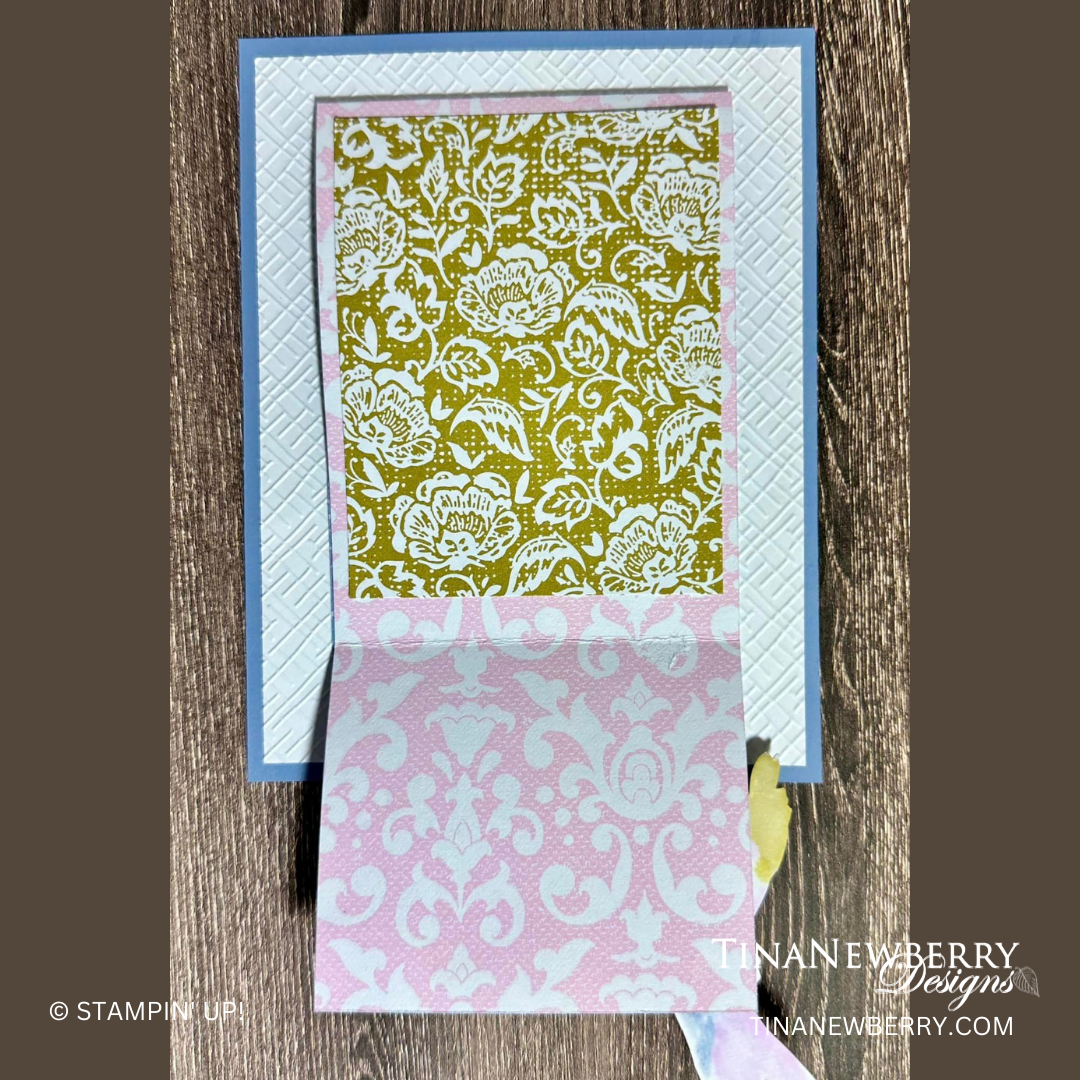
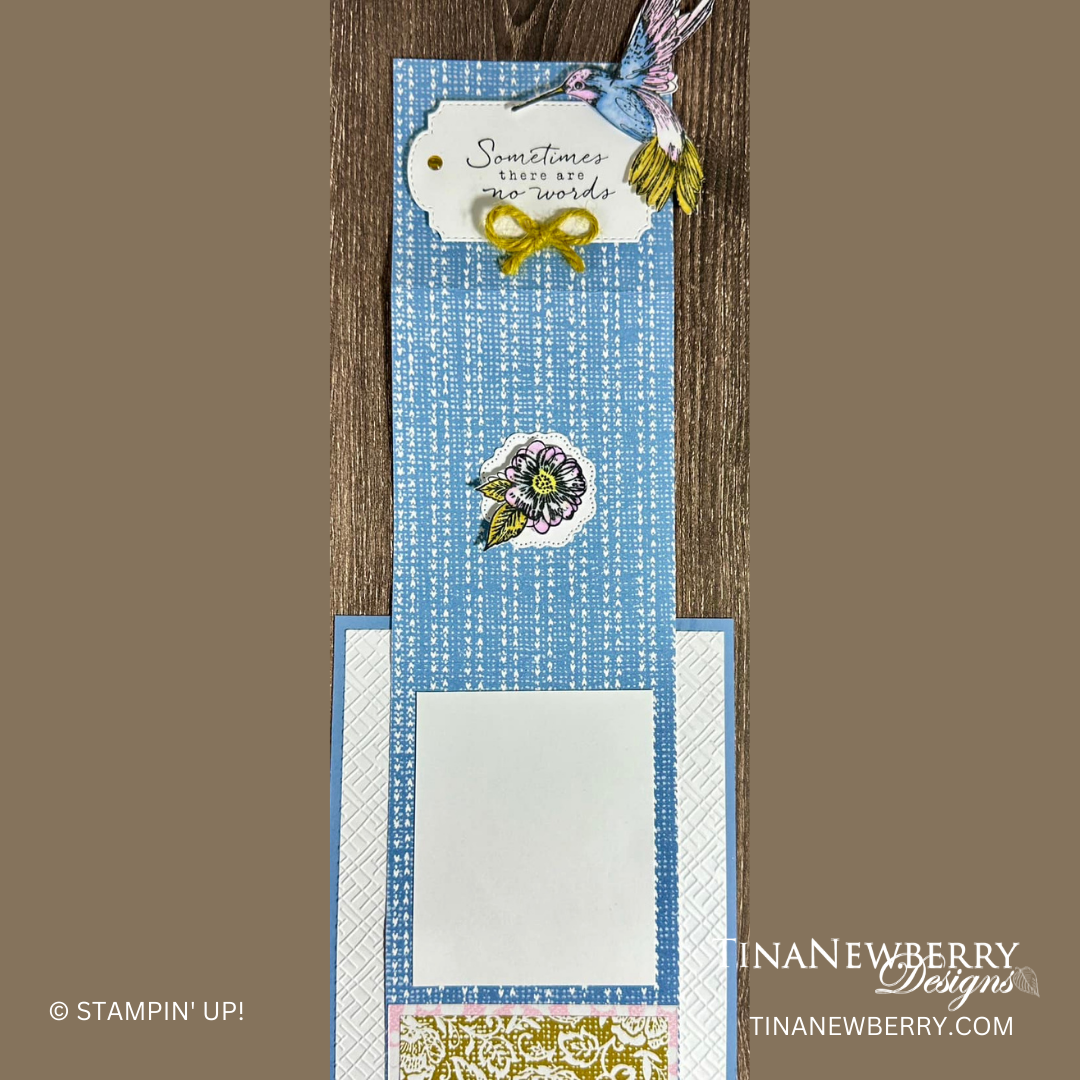
Layer 2 Poetic Expressions Designer Series Paper (DSP) 11” x 3”, scored at 4 ½” and 8 ½”
Layer 3 Poetic Expressions Designer Series Paper (DSP) 2 ¾” x 3 ½”
Layer 4 Poetic Expressions Designer Series Paper (DSP) 2 ¾” x ¾”
Layer 5 Basic White Cardstock 2 ½” x 3”
Scrap Basic White Cardstock for two labels, hummingbird, and flower.

Let’s Create

  1. Affix all stamps to Acrylic Blocks.
  2. Fold the Card Base in half using a Bone Folder to sharpen the crease.
  3. Cut Card Base 5 ½” x 4 ¼”
  4. Cut Layer 1 Basic White 4” x 5 ¼”, emboss with Basics 3D Embossing Folder (cross-hatch pattern). Adhere to card base.
  5. Cut Layer 2 Designer Series Paper 11” x 3”, scored at 4 ½” and 8 ½”. Center and adhere to card base.
  6. Cut Layer 3 Designer Series Paper 2 ¾” x 3 ½”. Adhere to Designer Series Paper flap as shown.
  7. Cut Layer 4 Designer Series Paper 2 ¾” x ¾”. Adhere to inside bottom of Designer Series Paper strip as shown.
  8. Cut Layer 5 Basic White 2 ½” x 3”. Adhere to inside of card, for signature.
  9. Die-Cut 2 ¾” wide Thoughtful Expressions label from Basic White. Stamp sentiment. Adhere to Designer Series Paper flap with Stampin’ DImensionals.
  10. Die-Cut 1 ½” circle Thoughtful Expressions label from Basic White. Adhere to center of inside flap.
  11. Stamp hummingbird in Tuxedo Black Memento Ink on Basic White Cardstock. Die-Cut stamped Humming Bird. Color with Blends. Adhere to corner to sentiment label with Stampin’ Dimensional. The Dimensional goes on the stamped label for maximum effect. (This may increase mailing costs)
  12. Stamp flower with Tuxedo Black Memento Ink on Basic White Cardstock. Die-Cut stamped flower. Color with Blends. Adhere with Stampin’ DImensional to center of Die-Cut circle label.
  13. Tie a cute little bow from Wild Wheat jute and adhere to sentiment label with a mini-glue dot.
  14. Add a coordinating gem.
  15. Sprinkle on the gems.
  16. Decorate your envelope.
  17. Stunning! Now send it to someone special.

PShopping List

Recommended Stamper’s Toolkit

Product List
Order online from the convenience of your own home or send me your order and I’ll take care of you. ❤ Either way, please use the host code ANTD9UHS. Order online AND, if your order is $50 or more using host code ANTD9UHS between now and the end of the month you’ll receive a free pack of embellishment as a THANK YOU gift from me. ❤ If your order is over $150, skip the host code, earn Stampin’ Rewards for free stuff yourself and I’ll still send you a free pack of embellishment as a THANK YOU gift from me. ❤

Use the Mirror Technique

Thank you for your interest in this project. Some projects are exclusive to subscribers who will receive passwords by email.

Are you a subscriber? Awesome! Check your email for the password and enter it here to view this project.

Not yet subscribed?  We’d love for you to join us.  Subscribe to my email list and receive news, information and inspiration by email.

Creative Challenges

If you’re looking for a fun, creative challenge, look no further—we have one ready to go! This challenge involves creating a card from a hand-drawn card sketch.

To complete this challenge, we took the In Color 6″ x 6″ (15.2 x 15.2 cm) Designer Series Paper Assortments and cut each pattern into the correct size according to the sketch. We adhered those pieces to a Boho Blue card panel with Stampin’ SEAL, then adhered the card panel to the card base with Stampin’ Dimensionals. Using the Wanted to Say Dies, we die cut the sentiment from Wild Wheat Cardstock and the sentiment shadow from Basic White Cardstock. We used Multipurpose Liquid Glue to adhere the sentiment pieces together, and then we adhered it to the card front with Stampin’ Dimensionals. We finished the card with a few 2023–2025 In Color Dots.

Try out this challenge next time you need some crafting inspiration!

Shopping List

Recommended Stamper’s Toolkit

Product List
Order online from the convenience of your own home or send me your order and I’ll take care of you. ❤ Either way, please use the host code ANTD9UHS. Order online AND, if your order is $50 or more using host code ANTD9UHS between now and the end of the month you’ll receive a free pack of embellishment as a THANK YOU gift from me. ❤ If your order is over $150, skip the host code, earn Stampin’ Rewards for free stuff yourself and I’ll still send you a free pack of embellishment as a THANK YOU gift from me. ❤

Hello Spring

Thank you to everyone who helped me with the color selection for this card at Stamp-Along Saturday. It was a tough choice between a Misty Moonlight, Boho Blue, or Flirty Flamingo egg. I just love the Flight & Airy Sale-a-bration paper behind the egg. Give your bunny some shimmer with the Clear Wink of Stella.

Stamp, then cut out Easter eggs and bunnies for cards and gift tags in minutes with the Excellent Eggs bundle. Combine stamp images and dies to create colorful and dimensional accents to welcome Easter and the arrival of spring!

Measurements

Full list of supplies needed, listed below. A die cutting machine is needed for this card.

Basic White Thick Cardstock: 

  • 5 ½” h x 8 ½” w scored and folded at 4 ¼” w
  • Scrap for egg and bunny

Basic White Cardstock:

  • 5 ¼” h x 4” w
  • 5” h x 3 ¾” w
  • Scrap for sentiment

Boho Blue: 5 ¼” h x 4” w

Flight & Airy Designer Series Paper (DSP): 2” h x 3 ¾” w


Let’s Create

  1. Affix all stamps to Acrylic Blocks.
  2. Fold the Card Base in half using a Bone Folder to sharpen the crease.
  3. Run one of the 5 ¼” h x 4” w Basic White panels through the Stampin’ Cut & Emboss Machine with the Cane Weave Embossing Folder and attach to the Boho Blue panel with Stampin’ Seal.
  4. Attach the DSP to the Cane Weave embossed panel with Tear N’ Tape (hold better on embossed surfaces).
  5. Wrap Inner Braid ribbon around the Boho Blue panel and tie a knot. 
  6. Attach the Boho Blue panel with Stampin’ Dimensionals. 
  7. Stamp the bunny and Egg in Memento ink on the Basic White Thick cardstock, then die cut.
  8. Use Stampin’ Blends to color the Egg and Bunny. I used Misty Moonlight and Light Crumb Cake. Use Clear Wink of Stella to add some shimmer to the Bunny. Attach the Egg and Bunny with Stampin’ Dimensionals.
  9. On a piece of Basic White cardstock, stamp the sentiment in Misty Moonlight ink, then Die Cut. Attach with Stampin’ Dimensionals. 
  10. Sprinkle on some Brushed Brass Butterflies.
  11. Stamp and decorate the remaining 5 ¼” w x 4” h for inside
  12. Decorate your envelope. 
  13. So sweet! ! Who needs some happy mail?

Shopping List

Recommended Stamper’s Toolkit

Product List
Order online from the convenience of your own home or send me your order and I’ll take care of you. ❤ Either way, please use the host code ANTD9UHS. Order online AND, if your order is $50 or more using host code ANTD9UHS between now and the end of the month you’ll receive a free pack of embellishment as a THANK YOU gift from me. ❤ If your order is over $150, skip the host code, earn Stampin’ Rewards for free stuff yourself and I’ll still send you a free pack of embellishment as a THANK YOU gift from me. ❤

Happy Easter

Use Stampin’ Blends alcohol markers to color this card in your favorite color combo.

Stamp, then cut out Easter eggs and bunnies for cards and gift tags in minutes with the Excellent Eggs bundle. Combine stamp images and dies to create colorful and dimensional accents to welcome Easter and the arrival of spring!

Measurements

Full list of supplies needed, listed below. A die cutting machine is needed for this card.

Basic White Thick Cardstock: 

  • 5 ½” h x 8 ½” w scored and folded at 4 ¼” w
  • Scrap for egg and springs

Basic White Cardstock:

5 ¼” h x 4” w (2)

Scrap for sentiment

Vellum Cardstock: Scrap for sprigs

Brights Designer Series Paper: Granny Apple Green scrap for envelope

Let’s Create

  1. Affix all stamps to Acrylic Blocks.
  2. Fold the Card Base in half using a Bone Folder to sharpen the crease.
  3. Attach one of the 5 ¼” h x 4” w Basic White panels to the front with Stampin’ Dimensionals.
  4. On Basic White Thick cardstock scrap, stamp the Egg with Bunnies in Memento Ink. Use the pen tip end of Stampin’ Blends to color in the bunny scene. I used Tahitian Tide Dark and Light, Lemon Lime Twist Dark and Light, and Flirty Flamingo Light.
  5. Die cut the Egg
  6. Die cut the Sentiment Tag, Sentiment Tag Ring and two spring from Basic White cardstock and two sprigs from Vellum Cardstock.
  7. On the Basic White Sprig, use Stampin’ Blends to color the stems and “berry” leaves. I used Granny Apple Green and Azure Afternoon Light and Dark.
  8. On the Basic White Sentiment Tag, attach the tag ring around the hole,  stamp the Sentiment in Azure Afternoon in and thread ribbon through the hole. Attach to Card Based with Stampin’ Dimensionals.
  9. Arrange the springs and the egg on above the Sentiment Tag. Attach springs with Mini Glue Dots and the Egg with Stampin’ Dimensionals.
  10. Sprinkle on some 2022–2024 In Color Pearls
  11. Stamp and decorate the remaining 5 ¼” w x 4” h for inside
  12. Decorate your envelope with a piece of Granny Apple Green from the Brights DSP pack.  
  13. Adorbs! ! Who will you send it to?

Shopping List

Recommended Stamper’s Toolkit

Product List
Order online from the convenience of your own home or send me your order and I’ll take care of you. ❤ Either way, please use the host code ANTD9UHS. Order online AND, if your order is $50 or more using host code ANTD9UHS between now and the end of the month you’ll receive a free pack of embellishment as a THANK YOU gift from me. ❤ If your order is over $150, skip the host code, earn Stampin’ Rewards for free stuff yourself and I’ll still send you a free pack of embellishment as a THANK YOU gift from me. ❤