Get Ready to Keep Memories!

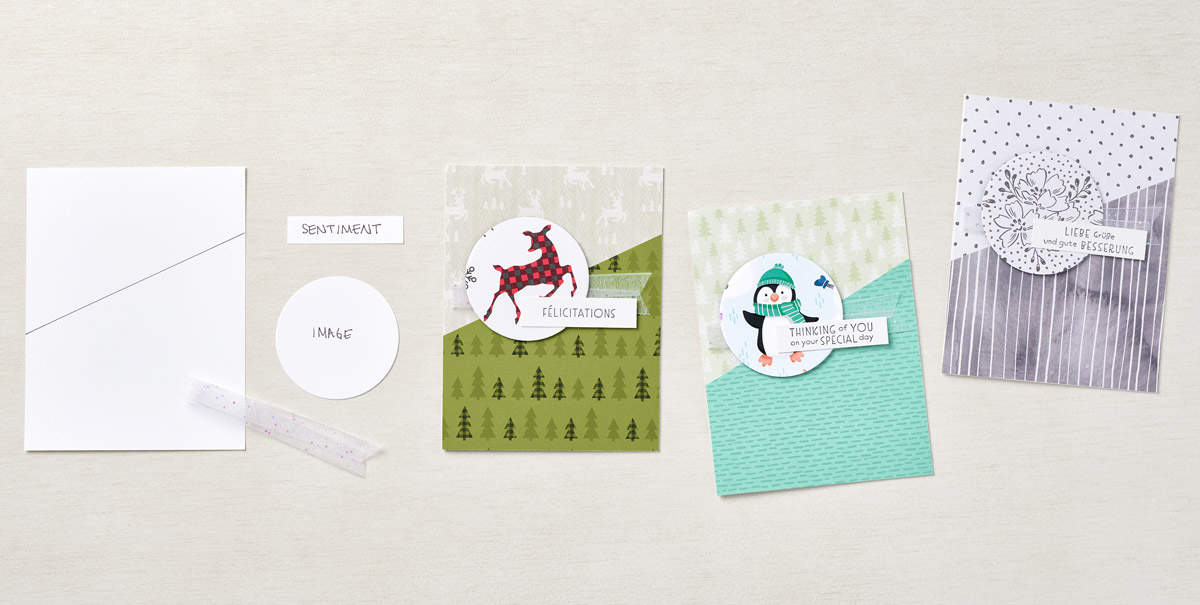
The July–December 2021 Mini Catalog is full of beautiful ways to keep memories, including ideas for remembering the upcoming Christmas season. That’s right we said it—Christmastime is coming fast, but there are plenty of ideas to get you ready for the season, and we know you’ll want to keep all the memories!

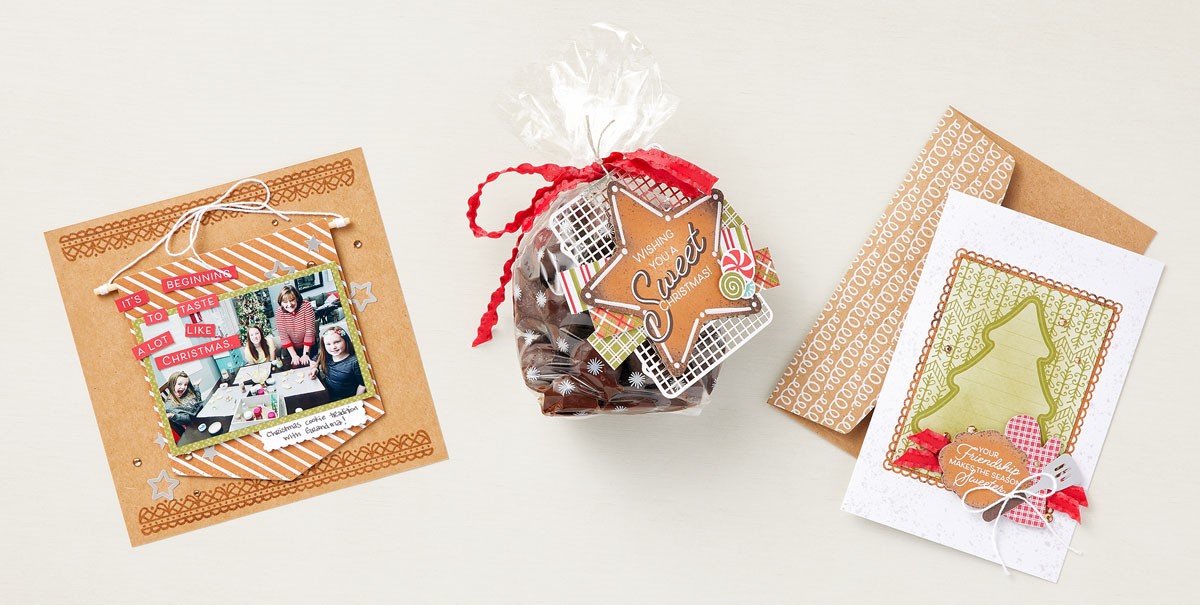
That’s where the Gingerbread & Peppermint Memories & More Card Pack comes in—it’ll spruce up the way you bring in the season and help you make it last. You can make it into tags to add to sweet treats, as our artist did with the Sweet Christmas tag! Just cut Memories & More cards into strips and add in some ribbon to a Printed Gusseted Cellophane Bag, and your guests will be ready for a festive indulgence.

Memories & More Cards even make great banners! You can add photos to your banner to display them in a fresh, new way—or as a way to capture those memories. (Pro Tip: get a wooden skewer from a craft store and tie a ribbon or a piece of string to each end to create the effect that the banner is hanging. Pop the banner onto some Stampin’ Dimensionals to give it a detached look.) And voilà! You’re ready for any seasonal needs.

Do you have unique ways to capture the upcoming Christmas season with your Memories & More cards? We’d love to see them.

You Are SO Worth Celebrating

The secret to the focal floral square on this card… Die cut the flowers in three colors – Basic White, Pear Pizzaz and Polished Pink, then snip the colored pieces apart and build it back together again for a multi-colored die cut image. The Meadow Moments Embossing Folder adds a simple elegant touch to the top of while Blackberry Beauty Specialty Designer Series paper adorns the bottom.

Measurements

Full list of supplies needed, listed below. A die cutting machine is needed for this card.
Card Base: Polished Pink Cardstock 5 1/2″ h x 8 1/2″ w folded to 5 1/2″ h x 4 1/4″ w
Background: Polished Pink Cardstock 5 1/2″ h x 4 1/4″ w with the Meadow Moments Embossing Folder
SDSP Background: Blackberry Beauty Specialty Designer Series Paper 3″h x 4 1/4″ w
Sentiment Layer: Basic White Cardstock scrap
Floral Square: Basic White, Polished Pink and Pear Pizzazz scrap cardstock.
Floral Square Background: Basic White Cardstock 1 7/8″ h x 1 7/8″ w
Inside Layer: Basic White Cardstock 5 /14″ h x 4″ w

Let’s Create

  1. Affix all stamps to Acrylic Blocks.
  2. Fold the Card Base in half using a Bone Folder to sharpen the crease.
  3. Run the Background through the Stampin’ Cut & Emboss machine with the Meadow Moments Embossing Folder toward the top of the layer.
  4. Attach the Blackberry Beauty SDSP to the Background with Stampin’ Seal+.
  5. Wrap Polished Pink Open Weave Ribbon around the Background and tie a bow.
  6. Then attach Background to the Card Base with Stampin’ Dimensionals.
  7. Die cut the Floral Square three times on – Basic White, Polished Pink and Pear Pizzazz scrap cardstock. Use Paper Snips to snip apart the Pear Pizzaz leaves and Polished Pink Flowers.
  8. Attach Basic White Floral Square to the Basic White Floral Square Background. Then assemble the snipped Flowers and Leaves on top of the Basic White.
  9. Attach the Floral Square to the card using Stampin’ Dimensionals.
  10. Stamp the Sentiment in Blackberry Bliss ink on Basic White Scrap. Trim with Paper Snips and attach with Stampin’ Dimensionals.
  11. Sprinkle with Playing With Patterns Resin Dots.
  12. Pretty!! Put it in the mail!

Shopping List

Stamper’s Toolkit

You will also need adhesive, acrylic blocks, scissors and other basic PaperCrafting items from the Stamper’s Toolkit

The BEST Thing About Today is YOU!

Two colors are enough with the many prints and patterns of this fun Bundle! I am so about squares and boxes, the All Squared Away Bundle makes me happy. I had so much fun creating this card, especially. I hope you enjoy it too.

Measurements

Full list of supplies needed, listed below. A die cutting machine is needed for this card.
Card Base: Basic White Thick Cardstock 5 1/2″ h x 8 1/2″ w folded to 5 1/2″ h x 4 1/4″ w
Background: Basic White Cardstock 3 3/4″ h x 3 3/4″ w
Stamped Squares (4): Basic White Cardstock scrap trimmed to 1 5/8″h x 1 5/8″ w (stamp first then trim)
Flower Frame: Basic White Cardstock scrap
Flowers: Pacific Point and Basic White scrap
Inside Layer: Basic White Cardstock 5 1/4″ h x 4″ w

Let’s Create

  1. Affix all stamps to Acrylic Blocks.
  2. Fold the Card Base in half using a Bone Folder to sharpen the crease.
  3. Use Pacific Point Ink to stamp the Sentiment.
  4. Stamp the four squares in Pacific Point ink on Basic White Scrap and trim to size.
  5. Use Stampin’ Seal to attach the four Stamped Squares to the Basic White Background.
  6. Die cut the Flower Frame and three small white Flowers from Basic White Cardstock.
  7. Die Cut one Large and two Small Flowers from Pacific Point Cardstock scrap.
  8. Attach the Flower Frame and the white Flowers using Multi-purpose Glue.
  9. Attach the Background with Stampin’ Dimensionals.
  10. Attach the Pacific Point Flowers.
  11. Sprinkle on the Metallic Pearls
  12. Stamp and decorate the Inside Layer and attach. 
  13. Decorate your envelope.
  14. So cute! Now send it to someone special.

Shopping List

Stamper’s Toolkit

You will also need adhesive, acrylic blocks, scissors and other basic PaperCrafting items from the Stamper’s Toolkit

Parts & Pieces: On a Slant

Can we be honest with each other? Some of us have a hard time letting go of our cardstock and Designer Series Paper scraps. They’re too small to use for a card front but too big to throw away. Still, we love them and know we’ll find a use for them sometime.

Here’s your chance! You can use these pretty scraps on cards that you can make in minutes.

Simply cut rectangles on a slant and combine them to create a beautiful card front. If possible, you may want to do as our concept artist did: Find cute images in the Designer Series Paper to punch out or die cut for your focal point—then pop them up with a few Stampin’ Dimensionals.

Need to create multiples in a short amount of time? Simply use this card layout as your template. You’ll have a stack of beautiful cards in no time at all!

We used three Sale A Bration Designer Series Papers—Beautifully Penned, Peaceful Prints, and Penguin Playmates—to create our fun cards. Remember you can get these adorable Sale -A-Bration Designer Series Papers for free with a qualifying purchase.

However, you may want to use whatever you have on hand so you can make a dent in that scraps collection . . . that we know you have. wink

Contact me for more tips and tricks in using your scraps for a slant card.