Happy Halloween

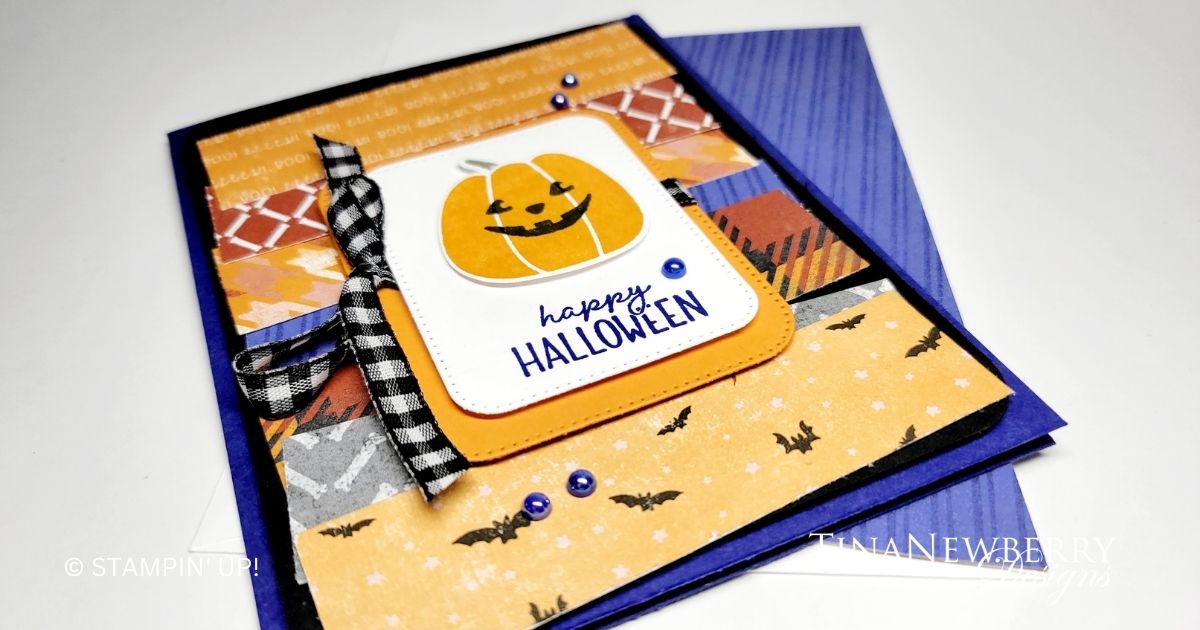
I really like the subtle Halloween prints in the Them Bones Designer Series Paper (DSP) pack and this layout of haphazardly layered DSP strips and a simple pumpkin layered on the sentiment. There is a new Black and Very Vanilla Large Check ribbon coming out in the new mini catalog, but with white cardstock on my card, I opted for the original Black & White gingham ribbon.

Measurements

Full list of supplies needed, listed below. A die cutting machine is needed for this card.

Starry Sky Cardstock: 5 ½” h x 8 ½” w scored and folded at 4 ¼”

Basic Black Cardstock: 5 ¼” h x 4 ¼” w

Pumpkin Pie Cardstock: 2 ½” x 3 ½”

Basic White Cardstock:

  • 5 ¼” x 4”
  • Scrap for sentiment and pumpkin

Them Bones Designer Series Paper (DSP): 1” h x 3 ¾” w (7)

Let’s Create

  1. Affix all stamps to Acrylic Blocks.
  2. Fold the Card Base in half using a Bone Folder to sharpen the crease.
  3. Round the corners of the 5 ¼” h x 4 ¼” w Basic Black cardstock. I used an old corner rounder punch to snip the edges. If you don’t have a corner rounder, you can trace the edge of any circular object and trim with your Paper Snips. 
  4. Attach the seven DSP strips with Multipurpose Glue haphazardly onto the Basic Black panel.
  5. Attach the Basic Black panel with Stampin’ Dimensionals.
  6. Use the Nested Essentials dies to cut the Basic White and Pumpkin Pie cardstock. 
  7. Wrap Black & White Gingham ribbon around the Pumpkin Pie panel and tie a bow.
  8. Stamp the sentiment in Starry Sky ink onto the Basic White die cut and attach to the Pumpkin Pie panel with Stampin’ Dimensionals. 
  9. Stamp the pumpkin in Pumpkin Pie ink and the Jack O’Lantern face in Tuxedo Black Memento Ink onto the Basic White scrap. Stamp the stem in Crumb Cake. Use the Pick of the Patch Builder punch to punch out the pumpkin and stem.  Use a Mini Glue Dot to attach the stem to the pumpkin. 
  10. Attach the pumpkin to the sentiment panel. 
  11. Attach the Pumpkin Pie panel to the DSP strips with Stampin’ Dimensionals. 
  12. Sprinkle on some 2022-2024 In Color Pearls.
  13. Stamp and decorate the remaining 5 ¼” x 4” Basic White cardstock and attach to the  inside
  14. Decorate your envelope.
  15. So cute! Who will you send this cheerful card to?

Shopping List

This project uses the Pick of the Patch Bundle [162201] and Them Bones Designer Series Paper [162215] from the Sept – December Mini Catalog available September 6, 2023

Recommended Stamper’s Toolkit ❤


A Harvest of Blessings

Easing into fall with a pretty pumpkin card from the Pick of the Patch bundle coming out in the Sep. – Dec. Mini Catalog launching on September 6, 2023. The bundle contains the Pick of the Patch Builder Punch and a photopolymer stamp set with a variety of gourds, mixed font sentiments, trees, leaves, and a crow. So cute!

Measurements

Full list of supplies needed, listed below. A die cutting machine is needed for this card.

Basic White Thick Cardstock: 8 ½” h x 5 ½” w scored and folded at  4 ¼” h

Lost Lagoon Cardstock:

  • 4” x 5 ¼” w
  • ⅝” h x 3 ⅛” w

Basic White Cardstock:

  • 3 ¾” h x 5” w 
  • ½” h x 3” w
  • Scrap for pumpkins
  • Scrap for foliage

Vellum Cardstock: scrap for foliage

Lemon Lolly Cardstock: scrap for flowers

Let’s Create

  1. Affix all stamps to Acrylic Blocks.
  2. Fold the Card Base in half using a Bone Folder to sharpen the crease.
  3. Run the 3 ¾” h x 5” w Basic White Cardstock through the Stampin’ Cut & Embossing machine with the Leaf Fall 3-D Embossing Folder. Tip: Align the cardstock on the folder so that the unembossed portion is in the lower left corner of the white cardstock. 
  4. Adhere the embossed panel to the 4” x 5 ¼” w Lost Lagoon with Stampin’ Seal and then attach the layered panels to the Card Base with Stampin’ Seal.
  5. On the Basic White scrap, use the light Lost Lagoon Stampin’ Blends to lay some color down and then cut some Lost Lagoon and Basic White foliage using the Textured Floral Dies.
  6. Die cut a few more pieces of foliage from Vellum Cardstock.
  7. On the Basic White Cardstock scrap, stamp three pumpkins- Tahitian Tide, Calypso Coral, Pool Party. Tip: Use a sponge dauber to add color to the edges of the pumpkins- Azure Afternoon to the Tahitian Tide, Pumpkin Pie to the Calypso Coral, and very lightly Tahitian Tide to the Pool Party. Then fussy cut with Paper Snips or with the Pick of the Patch Builder.
  8. In Daffodil Delight ink, stamp flowers from the Sweet Citrus stamp set onto Lemon Lolly cardstock. Then die cut with the Sweet Citrus Hybrid dies.
  9. Arrange the foliage, pumpkins and flowers in the lower left of the card front. Attach with Mini Glue Dots and Stampin’ Dimensionals. 
  10. Stamp the sentiment in Lost Lagoon ink on the ½” h x 3” w Basic White cardstock. Attach with Stampin’ Seal to the ⅝” h x 3 ⅛” w Lost Lagoon. 
  11. Use Tear N’ Tape to attach a piece of ¾” Herringbone Ribbon and then use Stampin’ Dimensionals to attach the layered sentiment. 
  12. Attach Iridescent Rhinestones to the centers of all the flowers.
  13. Stamp and decorate the inside
  14. Decorate your envelope.
  15. So lovely! Make someone’s day. Put it in the mail.

Shopping List

Recommended Stamper’s Toolkit ❤


Woo-Hoo

Woo-hoo! I say that all the time!! This sentiment from the Charming Sentiments stamp set makes me so happy! And it’s perfect for this super cute bird.

There’s nothing like the sweet sound of a bird singing to boost someone’s day. Use the Bird’s Eye View Stamp Set to do just that! With this stamp set, you can create your own aviary for the centerpiece of any card making project. The set includes five different bird images in a variety of sizes. Add quirky details to the birds using the monocle or eyeglasses stamps. Perch your birds on the top of a stack of books or a tree branch, also included in the set. These stamps will work with any of our coloring tools so you can add a plethora of color however you want. Pair with your favorite sentiments to complete your projects. Get ready for the birdwatch by snagging this set today!

Measurements

Full list of supplies needed, listed below. A die cutting machine is needed for this card.
Pretty Peacock Cardstock:

  • 5 1/2″ h x 8 1/2″ w scored and folder on the long-side at 4 1/4″
  • 4″ h x 3″ w

Basic White Cardstock:

  • 5 1/4″ h x 4″ w
  • 5″ h x 1 3/4″ w
  • 4″ h x 3″ w
  • scrap for leaves

Glorious Gingham Designer Series Paper (DSP): 5 1/2″ h x 3 1/4″ w

Inked Botanicals Designer Series Paper (DSP): 4 1/4″ h x 3/4″ w

Let’s Create

  1. Affix all stamps to Acrylic Blocks.
  2. Fold the Card Base in half using a Bone Folder to sharpen the crease.
  3. Attach the 5 1/2″ h x 3 1/4″ w Glorious Gingham to the card base with Stampin’ Seal.
  4. Run the 5″ h x 1 3/4″ w Basic White cardstock through the Stampin’ Cut & Emboss machine with the Leaf Fall 3D Embossing Folder. Use Paper Snips to flag the end. Attach with Stampin’ Seal.
  5. Use Paper Snips to flag the end of the Inked Botanicals DSP. Attach with Stampin’ Seal.
  6. Stamp the branch on the 4″ h x 3″ w Basic White Cardstock with Tuxedo Black Memento Ink and color with Crumb Cake Stampin’ Blends. Stamp the Bird and color with Smoky Slate Stampin’ Blends. Stamp the monacle as a balloon and color with Blueberry Bushel Stampin’ Blends. Die cut the Basic White with the Scalloped Contours die.
  7. Attach the scalloped Basic White to the 4″ h x 3″ w Pretty Peacock with Stampin’ Seal and then attach to the card base with Stampin’ Dimensionals.
  8. Stamp some leaves on Basic White scrap, color with Granny Apple Green Stampin’ Blends. Use Paper Snips to fussy cut. Attach with Stampin’ Dimensionals and Mini Glue Dots.
  9. Add a little Lost Lagoon bow.
  10. Sprinkle on the gems.
  11. Stamp and decorate the 5 1/4″ h x 4″ w Basic White cardstock for the inside and attach with Stampin’ Seal.
  12. Decorate your envelope.
  13. So cute! Whooo needs a little celebration?

Shopping List

Recommended Stamper’s Toolkit ❤


So Tiny, So Precious

Three of my co-workers had babies this summer and I this little birdie from the Bird’s Eye View stamp set makes a cute baby card. I paired it with the sentiment from the Charming Sentiments stamp set and CASEd the design from a card I did back in March 2022.

There’s nothing like the sweet sound of a bird singing to boost someone’s day. Use the Bird’s Eye View Stamp Set to do just that! With this stamp set, you can create your own aviary for the centerpiece of any card making project. The set includes five different bird images in a variety of sizes. Add quirky details to the birds using the monocle or eyeglasses stamps. Perch your birds on the top of a stack of books or a tree branch, also included in the set. These stamps will work with any of our coloring tools so you can add a plethora of color however you want. Pair with your favorite sentiments to complete your projects. Get ready for the birdwatch by snagging this set today!

Measurements

Full list of supplies needed, listed below. A die cutting machine is needed for this card.
Azure Afternoon Cardstock:

  • 5 1/2″ h x 8 1/2″ w folded to 5 1/2″ h x 4 1/4″ w
  • 1 1/2″ Scalloped Circle

Basic White Cardstock:

  • 5 1/4″ h x 4″ w
  • scrap for 1 1/4″ circle
  • scrap for sentiment

Basic Black Cardstock: 1/2″ h x 5 1/4″ w

Zoo Crew Designer Series Paper (DSP):

  • 3″ h x 5 1/4″ w
  • 2 1/4″ h x 2 1/4″ w

Let’s Create

  1. Affix all stamps to Acrylic Blocks.
  2. Fold the Card Base in half using a Bone Folder to sharpen the crease.
  3. Use Stampin’ Seal to attach the 1/2″ h x 5 1/4″ w Black Cardstock to the back top edge of the 3″ h x 5 1/4″ w Zoo Crew DSP so a smidge is showing from the front.
  4. Attach to the card base with Stampin’ Seal.
  5. Wrap Azure Afternoon ribbon around the card base and tie in a bow.
  6. Attach the 2 1/4″ h x 2 1/4″ w DSP over the ribbon with Stampin’ Dimensionals.
  7. Stamp the sentiment and bird on the Basic White Cardstock scrap in Azure Afternoon ink. Cut a 1 1/4″ circle around the bird and trim the sentiment to size.
  8. Create a scalloped Azure Afternoon circle. Attach the little bird circle to it with Stampin’ Seal.
  9. Attach the circles with Stampin’ Dimensionals.
  10. Attach the sentiment with Stampin’ Dimensionals.
  11. Stamp and decorate the 5 1/4″ h x 4″ w Basic White Cardstock for the inside and attach with Stampin’ Seal.
  12. Decorate your envelope.
  13. So cute! Now send it to someone special.

Shopping List

Recommended Stamper’s Toolkit ❤