True Beauty Step-by-Step

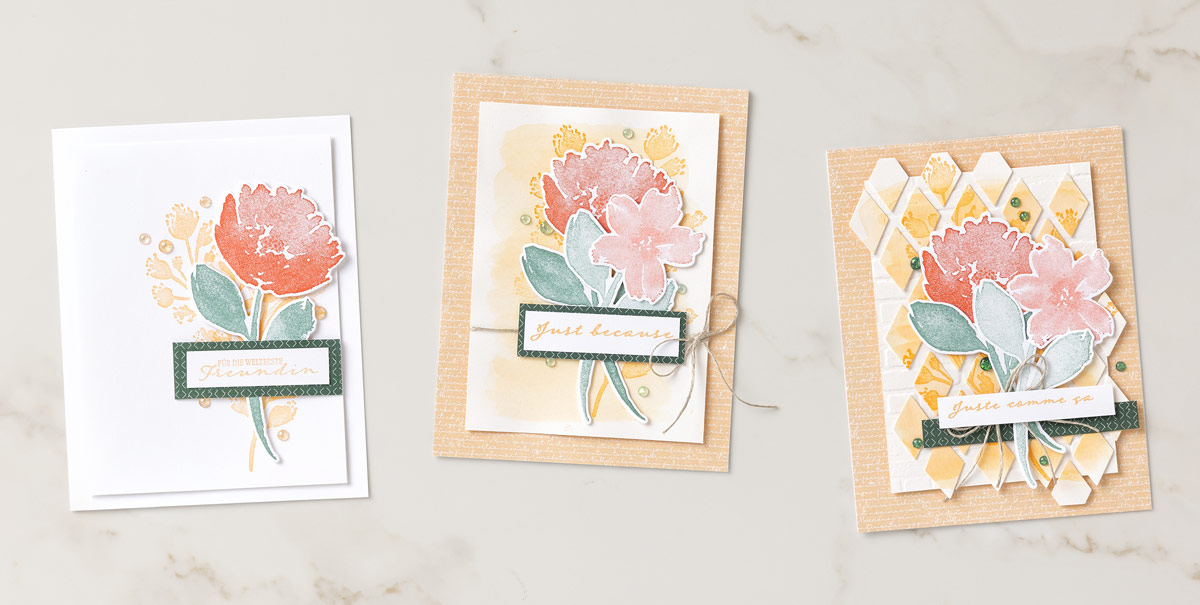
Just Because Card (4-1/4″ x 5″) (10.8 x 12.7 cm)

Celebrating friendship with a handmade card has never been easier than with the True Beauty Bundle to inspire you. Lovely sentiments like “You are a true friend” and “Here for you always,” plus gorgeous floral images straight out of an English country garden, will have you crafting for hours—perhaps with a cup of tea.

CASUAL
To create the casual version of our Just Because card, start by folding Basic White Cardstock in half; stamp the floral image in Pale Papaya ink on another layer of Basic White Cardstock, then adhere it to the card front. Add die-cut flowers and a sentiment, plus a few In Color Opal Rounds to finish off this simply stunning card.

AVID
Step up our second card by creating a wash background using Shimmery White Cardstock, Pale Papaya ink, and Water Painters. Let the background dry before stamping the beautiful floral image.

ARTFULLY AVID
Our most detailed card features the stamped wash background die cut using the lattice shape from the Organic Beauty Dies. Instead of the lattice, however, we used the die’s negative pieces to create this unique background with fancy diamond shapes. We also used a layer of Basic White Cardstock embossed using the Brick & Mortar 3D Embossing Folder for extra dimension.

Send Thinking of You Sentiments with Flowering Rain Boots

Create unique handmade greeting cards to brighten anyone’s day using the Flowering Rain Boots Bundle, which includes the Flowering Rain Boots Stamp Set and the Rain Boots Dies. It’s perfect to create a garden scene or to include garden tools in your papercrafing projects. You’ll love the endless possibilities!

Flowering Rain Boots – Save 10% when you buy the Stamp Set and Die Bundle

Measurements

Full list of supplies needed, listed below. A die cutting machine is needed for this card.
Pear Pizzazz Cardstock:   5 ½” h x 8 ½” w scored and folded on the long-side at 4 ¼ for Card Base
Flowering Fields Designer Series Paper (DSP): 5 1/4” h x 4″ w
Pear Pizzazz Cardstock: 2 ½” x 4”
Basic White Cardstock:

  • 2 3/8” x 3 7/8”
  • scraps for stamping and die cutting
  • 5 1/4″ h x 4″ w

Let’s Create

  1. Affix all stamps to Acrylic Blocks.
  2. Fold the Card Base in half using a Bone Folder to sharpen the crease.
  3. Tie the White Crinkled Seam Binding around the 5 1/4″ h x 4″ w Flowering Fields DSP layer with the bow on the left about ¾” from edge
  4. Attach Flowering Fields DSP with Stampin’ Dimensionals.
  5. Stamp the rain boots in Gorgeous Grape ink near the bottom of the the 2 3/8” x 3 7/8” Basic White layer.
  6. Stamp the stems in Pear Pizazz ink in the top of the rain boots
  7. Attach the 2 3/8” x 3 7/8” stamped Basic White to the right side of the card with Stampin’ Dimensionals – adjust as needed so the bow still shows.
  8. Stamp the tulip blossoms in Highland Heather ink and use the Stampin’ Cut & Emboss machine to die cut.
  9. Add tulip blossoms to stems using Stampin’Dimensionals.
  10. Sprinkle on some Brushed Brass Butterflies.
  11. Stamp and decorate the inside and attach with Stampin’ Seal.
  12. Decorate your envelope.
  13. So cheery! Now send it to someone special.

Shopping List

Recommended Stamper’s Toolkit ❤


Let’s Get Together Soon Greeting Card for a Friend

Thank you for your interest in this project. Some projects are exclusive to subscribers who will receive passwords by email.

Are you a subscriber? Awesome! Check your email for the password and enter it here to view this project.

Not yet subscribed?  We’d love for you to join us.  Subscribe to my email list and receive news, information and inspiration by email.

Cup of Tea Get Well Card

Such an endearing greeting card with polka dots, hearts, flowers and a dainty tea cup! I had seen a similar color palette on Pinterest and couldn’t wait to create it in a get well card with the pretty Cup of Tea Bundle.

Cup of Tea Bundle – Save 10% when you buy the bundle

Measurements

Full list of supplies needed, listed below. A die cutting machine is needed for this card.
Basic White Thick Cardstock: 4 1/4″ h x 11″ w for card base

Basic White Cardstock:

  • 3 1/2″ h x 4 3/4″ w for front
  • 4″ h x 5 1/4″ w for inside (optional)
  • 2″ h x 2 1/2″ w scrap for tea cup

Basic Black Cardstock:

  • 1″ h x 2″ h for sentiment
  • scrap for hearts

Tahitian Tide Cardstock: 2″ h x 2 1/2″ w scrap for tea cup outline

Kraft Paper: scrap for tea tag

Tea Boutique Designer Series Paper (DSP): 3 3/4″ h x 5″ w

Let’s Create

  1. Affix all stamps to Acrylic Blocks.
  2. Fold the Card Base in half using a Bone Folder to sharpen the crease.
  3. Attach the Tea Boutique DSP at an angle with Stampin’ Seal.
  4. Stamp the multi-flower image with Tahitian Tide ink and then add some large flowers in Balmy Blue Ink.
  5. Stamp the floral tea cup image on 2″ h x 2 1/2″ w Basic White Cardstock scrap and die cut.
  6. Attache Adhesive Sheets to the back of the Tahitian Tide scrap cardstock and die cut tea cup outline. Peel off backing and adhere to cup.
  7. Stamp the floral tea bag tag on Kraft Paper with Tuxedo Black Memento Ink and die cut. Use Mini Glue Dots to attach a bit of Basic White Bakers Twine to the tag and cup.
  8. Attach Tea Cup with Stampin Dimensionals.
  9. Die Cut some hearts from Basic Black Cardstock scraps and attach with Multupurpose Liquid Glue.
  10. Stamp the sentiment in Versamark in on 1″ h x 2″ h Basic Black Cardstock and heat emboss with Basic White embossing powder.
  11. Wrap a strand of Linen Thread around the stamped Basic White Cardstock and tie a bow to the left.
  12. Attach the sentiment with Stampin’ Dimensionals.
  13. Sprinkle on the gems.
  14. Stamp and decorate the inside and attach with Stampin’ Seal.
  15. Decorate your envelope.
  16. So cute! Send these get well wishes to someone who is feeling blue.

Shopping List

Recommended Stamper’s Toolkit ❤


Tea Boutique Thank You

As a tea drinker, I was thrilled to see the Tea Boutique Suite in the new Annual Catalog. So cute! Although I don’t drink my tea out of a pretty porcelain tea cup, preferring an insulated mug to keep it hot, I find them quite pretty. After playing with the Cup of Tea Bundle I am excited about the possibilities of these products. And since I’m a klutz, creating with paper is a lot less daunting than a dainty, breakable cup. LOL

Cup of Tea Bundle – Save 10% when you buy the bundle

Measurements

Full list of supplies needed, listed below. A die cutting machine is needed for this card.
Bright White Thick Cardstock: 5 1/2″ h x 8 1/2″ w , scored and folded on the long-side at 4 1/4″ for card base.

Basic White Cardstock:

  • 1 1/2″ square scrap for sentiment
  • 4″ h x 3″ w for die cut
  • 5 1/4″ h x 4″ w for inside

Crushed Curry Cardstock: 1 3/4″ square scrap

Tea Boutique Designer Series Paper (DSP):

  • 5 1/2″ x 4 1/4″ for die cut
  • scraps for flowers

Let’s Create

  1. Affix all stamps to Acrylic Blocks.
  2. Fold the Card Base in half using a Bone Folder to sharpen the crease.
  3. Die cut the 5 1/2″ x 4 1/4″ Tea Boutique DSP with the largest Scalloped Contours Die, then attach to the Card Base with Stampin’ Seal.
  4. Stamp the striped tea cup on the 4″ h x 3″ w Basic White with Orchid Oasis Stamp Pad and then die cut with the Scalloped Contrours Die.
  5. Die cut about 20 flowers – large and small – in coordinating Tea Boutique DSP and use Mini Glue Dots to adhere to the cup layer and then attach to the card with Stampin Dimensionals.
  6. Stamp the Thank You sentiment stamp pad Orchid Oasis and die cut with Layering Circles Dies.
  7. Die cut a scalloped circle in Crushed Curry from the Layering Circles Dies.
  8. Attach the Thank You sentiment to the Crushed Curry scalloped circle and then attach both the card with Stampin’ Dimensionals. In the lower right of the circle, you may need to stack the dimensionals to keep the circles level becuase the tea cup die is already raised with dimensionals.
  9. Add a few small flowers to the sentiment with Mini Glue Dots.
  10. Add Basic Pearls to the center of each large flower.
  11. Tie a bow with Orchid Oasis Metallic Ribbon and attach with a Mini Glue Dot.
  12. Stamp and decorate the inside and attach with Stampin’ Seal.
  13. Decorate your envelope.
  14. So cute! Send your thanks today.

Shopping List

Recommended Stamper’s Toolkit ❤