Flight & Airy Happy Birthday

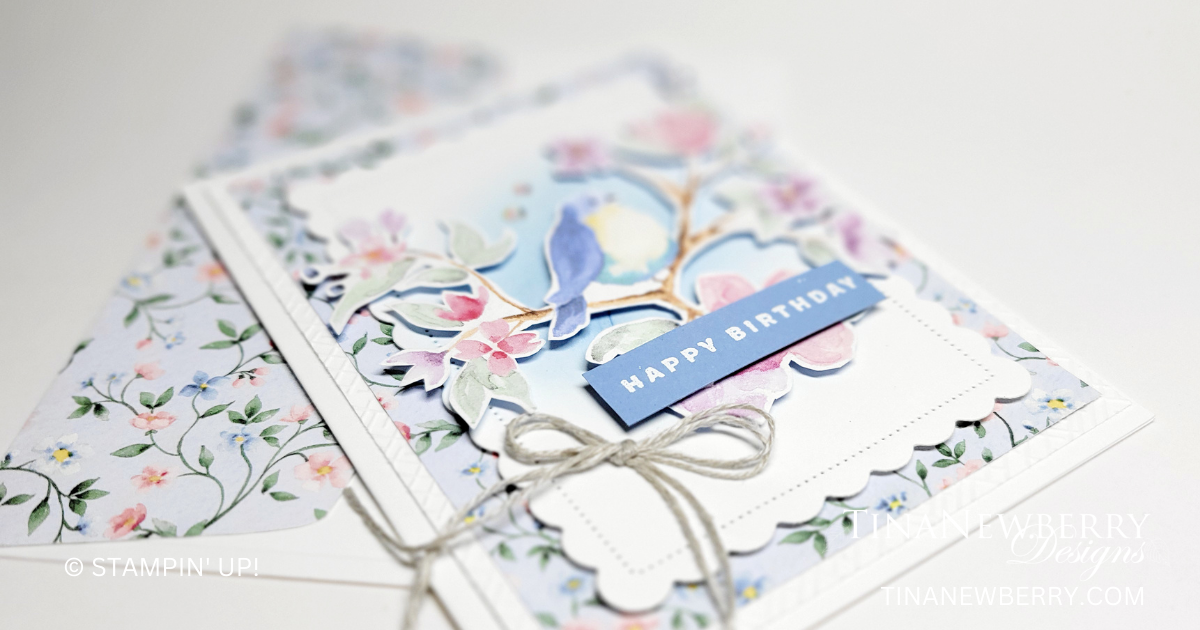
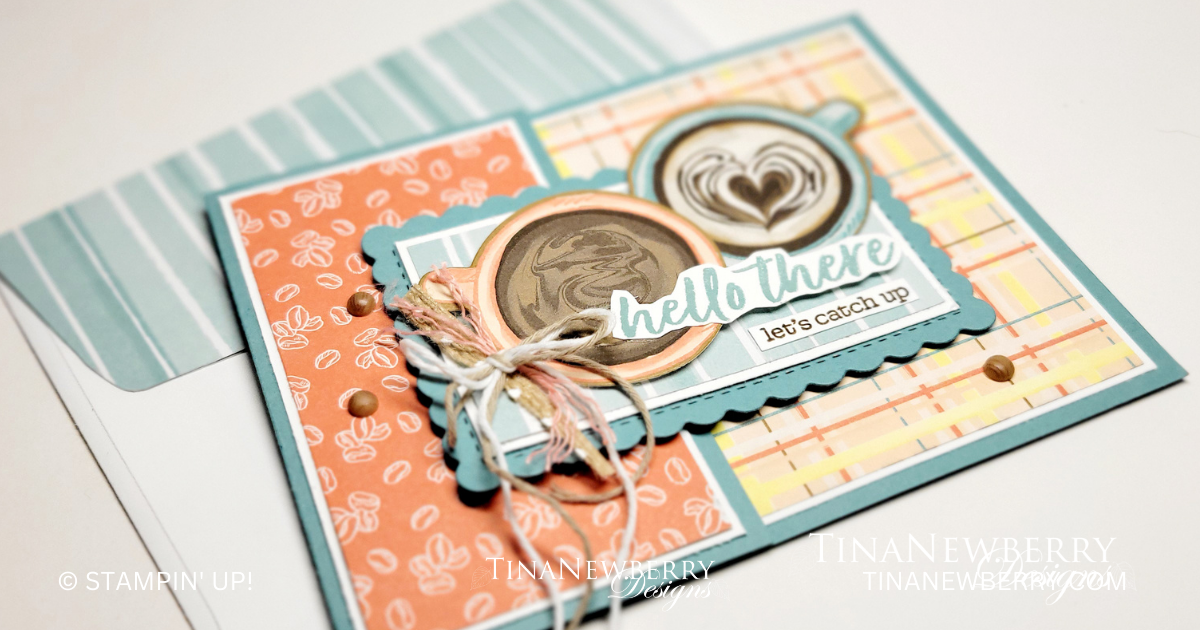
I’m finding it quite therapeutic to use my Paper Snips scissors to cut images out of Stampin’ Up!’s beautiful Designer Series Paper. And I couldn’t resist CASEing this stunning card by Kim McGillis, unsing the Flight & Airy free Sale-a-bration DSP, the Scalloped Contours Dies (retiring April 30), and the Something Fancy Stamp Set (NOT retiring! YAY).
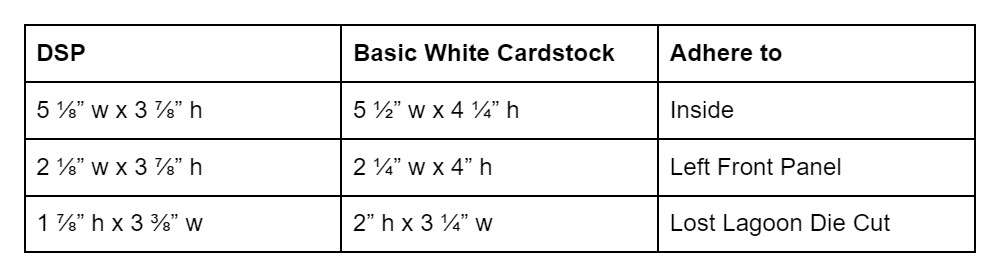
Say everything you want to say with the Something Fancy Stamp Set. This stamp set has all the sentiments you never knew you needed! From classic well wishes to snarky celebratory statements, the Something Fancy Stamp Set says it all in a beautiful modern font combo. Also available in French.

Measurements

Full list of supplies needed, listed below. A die cutting machine is needed for this card.
Basic White Thick Cardstock: 5 1/2″ h x 8 1/2″ w folded to 5 1/2″ h x 4 1/4″ w
Basic White Cardstock:

  • 5 1/4″ h x 4″ w
  • 4 1/2″ x 3 1/2″ w

Boho Blue Cardstock: Scrap for sentiment

Flight & Airy Designer Series Paper (DSP):

  • 5″ h x 3 3/4″ w
  • Scrap of bird on a branch

Let’s Create

  1. Affix all stamps to Acrylic Blocks.
  2. Fold the Card Base in half using a Bone Folder to sharpen the crease.
  3. Run the 5 1/4″ h x 4″ w Basic White through the Stampin’ Cut & Emboss Machine with an embossing folder of your choice. Attach to the Card Base with Stampin’ Seal.
  4. Attach the DSP Panel with Stampin’ Seal.
  5. Run the 4 1/2″ x 3 1/2″ w Basic White through the Stampin’ Cut & Emboss Machine with the Scalloped Contour dies.
  6. With a blending brush, apply Boho Blue ink to the scalloped panel.
  7. Use Paper Snips to fussy cut the bird on the branch from the scrap DSP.
  8. Attach the bird to the scalloped panel with Stampin’ Dimensionals.
  9. Attach the scalloped panel with Stampin’ Dimensionals.
  10. Make the Sentiment
    • Stamp the sentiment in Versamark Ink
    • Sprinkle on white Embossing Powder
    • Use a Heat Tool to heat set
    • Use Paper Trimmer or Paper Snips to trim the sentiment to size.
  11. Attach the sentiment with Stampin’ Dimensionals.
  12. Double over a stand of Linen Thread and tie a bow. Attach with a Mini Glue Dot.
  13. Sprinkle on the Iridescent Rhinestone gems.
  14. Stamp and decorate the inside.
  15. Decorate your envelope.
  16. So lovely! Now send it to someone special.

Shopping List

Recommended Stamper’s Toolkit

Product List
Order online from the convenience of your own home or send me your order and I’ll take care of you. ❤ Either way, please use the host code ANTD9UHS. Order online AND, if your order is $50 or more using host code ANTD9UHS between now and the end of the month you’ll receive a free pack of embellishment as a THANK YOU gift from me. ❤ If your order is over $150, skip the host code, earn Stampin’ Rewards for free stuff yourself and I’ll still send you a free pack of embellishment as a THANK YOU gift from me. ❤

2022-2024 In Colors Retiring

Alas all good things must come to an end. This has been my favorite palette of In Colors and I am sad to see them retiring the end of this month. Grab them before they’re gone.

Measurements

Full list of supplies needed, listed below. A die cutting machine is needed for this card.

  • Cut Basic White Card Base 8 ½” x 5 ½”, score at 4 ¼”
  • Cut Basic White 4” x 5 ¼”
  • DIe-cut Hearts from In-Color 6” x 6” Designer Series Paper using Adoring Hearts Bundle
  • Emboss and Die-cut hearts from coordinating Cardstock using Adoring Hearts Bundle


Let’s Create

  1. Affix all stamps to Acrylic Blocks.
  2. Fold the Card Base in half using a Bone Folder to sharpen the crease.
  3. Die-cut hearts from In-Color 6” x 6” Designer Series Paper using Adoring Hearts Bundle
  4. Emboss and Die-cut hearts from coordinating Cardstock using Adoring Hearts Bundle
  5. Stamp sentiment in In-Color on Basic white layer
  6. Arrange and adhere hearts from coordinating In-Color around sentiment
  7. Adhere decorated layer to card front using Stampin’ Dimensionals
  8. Add bow with Mini-Glue Dot to bottom right heart
  9. Decorate your envelope.
  10. So cute! Now send it to someone special.

Shopping List

Recommended Stamper’s Toolkit

Product List
Order online from the convenience of your own home or send me your order and I’ll take care of you. ❤ Either way, please use the host code ANTD9UHS. Order online AND, if your order is $50 or more using host code ANTD9UHS between now and the end of the month you’ll receive a free pack of embellishment as a THANK YOU gift from me. ❤ If your order is over $150, skip the host code, earn Stampin’ Rewards for free stuff yourself and I’ll still send you a free pack of embellishment as a THANK YOU gift from me. ❤

Hello There, Let’s Catch Up

One of my favorite card layouts shows off designer series paper with a big impact, yet so quick & easy to make. Here I’m using the the A Little Latte Suite with a Calypso Coral and Lost Lagoon color palette. What will you make with this layout?

Spread love and gratitude with the Latte Love Bundle. Create fun paper crafting projects with coffee-themed imagery and heartfelt sentiments and brighten someone’s day!

Measurements

Full list of supplies needed, listed below. A die cutting machine is needed for this card.

Lost Lagoon Cardstock: 

  • 4 ¼” h x 8” w scored and folded at 5 ½” w
  • 4 ¼” w x 3” h scrap for die cut

Basic White Cardstock:

  • 5 ½” w x 4 ¼” h
  • 2 ¼” w x 4” h
  • 2” h x 3 ¼” w (2)
  • Scrap for sentiments

A Little Latte Designer Series Paper (DSP): Three coordinating patterns

  • 5 ⅛” w x 3 ⅞” h
  • 2 ⅛” w x 3 ⅞” h
  • 1 ⅞” h x 3 ⅜” w

Let’s Create

  1. Affix all stamps to Acrylic Blocks.
  2. Fold the Card Base at the score line using a Bone Folder to sharpen the crease.
  3. Run the Lost Lagoon scrap through the Stampin’ Cut & Emboss Machine with the Scalloped Contours Die. 
  4. Die cut coffee cups from Designer Series Paper (DSP).
  5. Stamp Hello There on Basic White scrap in Lost Lagoon ink and use Paper Snips to fussy cut out.
  6. Stamp Let’s Catch Up on Basic White scrap in Early Espresso Ink and use Paper Trimmer or Paper Snips to trim to size
  7. Matte DSP with Basic White Cardstock:
  8. Attach Lost Lagoon Die Cut to Left Front Panel with Stampin’ Dimensionals. Be careful to only put Dimensionals behind left most part of die cut panel. 
  9. Arrange coffee cups and sentiments on Lost Lagoon Die Cut panel and attach with Stampin’ Dimensionals and Stampin’ Seal.
  10. Make a junk bow by laying two small pieces of trim or ribbon on top of two pieces of Baker’s Twine and then tying a bow with the Baker’s Twine. Arrange and trim ends as needed. Attach with Mini Glue Dot.
  11. Sprinkle on Adhesive Backed Swirl Dots
  12. Stamp and decorate the remaining 2” h x 3 ¼” w Basic White for inside
  13. Decorate your envelope.
  14. So fun!! Who will you send it to?

Shopping List

Recommended Stamper’s Toolkit

Product List
Order online from the convenience of your own home or send me your order and I’ll take care of you. ❤ Either way, please use the host code ANTD9UHS. Order online AND, if your order is $50 or more using host code ANTD9UHS between now and the end of the month you’ll receive a free pack of embellishment as a THANK YOU gift from me. ❤ If your order is over $150, skip the host code, earn Stampin’ Rewards for free stuff yourself and I’ll still send you a free pack of embellishment as a THANK YOU gift from me. ❤

You’re the Best Part of My Day

Use a scoring tool and a blending brush to create a simple background for this sweet layout. I used the Latte Love Bundle, but you could substitute any sentiment and focal image.

Spread love and gratitude with the Latte Love Bundle. Create fun paper crafting projects with coffee-themed imagery and heartfelt sentiments and brighten someone’s day!

Measurements

Full list of supplies needed, listed below. A die cutting machine is needed for this card.

Basic White Thick Cardstock: 

  • 5 ½” w x 8 ½” h  scored and folded at 4 ¼” h
  • Scrap for coffee cup

Basic White Cardstock: 5 ½” w x 4 ¼” h (2)

Petal Pink Cardstock: scrap for tea cup


Let’s Create

  1. Affix all stamps to Acrylic Blocks.
  2. On Basic White Thick Cardstock, stamp the coffee cup in Starry Sky ink. Color with Starry Sky Stampin’ Blends as follows:
    1. Mimicking the bottom curve of the coffee cup, use the Dark Starry Sky Blend to extend curved lines out from the left and right edges about ¼ – ½”, all the way up the edge.
    2. Allow about 30 seconds for the ink to dry. 
    3. Using the LIght Starry Sky Blend, repeat the curved lines, starting at the left edge and then going up the right edge extend the lines all the way across the cup.
    4. The idea is to pull some of the darker ink from the edges toward the center.
    5. Allow about 30 seconds for the ink to dry. 
    6. Repeat step a with the Dark Starry Sky Blend.
  3. Die cut the coffee cup.
  4. From a scrap piece of Petal Pink, die cut the tea cup.
  5. Arrange tea cup and coffee cup on one of the 5 ½” w x 4 ¼” h  Basic White Cardstock panels. Mark placement with a light pencil mark, then remove cups.
  6. Stamp Sentiment on 5 ½” w x 4 ¼” h panel off to the side of the cups.
  7. Use a Blending Brush to apply subtle ink to the background of the panel
  8. Use the scoring blade on Paper Trimmer to create three lines ½” apart on the inked panel, across where cups will be placed.
  9. Use Dimensionals to attach the cups.
  10. Fold the Card Base in half using a Bone Folder to sharpen the crease.
  11. Attach the panel to the Card Base with Stampin’ Dimensionals. 
  12. Sprinkle on 2022-2024 In Color Pearls.
  13. Tie a bow with the Petal Pink from the Ribbon Duo combo pack and attach with a Mini Glue Dot.
  14. Stamp and decorate the remaining 5 ¼” w x 4” h for inside
  15. Decorate your envelope.
  16. So sweet! Who will you send it to?

Shopping List

Recommended Stamper’s Toolkit

Product List
Order online from the convenience of your own home or send me your order and I’ll take care of you. ❤ Either way, please use the host code ANTD9UHS. Order online AND, if your order is $50 or more using host code ANTD9UHS between now and the end of the month you’ll receive a free pack of embellishment as a THANK YOU gift from me. ❤ If your order is over $150, skip the host code, earn Stampin’ Rewards for free stuff yourself and I’ll still send you a free pack of embellishment as a THANK YOU gift from me. ❤