You Are SO Worth Celebrating

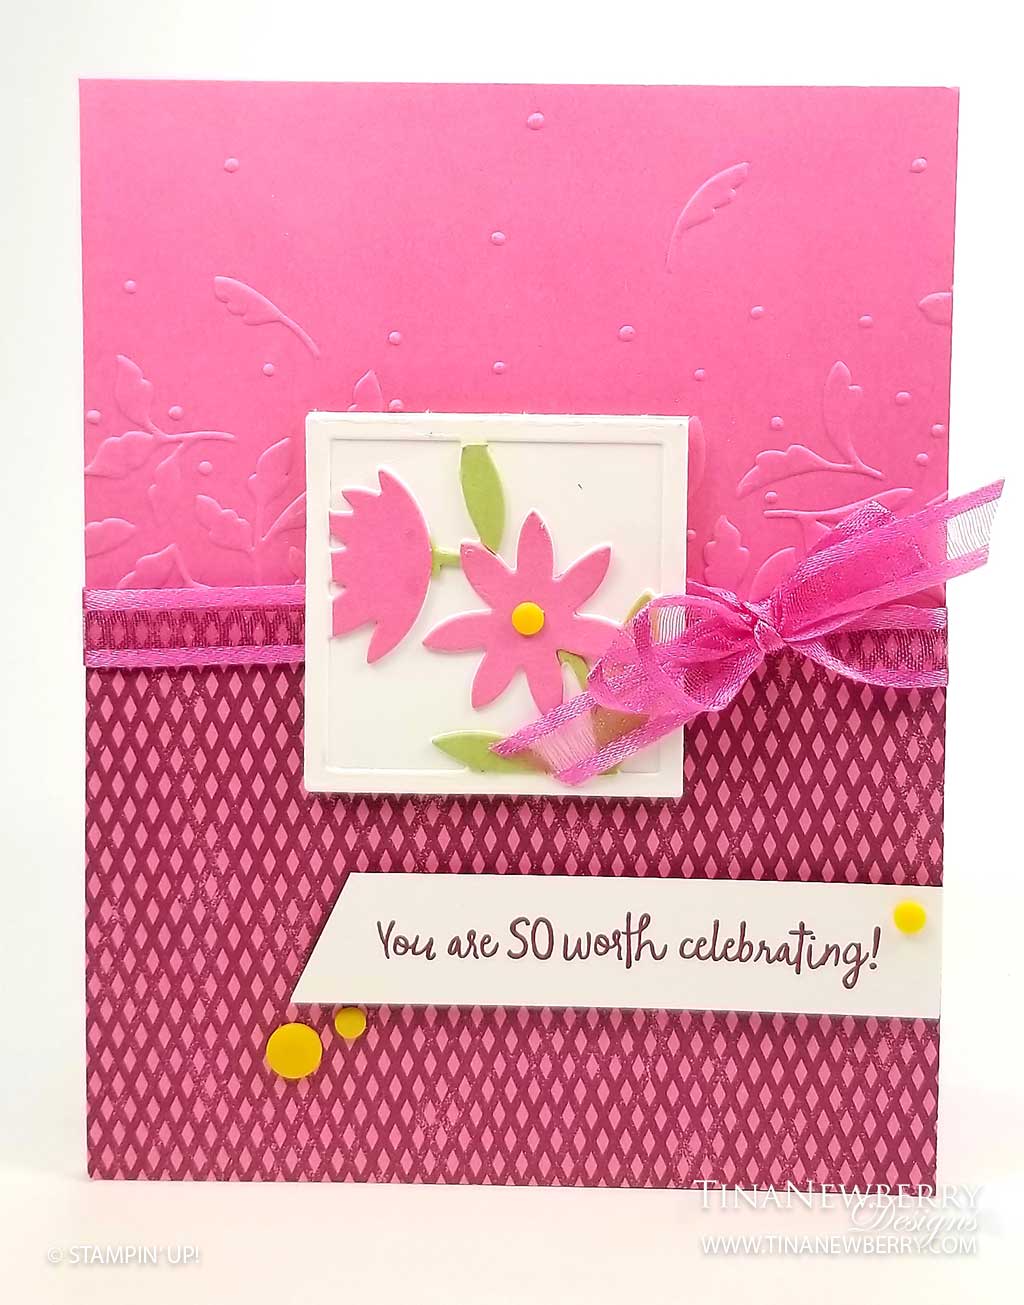
The secret to the focal floral square on this card… Die cut the flowers in three colors – Basic White, Pear Pizzaz and Polished Pink, then snip the colored pieces apart and build it back together again for a multi-colored die cut image. The Meadow Moments Embossing Folder adds a simple elegant touch to the top of while Blackberry Beauty Specialty Designer Series paper adorns the bottom.

Measurements

Full list of supplies needed, listed below. A die cutting machine is needed for this card.
Card Base: Polished Pink Cardstock 5 1/2″ h x 8 1/2″ w folded to 5 1/2″ h x 4 1/4″ w
Background: Polished Pink Cardstock 5 1/2″ h x 4 1/4″ w with the Meadow Moments Embossing Folder
SDSP Background: Blackberry Beauty Specialty Designer Series Paper 3″h x 4 1/4″ w
Sentiment Layer: Basic White Cardstock scrap
Floral Square: Basic White, Polished Pink and Pear Pizzazz scrap cardstock.
Floral Square Background: Basic White Cardstock 1 7/8″ h x 1 7/8″ w
Inside Layer: Basic White Cardstock 5 /14″ h x 4″ w

Let’s Create

  1. Affix all stamps to Acrylic Blocks.
  2. Fold the Card Base in half using a Bone Folder to sharpen the crease.
  3. Run the Background through the Stampin’ Cut & Emboss machine with the Meadow Moments Embossing Folder toward the top of the layer.
  4. Attach the Blackberry Beauty SDSP to the Background with Stampin’ Seal+.
  5. Wrap Polished Pink Open Weave Ribbon around the Background and tie a bow.
  6. Then attach Background to the Card Base with Stampin’ Dimensionals.
  7. Die cut the Floral Square three times on – Basic White, Polished Pink and Pear Pizzazz scrap cardstock. Use Paper Snips to snip apart the Pear Pizzaz leaves and Polished Pink Flowers.
  8. Attach Basic White Floral Square to the Basic White Floral Square Background. Then assemble the snipped Flowers and Leaves on top of the Basic White.
  9. Attach the Floral Square to the card using Stampin’ Dimensionals.
  10. Stamp the Sentiment in Blackberry Bliss ink on Basic White Scrap. Trim with Paper Snips and attach with Stampin’ Dimensionals.
  11. Sprinkle with Playing With Patterns Resin Dots.
  12. Pretty!! Put it in the mail!

Shopping List

Stamper’s Toolkit

You will also need adhesive, acrylic blocks, scissors and other basic PaperCrafting items from the Stamper’s Toolkit

The BEST Thing About Today is YOU!

Two colors are enough with the many prints and patterns of this fun Bundle! I am so about squares and boxes, the All Squared Away Bundle makes me happy. I had so much fun creating this card, especially. I hope you enjoy it too.

Measurements

Full list of supplies needed, listed below. A die cutting machine is needed for this card.
Card Base: Basic White Thick Cardstock 5 1/2″ h x 8 1/2″ w folded to 5 1/2″ h x 4 1/4″ w
Background: Basic White Cardstock 3 3/4″ h x 3 3/4″ w
Stamped Squares (4): Basic White Cardstock scrap trimmed to 1 5/8″h x 1 5/8″ w (stamp first then trim)
Flower Frame: Basic White Cardstock scrap
Flowers: Pacific Point and Basic White scrap
Inside Layer: Basic White Cardstock 5 1/4″ h x 4″ w

Let’s Create

  1. Affix all stamps to Acrylic Blocks.
  2. Fold the Card Base in half using a Bone Folder to sharpen the crease.
  3. Use Pacific Point Ink to stamp the Sentiment.
  4. Stamp the four squares in Pacific Point ink on Basic White Scrap and trim to size.
  5. Use Stampin’ Seal to attach the four Stamped Squares to the Basic White Background.
  6. Die cut the Flower Frame and three small white Flowers from Basic White Cardstock.
  7. Die Cut one Large and two Small Flowers from Pacific Point Cardstock scrap.
  8. Attach the Flower Frame and the white Flowers using Multi-purpose Glue.
  9. Attach the Background with Stampin’ Dimensionals.
  10. Attach the Pacific Point Flowers.
  11. Sprinkle on the Metallic Pearls
  12. Stamp and decorate the Inside Layer and attach. 
  13. Decorate your envelope.
  14. So cute! Now send it to someone special.

Shopping List

Stamper’s Toolkit

You will also need adhesive, acrylic blocks, scissors and other basic PaperCrafting items from the Stamper’s Toolkit

Parts & Pieces: On a Slant

Can we be honest with each other? Some of us have a hard time letting go of our cardstock and Designer Series Paper scraps. They’re too small to use for a card front but too big to throw away. Still, we love them and know we’ll find a use for them sometime.

Here’s your chance! You can use these pretty scraps on cards that you can make in minutes.

Simply cut rectangles on a slant and combine them to create a beautiful card front. If possible, you may want to do as our concept artist did: Find cute images in the Designer Series Paper to punch out or die cut for your focal point—then pop them up with a few Stampin’ Dimensionals.

Need to create multiples in a short amount of time? Simply use this card layout as your template. You’ll have a stack of beautiful cards in no time at all!

We used three Sale A Bration Designer Series Papers—Beautifully Penned, Peaceful Prints, and Penguin Playmates—to create our fun cards. Remember you can get these adorable Sale -A-Bration Designer Series Papers for free with a qualifying purchase.

However, you may want to use whatever you have on hand so you can make a dent in that scraps collection . . . that we know you have. wink

Contact me for more tips and tricks in using your scraps for a slant card.

May the Good You Do Come Back to You

Thank you for your interest in this project. Some projects are exclusive to subscribers who will receive passwords by email.

Are you a subscriber? Awesome! Check your email for the password and enter it here to view this project.

Not yet subscribed?  We’d love for you to join us.  Subscribe to my email list and receive news, information and inspiration by email.

Peachy Thank You Card

I have been seeing these layered die cut flowers for quite some time now in different sets and have been inspired by all the combinations. This is my first time working with them and I sure did have some fun! The You’re a Peach Designer Series Paper and Summer Shadows die cut flower do all the work on this pretty thank you card!

Measurements

Full list of supplies needed, listed below. A die cutting machine is needed for this card.
Card Base: Pear Pizzaz Cardstock 5 1/2″ h x 8 1/2″ w scored and folded to 5 1/2″ h x 4 1/4″ w
Striped Background: You’re a Peach Designer Series Paper 5 1/4″ h x 4″ w
Focal Matte: Old Olive Cardstock 4 1/2″ h x 3 1/4″ w
Focal Top Pattern: You’re a Peach Designer Series Paper 2 1/2″ h x 3″ w
Focal Bottom Pattern: You’re a Peach Designer Series Paper 1 1/2″ h x 3″ w
Banner: Old Olive Cardstock 3/4″ h x 2 1/2″ w
Sentiment Layer: Basic White Cardstock scrap punched with Label Me Fancy Punch
Die Cut Flower & Leaves: Basic White, Balmy Blue, Old Olive, Pear Pizzazz Cardstock scraps
Inside (optional): 5 1/4″ h x 4″ w Basic White Cardstock

Let’s Create

  1. Affix all stamps to Acrylic Blocks.
  2. Fold the Card Base in half using a Bone Folder to sharpen the crease.
  3. Use the Detailed Trio Punch to round the right-side corners of the Striped Background, Focal Matte, Focal Top Pattern, and Focal Bottom Pattern layers, then use Stampin’ Seal to attach each of these layers as shown.
  4. Stamp the Sentiment in Balmy Blue and the Branch in Pear Pizzazz ink in on Basic White Cardstock scrap and punch with the Label Me Fancy Punch.
  5. Use Stampin’ Seal to attach the Sentiment to the Old Olive Banner.
  6. Attach the Banner and Sentiment to the card, using Stampin’ Dimensionals.
  7. Die cut the Flower and Leaves fill and outlines – it’s recommended to use Adhesive Sheets on the outlines for easier assembly- and then assemble the pieces.
  8. Attach with Flower and Leaves to the card with Stampin’ Dimensionals and Mini Glue Dots.
  9. Stamp the Inside Layer to your liking and attach with adhesive of your choice.
  10. Decorate your envelope.
  11. Beautiful!!!! Who will you send it to?

Stamper’s Toolkit

You will also need adhesive, acrylic blocks, scissors and other basic PaperCrafting items from the Stamper’s Toolkit