Santa Paws is Coming to Town

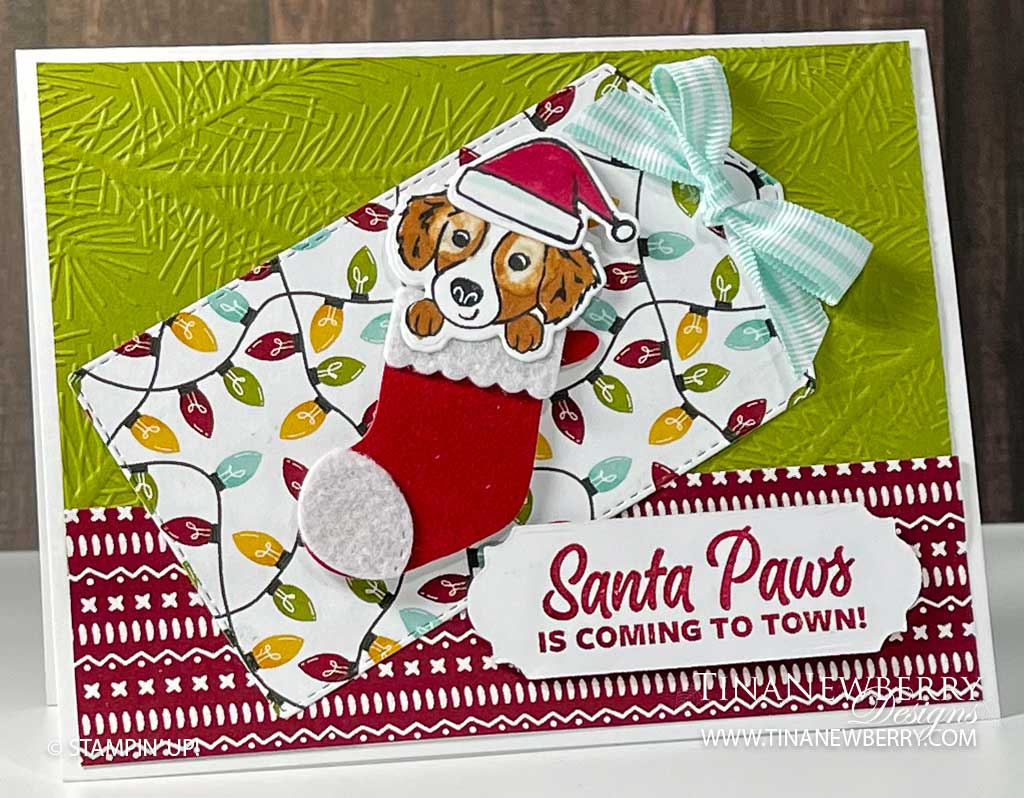
Inspired by a card swap, this fetive tag card sure brings the fun! I just love the sweet pup on the front and the designer series paper with all the lights on it!

Measurements

Full list of supplies needed, listed below. A die cutting machine is needed for this card.

Basic White Thick Cardstock Card Base: 8 ½ h” x 5 ½ w”, scored and folded on the long side at 4 ¼” h

Old Olive Cardstock: 2 ½” x 5 ¼”

Sweet Stockings Designer Series Paper:

  • 2” h x 5 ¼” w
  • scrap for tag

Jolly Felt: scrap for stocking

Red Velvet: scrap for stocking

Basic White Cardstock:

  • 4″ h x 5 1/4″ w (inside layer)
  • scrap for puppy
  • scrap for tag

Let’s Create

  1. Affix all stamps to Acrylic Blocks.
  2. Fold the Card Base in half using a Bone Folder to sharpen the crease.
  3. RUn Old Olive through Stampin’ Cut & Emboss machine with the Wintry 3D (pine needles) Embossing Folder.
  4. Adhere Old Olive panel to card base with Multipurpose Liquid Glue or Stampin’ Seal.
  5. Align and adhere 2” h x 5 ¼” w DSP to card base with Multipurpose Liquid Glue or Stampin’ Seal.
  6. Die-cut
    1. Large tag from 2” x 5 ¼” DSP
    2. Stocking from Red Velvet scrap
    3. Stocking trim and toe accents from Felt scraps
    4. Sentiment label from Basic White Cardstock scrap
  7. Stamp sentiment in Cherry Cobbler on Basic White Sentiment Label.
  8. Assemble stocking by gluing felt trim and felt toe to velvet stocking.
  9. Stamp puppy on scrap piece of Basic White Cardstock. Stamp hat on scrap. Color with Stampin’ Blends. Die cut with coordinating Sweet Stockings dies.
  10. Adhere tag on an angle to the card front with Multipurpose Liquid Glue or Stampin’ Seal.
  11. Adhere stocking with glue. Adhere puppy face with Stampin’ Dimensionals. Glue the Santa cap with a light touch of glue on the forehead.
  12. Adhere sentiment with Stampin’ Dimensionals.
  13. Tie a nice bow from Pool Party Striped ribbon and adhere with Mini-Glue Dots.
  14. Sprinkle on some Decorative Matte Dots (optional).
  15. Stamp and decorate the inside and attach with Stampin’ Seal.
  16. Decorate your envelope.
  17. So cute! Who will you send it to?

Shopping List

Stamper’s Toolkit

You will also need adhesive, acrylic blocks, scissors and other basic PaperCrafting items from the Stamper’s Toolkit

Sending Lots of Love

When a card in the catalog is so cute you just HAVE to create it yourself. Feel free to CASE (copy and share everything) the Catalog, when you feel inspired. Aren’t these little stockings the cutest?

Measurements

Full list of supplies needed, listed below. A die cutting machine is needed for this card.

Old Olive Card Base: 8 ½” w x 5 ½” h, scored on the long side at 4 ¼”

Sweet Stockings Designer Series Paper (DSP):

  • 1” h x 4” w strip (3)
  • 5” h x 3 ⅓” w
  • 2” x 4” crap (3 – for the stockings)

Jolly Felt: scraps coordinating with DSP for stocking

Basic White

  • 1/4″ h x 2 7/8” w
  • 5″ h x 4 1/4″ w (inside)

Let’s Create

  1. Affix all stamps to Acrylic Blocks.
  2. Fold the Card Base in half using a Bone Folder to sharpen the crease.
  3. Cut Old Olive card base at 8 ½” x 5 ½”. Score at 4 ¼” and fold in half.
  4. Cut three pieces of (Designer Series Paper) DSP to 1” x 4”. Adhere with glue down the center of the card front, evenly spaced.
  5. Cut a piece of matching DSP to 3 ½” x 5” and attach with glue to center of card front.
  6. Cut 2″ strips of each of the DSP patterns that you intend to use for the stockings and the border.
  7. Die-cut a large, medium, and small stocking from DSP. Die-cut two scalloped borders from Pool Party paper.
  8. Die-cut three sets of stocking trim from white, cherry and olive felt scraps.
  9. Adhere felt trim to stockings with glue. Adhere stockings to card front with glue.
  10. Stamp sentiment on Basic White strip that measures 2 7/8″ x 1/4″. Adhere scalloped borders to sentiment with glue.
  11. Adhere sentiment panel to card front with Stampin’ Dimensionals.
  12. Optionally sprinkle on some Matte Dots. (I just realized that I forgot to add mine but they would be so super cute and they would add just the perfect finishing touch!)
  13. Stamp and decorate the inside and attach with Stampin’ Seal.
  14. Decorate your envelope.
  15. Adorbs! Now send it to someone special.

Shopping List

Stamper’s Toolkit

You will also need adhesive, acrylic blocks, scissors and other basic PaperCrafting items from the Stamper’s Toolkit

Step Up Your Christmas Greetings

Christmas is right around the corner, and we can’t wait for the treats that will fill our stockings! But no stocking stuffer will be cuter than the furry friends found in the Sweet Little Stockings Bundle.

CASUAL

To make the Very Merry card, stamp the stars in Pool Party ink, making sure to stamp off to create lighter stars. Use Early Espresso to stamp the stocking and hamster on Basic White Cardstock, then color them in with the Polished Pink and Light Gray Granite Stampin’ Blends. Adhere your sentiment with Stampin’ Dimensionals, and add a beautiful Jolly Felt die-cut ribbon with Multi-Purpose Liquid Glue.

AVID

For the Santa Paws card, use the Mini Stampin’ Cut and Emboss Machine to die cut tags using Sweet Stockings Designer Series Paper and Basic White Cardstock. Then, die cut your furry friend and a stocking, and use Jolly Felt to make a holly bush. Color in the kitty and the stocking and adhere it to your card, along with a sweet sentiment, with Stampin’ Dimensionals . Finish the card off with a Pool Party 3/8″ (1 cm) Striped Grosgrain Ribbon.

ARTFULLY AVID

To make the Christmas Greetings card, die cut leaves from Shaded Spruce Cardstock, presents from Vellum, and stars from Jolly Felt . For the sentiment, try putting masking tape over one word at a time to create two separate stamps, then use the heat embossing tool to make it shine.

May Your Days Be Merry & Bright

There’s lots of inspiration for what I call the quilt technique, but I’m not really sure that’s what it’s called. Either way, I really like the look of it and this is one more way to use up your scraps! This design would work for countless color palettes and designer series papers. The main this is to cut your DSP going the right way. Follow the cutting instructions in the Measurements section and you will have everything cut correctly.

Measurements

Full list of supplies needed, listed below. A die cutting machine is needed for this card.

  • Evening Evergreen
    • 5 ½” h x 8 ½” w scored and folded on the long side at 4 ¼” (Card Base)
    • 2” h x 3 ¾” w scrap (Sentiment Matte)
  • Basic White
    • 5 ¼” h x 4” w (Background)
    • 1 ½” h x 3” w scrap (Sentiment)
    • 2 ½” h x 1 ½” w scrap (Stocking)
  • Tidings of Christmas DSP
    • 1” h x 5 ¾” w 
    • 1” h x varying “ w (6-7)
    •  Varying “h x 1” w (3)
    • 1” x 1” Soft Succulent scrap (Bow)

Let’s Create

  1. Affix all stamps to Acrylic Blocks.
  2. Use a Bone Folder to sharpen the crease on the Card Base.
  3. Arrange the Tidings of Christmas DSP Strips on the 5 ¼” x 4” Basic White Background Layer. Use Multipurpose Glue to adhere them, wiggling into position as needed. 
  4. Trim off any excess pieces of DSP that are overhanging the Background.
  5. Stamp
    1. The Sentiment in Evening Evergreen Ink on the 1 ½” h x 3” w Basic White scrap.
    2. The Stocking in Soft Succulent Ink on the 2 ½” h x 1 ½” w Basic White scrap
    3. The Bow in Evening Evergreen on scrap Soft Succulent DSP.
  6. Die Cut
    1. The Sentiment Matte out of the 2” h x 3 ¾” w Evening Evergreen scrap.
    2. The Sentiment out of the stamped 1 ½” h x 3” w Basic White scrap.
    3. The Stocking out of the 2 ½” h x 1 ½” w Basic White scrap.
    4. The Bow out of scrap Soft Succulent DSP.
  7. Use Stampin’ Seal to attach:
    1. The Sentiment to the Evergreen Sentiment Matte.
    2. The Bow to the Stocking.
    3. The Stocking to the Sentiment.
  8. Use Stampin’ Dimensionals to attach:
    1. The Sentiment and Stocking to the Background.
    2. The Background to the Card Base.
  9. Stamp Inside Layer and attach.
  10. Decorate your Envelope. 
  11. #simplestamping at it’s finest! Send it today!

Shopping List

Stamper’s Toolkit

You will also need adhesive, acrylic blocks, scissors and other basic PaperCrafting items from the Stamper’s Toolkit