For My Wife

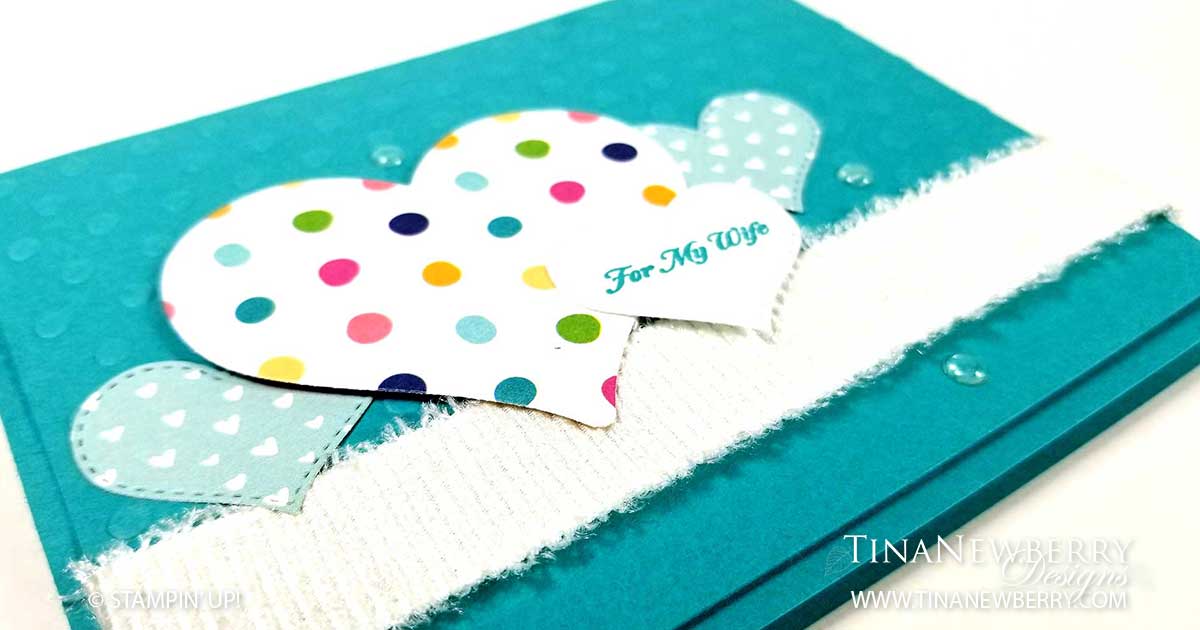
The stitched hearts in the new Love & Happiness Bundle add just the right amount of color to this pretty card meant to inspire all the husbands out there.

Measurements

Complete list of supplies needed is listed below. A die cutting machine is needed for this card.

Bermuda Bay Cardstock

  • 8 1/2″ h x 5 1/2″ w scored and folded on the long side at 4 1/4″
  • 4″ h x 5 1/4″ w

Sunshine & Rainbows Sale-a-bration 6×6 Designer Series Paper

  • ~3″ square for large heart
  • 1 3/4″ square (2) for small hearts

Basic White

  • ~ 1 3/4″ square scrap
  • 4″ h x 5 1/4″ w

Let’s Create

  1. Affix the For My Wife Stamp to an acrylic block.
  2. Stamp For My Wife Sentiment in Bermuda Bay ink on the 1 3/4″ Basic White scrap. Then die cut with the small stitched heart die.
  3. Die cut two more small stitched hearts from the 1 3/4″ square Sunshine & Rainbows Sale-a-bration 6×6 Designer Series Paper.
  4. Die cut the large heart from the 3″ square Sunshine & Rainbows Sale-a-bration 6×6 Designer Series Paper
  5. Run the 4″ h x 5 1/4″ w Bermuda Bay Cardstock through the die cutting machine with the Dots Embossing Folder.
  6. Attach two pieces of Tear n’ Tape on the lower outer edge of the back of the 4″ h x 5 1/4″ w Bermuda Bay Cardstock. Run the White Frayed Ribbon across the lower front and attach to the Tear n’ Tape on the back.
  7. Use Stampin’ Seal to attach the two small stitched hearts above the ribbon.
  8. Use Stampin’ Dimensionals to attach the large heart and the sentiment to the 4″ h x 5 1/4″ w Bermuda Bay Cardstock and then use more Stampin’ Dimensionals to attach to the Card Base.
  9. Sprinkle on some Clear Epoxy Essentials.
  10. Stamp and decorate the 4″ h x 5 1/4″ w Basic White and attach to the inside.
  11. Decorate your envelope.
  12. Ta da! Who will you send it to?

Shopping List

Stamper’s Toolkit

You will also need adhesive, acrylic blocks, scissors and other basic PaperCrafting items from the Stamper’s Toolkit

Valentine Greetings

Classic black, red and white with a twist of color from the Pattern Party Host Designer Series Paper pack. The Bouquet of Love Hybrid Embossing Folder really adds just the right amount of pizzaz to this card, all while saving time by embossing and die cutting at the same time! Half the amount of passes through the die cutting machine.

Measurements

Real Red Cardstock

  • 4 1/4″ h x 11″ w scored and folded on the long-side at 5 1/2″ for the Card Base
  • ~3″ square scrap for the large heart

Basic Black Cardstock

  • 3 3/4″ h x 5″ w
  • ~3″ square scrap for the large heart

Basic White Cardstock

  • ~3/4″ h x 3″ w scrap sentiment
  • 4″ h x 5 1/4″ w for inside layer

Pattern Party Host Designer Series Paper

  • 3 5/8″ h x 4 7/8″

Let’s Create

  1. Affix the Valentine Greetings stamp to an acrylic block.
  2. Using Real Red ink, stamp Valentine Greetings on the ~3/4″ h x 3″ w Basic White scrap and die cut with the Label Die.
  3. Run both the Basic Black and Real Red ~3″ square scrap through the Die Cutting Machine with the Large Heart Die and the Bouquet of Love Hybrid Embossing Folder.
  4. Use a Bone Folder to sharpen the crease of the Card Base.
  5. Use Stampin’ Seal to attach the 3 5/8″ h x 4 7/8″ Pattern Party Host Designer Series Paper to the 3 3/4″ h x 5″ w Basic Black Cardstock and then to attach the Basic Black Cardstock to the Card Base.
  6. Attach the Black Large Heart with Stampin’ Seal and the Red Large Heart and Sentiment with Stampin’ Dimensionals.
  7. Tie a bow with the Black and White Gingham Ribbon and attach with a Mini Glue Dot.
  8. Add two Red Rhinestones to the Sentiment.
  9. Stamp and decorate the 4″ h x 5 1/4″ w and attach to the inside.
  10. Decorate the envelope.
  11. Love it! Now send it to your Valentine!

Shopping List

Stamper’s Toolkit

You will also need adhesive, acrylic blocks, scissors and other basic PaperCrafting items from the Stamper’s Toolkit

Friendly Hello Step-by-Step

These fun step-by-step cards feature products from our fabulous Sale-A-Bration offering that you won’t want to miss: the Friendly Hello Stamp Set plus our Friendly Hello 12″ x 12″ (30.5 cm x 30.5 cm) Designer Series Paper—FREE with a qualifying purchase. Available until 28 February 2022, these products are the perfect combo for bright and cheery cards. Get your creative juices flowing with these three projects. Click the products in the shopping list below for more details.

CASUAL

The Hello card is simple and fast. Start by stamping the charming little bird image in Gray Granite ink, then add subtle color using Watercolor Pencils. Brush over the image with a Water Painter to create a light wash. Layer Friendly Hello Designer Series Paper under this focal image for extra prettiness. Tip: To just stamp the “Hello” sentiment, cover the word below it with a sticky note.

AVID

Step up the color on the Gruss card using both watercolor pencil assortments for richness and depth. We also adhered a Cajun Craze Cardstock frame on two edges and backed the sentiment with a little frayed Gold 3/8″ (1 cm) Fine Art Ribbon.
To add a tactile layer, we ran a piece of Bumblebee Cardstock through the Stampin’ Cut & Emboss Machine using the Macrame 3D Embossing Folder. The fussy-cut cosmos flowers popped up with Stampin’ Dimensionals are a great finishing touch.

ARTFULLY AVID

For our Coucou card, we stamped the sentiment in VersaMark ink, then applied Heat and Stick Powder and Gilded Leafing. We also added a few more fussy-cut layers and a sprinkling of Genial Gems to finish.

Shopping List

Thanks from the Depths of my Heart

Thank you for your interest in this project. Some projects are exclusive to subscribers who will receive passwords by email.

Are you a subscriber? Awesome! Check your email for the password and enter it here to view this project.

Not yet subscribed?  We’d love for you to join us.  Subscribe to my email list and receive news, information and inspiration by email.

Seas the Day

Another cute and #simplestamping card! The Friendly Hello Sale-a-bration Designer Series Paper sets the color palette for this pretty card and the Sea Dies bring the fun sea shapes.

Measurements

Pool Party Cardstock

  • 5 1/2″ h x 8″ w scored and folded on the long-side at 4 1/4″ for the Card Base
  • 3″ square

Shaded Spruce Cardstock

  • 5 1/4″ h x 4″ w
  • Scrap for fish

Friendly Hello Designer Series Paper

  • 5 1/8″ h x 3 7/8″ w

Fresh Freesia Cardstock

  • 3″ square

Basic White Cardstock

  • 1 1/2″ h x 3 7/8″ w

Let’s Create

  • Apply Seas the Day stamp to an acrylic block.
  • Stamp Seas the Day stamp in Shaded Spruce ink on the 1 1/2″ h x 3 7/8″ w Basic White Cardstock.
  • Fold the Pool Party Card Base and sharpen the crease with the Bone Folder.
  • Use Stampin’ Seal to attach the Basic White Sentiment to the Friendly Hello DSP and then the Shaded Spruce Cardstock, and then to the Pool Party Card Base.
  • Die cut the Pool Party 3″ square with the Scalloped Circle die and the Fresh Freesia 3″ square with the Straight Circle die, then with the Seaweed die.
  • Die cut the Fish from the Shaded Spruce Cardstock.
  • Attach the Fresh Freesia Circle to the Pool Party Scalloped Circle with Stampin’ Dimensionals and attach the Pool Party Scalloped Circle with Stampin’ Seal.
  • Attach the Fish with Stampin’ Dimensionals.
  • Use a Shaded Spruce Stampin’ Blend to color the Clear Circles from the Silver and Clear Epoxy Essentials.
  • Tie a bow with the Fresh Freesia 3/8″ Open Weave Ribbon and attach with a Mini Glue Dot.
  • So cute!! Now put it in the mail!

Shopping List

Stamper’s Toolkit

You will also need adhesive, acrylic blocks, scissors and other basic PaperCrafting items from the Stamper’s Toolkit