Seascape Sunset Greeting Card

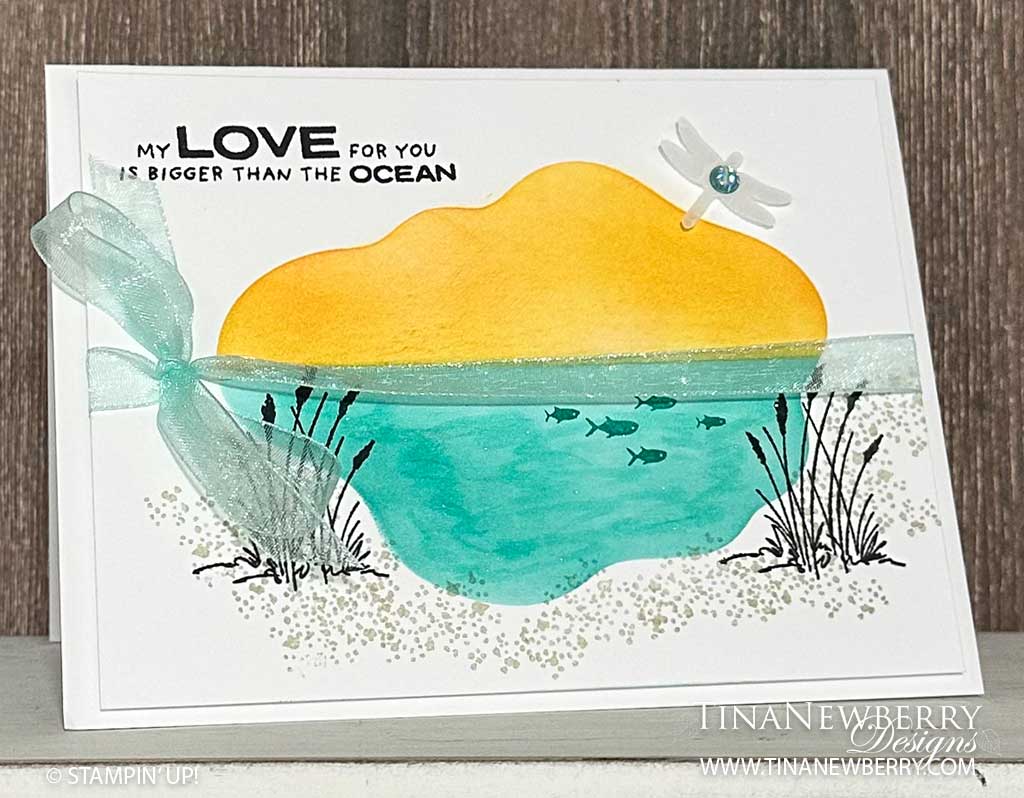
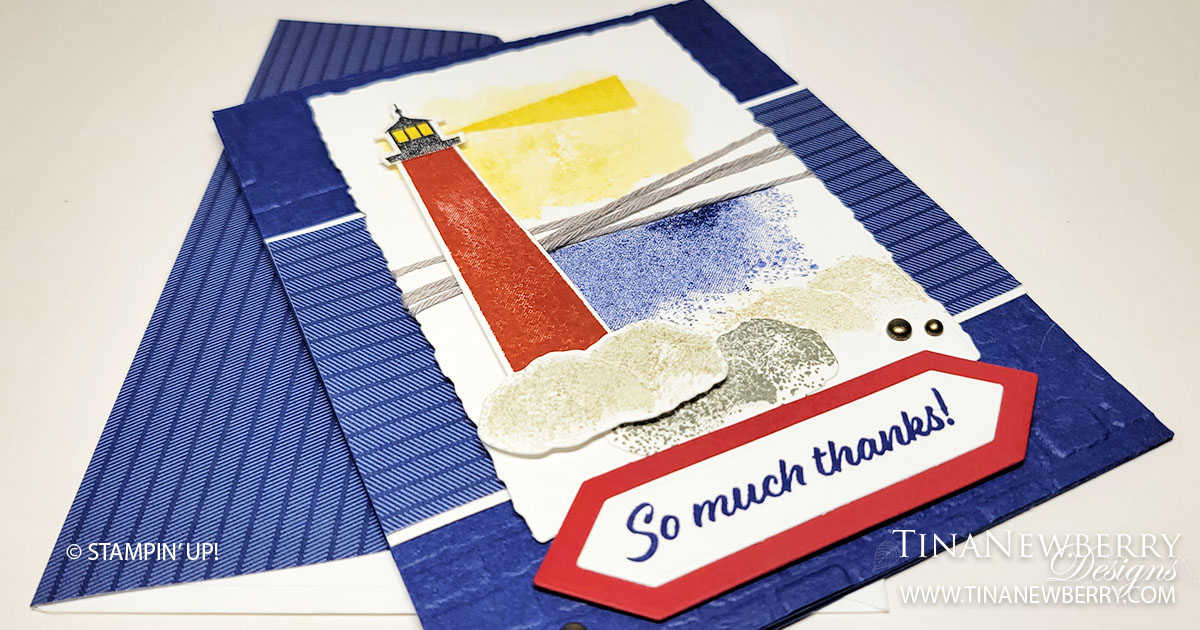
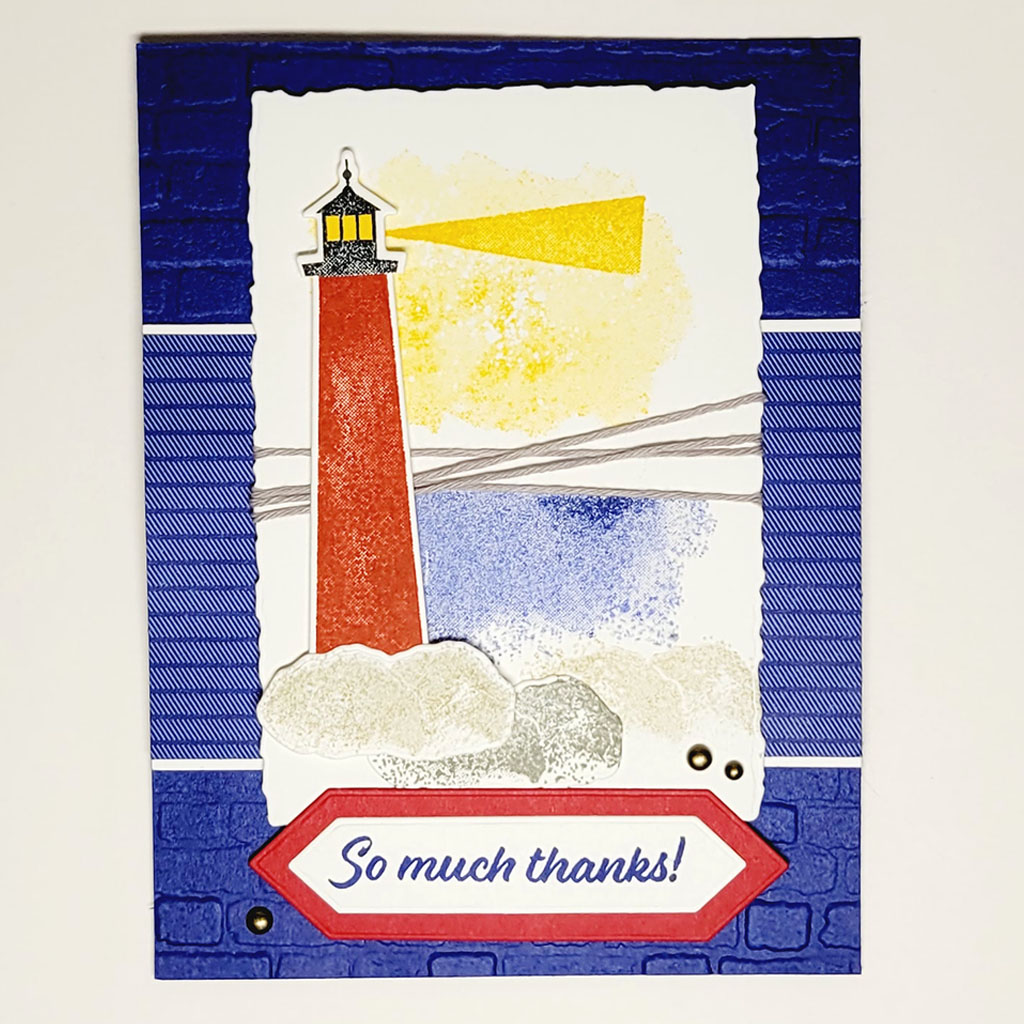
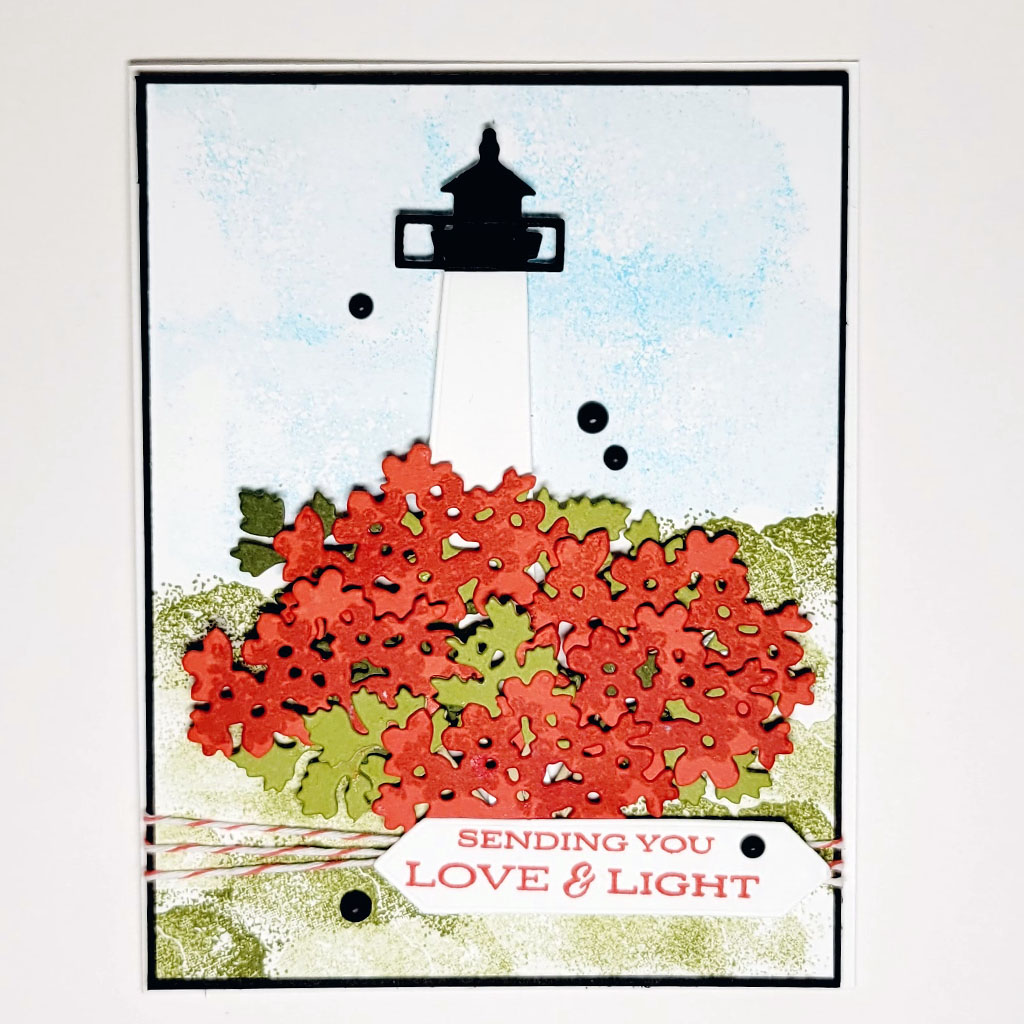
I love this combination of stamp sets, dies, and colors. What a serene setting. So peaceful.

Create incredible layered dioramas with the Layering Diorama Dies! These dies nest to create a 3D effect for unique diorama card fronts. For an easy but intricate looking diorama, use a minimum of 3 diorama layers with tonal cardstock to create depth-of-field. Want to create a safari escape? An underwater world? Or frame a space exploration? The diorama designs are versatile to fit a wide variety of diorama landscapes!

Measurements

Full list of supplies needed, listed below. A die cutting machine is needed for this card.

Card Base Basic White Thick Card Stock 8 ½” x 5 ½”, score at 4 ¼”
Basic White layer 4” x 5 ¼”, Die-Cut with Diorama Die (to use as a masking template)
Basic White layer 4” x 5 ¼”
Vellum Punched Dragonfly

Let’s Create

  1. Affix all stamps to Acrylic Blocks.
  2. Fold the Card Base in half using a Bone Folder to sharpen the crease.
  3. Create the scene
    • Use Diorama layer as a template.
    • Use Blending Brushes and the masking technique to create first the sky, and then the ocean. (I used large yellow stickies, but you could also use our masking paper.
    • Place the diorama mask on the Basic White layer.
    • Place large mask (yellow sticky) to cover the ocean while you create the sky.
    • Create the sky with Daffodil Delight and Calypso Coral ink and Blending Brushes.
    • Lift the sticky and use a new sticky to create a mask to cover the sky.
    • Create the ocean with Pool Party and Bermuda Bay ink and Blending Brushes.)
  4. Stamp the fish, the sentiment, and the plants in Tuxedo black ink.
  5. Stamp the sand in Sahara Sand ink.
  6. Wrap ribbon around layer, centered on the horizon line. Tie a bow. Adhere to card base with Stampin’ Dimensionals.
  7. Punch small dragonfly from vellum and adhere to sky. Place a small gem on the dragonfly.
  8. Stamp and decorate the inside.
  9. Decorate your envelope.
  10. Stunning!! Now send it to someone special.

Shopping List

Recommended Stamper’s Toolkit

Product List
Order online from the convenience of your own home or send me your order and I’ll take care of you. ❤ Either way, please use the host code ANTD9UHS. Order online AND, if your order is $50 or more using host code ANTD9UHS between now and the end of the month you’ll receive a free pack of embellishment as a THANK YOU gift from me. ❤ If your order is over $150, skip the host code, earn Stampin’ Rewards for free stuff yourself and I’ll still send you a free pack of embellishment as a THANK YOU gift from me. ❤

Sunset Card with Diorama Dies

A few die cuts and some amazing paper brings this card together in a jiffy.

Create incredible layered dioramas with the Layering Diorama Dies! These dies nest to create a 3D effect for unique diorama card fronts. For an easy but intricate looking diorama, use a minimum of 3 diorama layers with tonal cardstock to create depth-of-field. Want to create a safari escape? An underwater world? Or frame a space exploration? The diorama designs are versatile to fit a wide variety of diorama landscapes!

Measurements

Full list of supplies needed, listed below. A die cutting machine is needed for this card.

Card Base Pumpkin Pie Cardstock: 8 ½” x 5 ½”, score at 4 ¼”
Pumpkin Pie Cardstock: 4 ¼” x 5 ½”, Die-Cut with DIorama Die
Mango MelodyCardstock: 4 ¼” x 5 ½”, Die-Cut with next smallest DIorama Die
Designer Series Paper (DSP) Layer: 4 ⅛” x 5 ⅜”
Die-Cut Harvest Die in Cajun Craze Cardstock
Punched Dual Oval in coordinating Designer Series Paper
Inside: Basic White Cardstock 4″ h x 5 1/4″ w

Let’s Create

  1. Affix all stamps to Acrylic Blocks.
  2. Fold the Card Base in half using a Bone Folder to sharpen the crease.
  3. Die-Cut Harvest Die in Cajun Craze
  4. Punch Dual Oval in coordinating Designer Series Paper. Stamp sentiment in Cajun Craze.
  5. Assemble Card.
    • Adhere DSP to card base with liquid glue.
    • Adhere Mango Melody layer with liquid glue.
    • Adhere Pumpkin Pie layer with Stampin’ Dimensionals.
    • Adhere sentiment with liquid glue.
    • Adhere Harvest Die with liquid glue on the card base and Stampin’ Dimensionals on the inside.
  6. Sprinkle on the Glossy Dots.
  7. Stamp and decorate the inside and attach with Stampin’ Seal.
  8. Decorate your envelope.
  9. Stunning and so easy! Who needs a little hello? Put it in the mail.

Shopping List

Recommended Stamper’s Toolkit

Product List
Order online from the convenience of your own home or send me your order and I’ll take care of you. ❤ Either way, please use the host code ANTD9UHS. Order online AND, if your order is $50 or more using host code ANTD9UHS between now and the end of the month you’ll receive a free pack of embellishment as a THANK YOU gift from me. ❤ If your order is over $150, skip the host code, earn Stampin’ Rewards for free stuff yourself and I’ll still send you a free pack of embellishment as a THANK YOU gift from me. ❤

So Much Thanks

I knew I wanted to create a red lighthouse. I haven’t seen one in person before, but the South Haven Lighthouse on Lake Michigan in South Haven, Michigan sure is a pretty site and was the inspiration for this card.

Measurements

Full list of supplies needed, listed below. A die cutting machine is needed for this card.
Starry Sky Cardstock:

  • 5 1/2″ h x 8 1/2″ w folded to 5 1/2″ h x 4 1/4″ w for Card Base.
  • 5 1/4″ h x 4″ w

Basic White Cardstock:

  • 4 1/4″ h x 3″ w die cut with Deckled Rectangle Die
  • 2 5/8″ h x 4 1/4″ w
  • Scrap for Lighthouse, Lighthouse top, Rocks and Sentiment

2022-2024 In-Color Designer Series Paper: 2 1/3″ h x 4 1/4″ w

Let’s Create

  1. Affix all stamps to Acrylic Blocks.
  2. Fold the Card Base in half using a Bone Folder to sharpen the crease.
  3. Run the 5 1/4″ h x 4″ w Starry Sky panel through the Stampin’ Cut & Emboss machine with the Brick & Mortar Embossing Folder. Attach to Card Base with Stampin’ Seal.
  4. Attach the 2022-2024 DSP panel to the 2 5/8″ h x 4 1/4″ w Basic White cardstock with Stampin’ Seal and attach with Stampin’ Seal+ or Multipurpose Glue to adhere to the uneven surface of the embossed panel.
  5. Stamp the Lighthouse in Real Red, the top of the Light house in Tuxedo Black and Crushed Curry, a few rocks in Gray Granite and Basic Gray, and the Sentiment in Starry Sky. Then die cut them all.
  6. Die cut the larger tag from Real Red.
  7. On the Basic White panel, stamp the sky in Crushed Curry – use the stamp-off technique where you stamp on scrappaper and then stamp on the panel, the water in Starry Sky, try the stamp-off technique for this too, and the rocks in Gray Granite.
  8. Apply some Tear N’ Tape to the back of the Basic White panel and wrap Linen Thread around panel securing with the Tear N’ Tape. Then attach the panel with Stampin’ Dimensionals.
  9. Arrange the Lighthouse and Rocks. Stamp the Ray of Light with Crushed Curry, then attach the Lighthouse and Rocks with Stampin Seal, Multipurpose Glue and Stampin’ Dimensionals, as needed.
  10. Attach the sentiment tag to the Real Red Tag with Stampin’ Seal and then attach with Stampin’ Dimensionals applied to the bottom where it doesn’t overlap the Basic White panel.
  11. Sprinkle on some Rustic Metallic Dots.
  12. Stamp and decorate the inside and attach with Stampin’ Seal.
  13. Decorate your envelope.
  14. Stunning! Now put it in the mail.

Shopping List

Recommended Stamper’s Toolkit

Product List
Order online from the convenience of your own home or send me your order and I’ll take care of you. ❤ Either way, please use the host code ANTD9UHS. Order online AND, if your order is $50 or more using host code ANTD9UHS between now and the end of the month you’ll receive a free pack of embellishment as a THANK YOU gift from me. ❤ If your order is over $150, skip the host code, earn Stampin’ Rewards for free stuff yourself and I’ll still send you a free pack of embellishment as a THANK YOU gift from me. ❤

Sending You Love & Light

When I first saw the Lighthouse Point Bundle, I knew I wanted to depict some of the many beautiful lighthouses we have along the coasts throughout the U.S. This is the Key West Lighthouse. Key West holds a special place in my heart having spent a good deal of time in the Keys over the years.

Measurements

Full list of supplies needed, listed below. A die cutting machine is needed for this card.
Basic White Thick Cardstock: 5 1/2″ h x 8 1/2″ w folded to 5 1/2″ h x 4 1/4″ w
Basic Black Cardstock: 5 3/8″ h x 4 1/8″ w
Basic White Cardstock: 5 1/4″ h x 4″ w
Scrap Cardstock:

  • Basic White
  • Basic Black
  • Poppy Parade
  • Mossy Meadow
  • Pear Pizzazz

Let’s Create

  1. Affix all stamps to Acrylic Blocks.
  2. Fold the Card Base in half using a Bone Folder to sharpen the crease.
  3. On the lower half of the Basic White panel stamp the rocks in Pear Pizzazz ink using the ‘stamping off’ technique, where you ink once and stamp two or three times before you re-ink.
  4. On the upper half of the Basic White panel, stamp the squarish image in Tahitian Tide, using the same technique, but stamp off first on scrap and then stamp twice on the panel to give a subtle sky color.
  5. On the Poppy Parade Cardstock, in Real Red ink stamp the Geranium Fill stamp randomly. Then die cut with the Geranium fill die- it is not meant to be aligned, which will give your flowers a random two-tone look.
  6. In Pear Pizzazz and Mossy Meadow die cut a few stems from the Meadows Dies. Cut off the stems and break up the leave bunches.
  7. On a Silicone Craf Sheet, arrange the flowers and leaves into a cluster. Adhere together with Multipurpose Glue and Mini Glue Dots, as needed. Set aside to dry.
  8. Attach a bit of Adhesive Sheet to a small piece of Black Cardstock and die cut the tip of the Lighthouse and Railing.
  9. Die cut the Lighthouse from Basic White Cardstock. Remove the backing from the tip of the Lighthouse and the Railing and attach to the Basic White Lighthouse.
  10. Stamp sentiment in Real Red ink and die cut from tag in the Lighthouse Dies.
  11. Attach your stamped Basic White panel to the Basic Black panel with Stampin’ Seal.
  12. Attach some Tear N’ Tape to the back near the bottom. Wrap Sweet Sorbet Bakers Twine three times around the lower part and secure in the back on the Tear N’ Tape.
  13. Attach stamped panel with Stampin’ Dimensionals.
  14. Add the Lightouse with Stampin’ Dimensionals.
  15. Add the Flowers and Leaves with Stampin’ Seal overlapping the Lighthouse and with Stampin’ Dimensionals where it overlaps the stamped green background.
  16. Use Stampin’ Dimensionals to attach sentiment.
  17. Sprinkle on the Black Matte Dots.
  18. Stamp and decorate the inside and attach with Stampin’ Seal.
  19. Decorate your envelope.
  20. Delightful!! Who will you send it to?

Shopping List

Recommended Stamper’s Toolkit

Product List
Order online from the convenience of your own home or send me your order and I’ll take care of you. ❤ Either way, please use the host code ANTD9UHS. Order online AND, if your order is $50 or more using host code ANTD9UHS between now and the end of the month you’ll receive a free pack of embellishment as a THANK YOU gift from me. ❤ If your order is over $150, skip the host code, earn Stampin’ Rewards for free stuff yourself and I’ll still send you a free pack of embellishment as a THANK YOU gift from me. ❤